No Egg Recipes – Delicious Cooking Without Eggs
Eggless Cake Recipe Without Oven: Perfect Stovetop Chocolate Delight
For Eggless Cake Recipe Without Oven. Bake a moist chocolate eggless cake without an oven! Elsie's 7 fail-proof stovetop secrets guarantee bakery-quality
After my fifth attempt at making an eggless cake recipe without oven, I nearly gave up. Each time, the center collapsed like a failed soufflé, leaving me with a gooey mess instead of the moist chocolate cake I promised my egg-allergic daughter Molly. Then I discovered the secret: mastering the ‘pan-bake’ method requires perfect batter consistency and precise chemistry. Now I can confidently create bakery-quality chocolate cakes using just my stovetop, and you can too. My ribbon-stage technique and vinegar-baking soda reaction create the lift that eggs would normally provide.
- Texture target: Moist, even crumb with no sunken center
- Reliable swap: Precise vinegar-baking soda ratio replaces egg lift
- Make-ahead: Stores at room temperature for 3 days; freezes beautifully for up to 1 month
Table of Contents
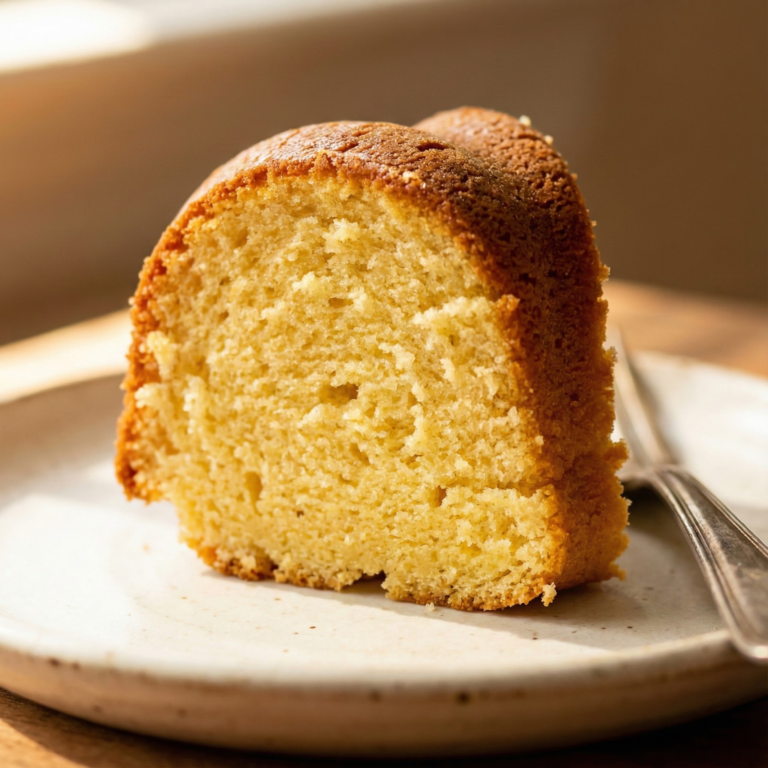
Stovetop Eggless Chocolate Tawa Cake
A rich, moist chocolate cake made entirely on a stovetop using a non-stick pan. No oven or pressure cooker required.
PREP TIME
15 mins
15 mins
COOK TIME
30 mins
30 mins
TOTAL TIME
45 mins
45 mins
Servings: 8 servings
Course: Snack
Cuisine: Fusion
Calories: 327
🥄 Ingredients
- 1 cup (240 ml) whole milk
- 0.25 cup (60 ml) vegetable oil
- 1 teaspoon (5 ml) vanilla extract
- 1 teaspoon (5 ml) white vinegar
- 0.5 cup (100 g) granulated sugar
- 1 cup (125 g) all-purpose flour
- 3 tablespoons (22 g) cocoa powder
- 1 teaspoon (5 g) baking powder
- 0.25 teaspoon (1.5 g) baking soda
- 1 cup (240 ml) heavy cream
- 0.5 cup (60 g) icing sugar
👩🍳 Method
- In a large mixing bowl, whisk together 1 cup milk, 0.25 cup oil, 1 teaspoon vanilla extract, 1 teaspoon vinegar, and 0.5 cup granulated sugar until the sugar is completely dissolved.
- Sift 1 cup all-purpose flour, 3 tablespoons cocoa powder, 1 teaspoon baking powder, and 0.25 teaspoon baking soda directly into the wet ingredients.
- Use the cut-and-fold method to mix until a smooth, lump-free batter forms. Add a tablespoon of extra milk if the consistency is too thick.
- Grease an 8-inch non-stick pan and line the bottom with greased parchment paper.
- Pour the batter into the pan and tap it twice on the counter to release air bubbles.
- Cover the pan with a tight-fitting lid and place it on the gas stovetop over a very low flame.
- Cook for 30 minutes. Check for doneness by inserting a toothpick; it should come out clean.
- Remove the pan from heat and let the cake cool completely in the pan before inverting.
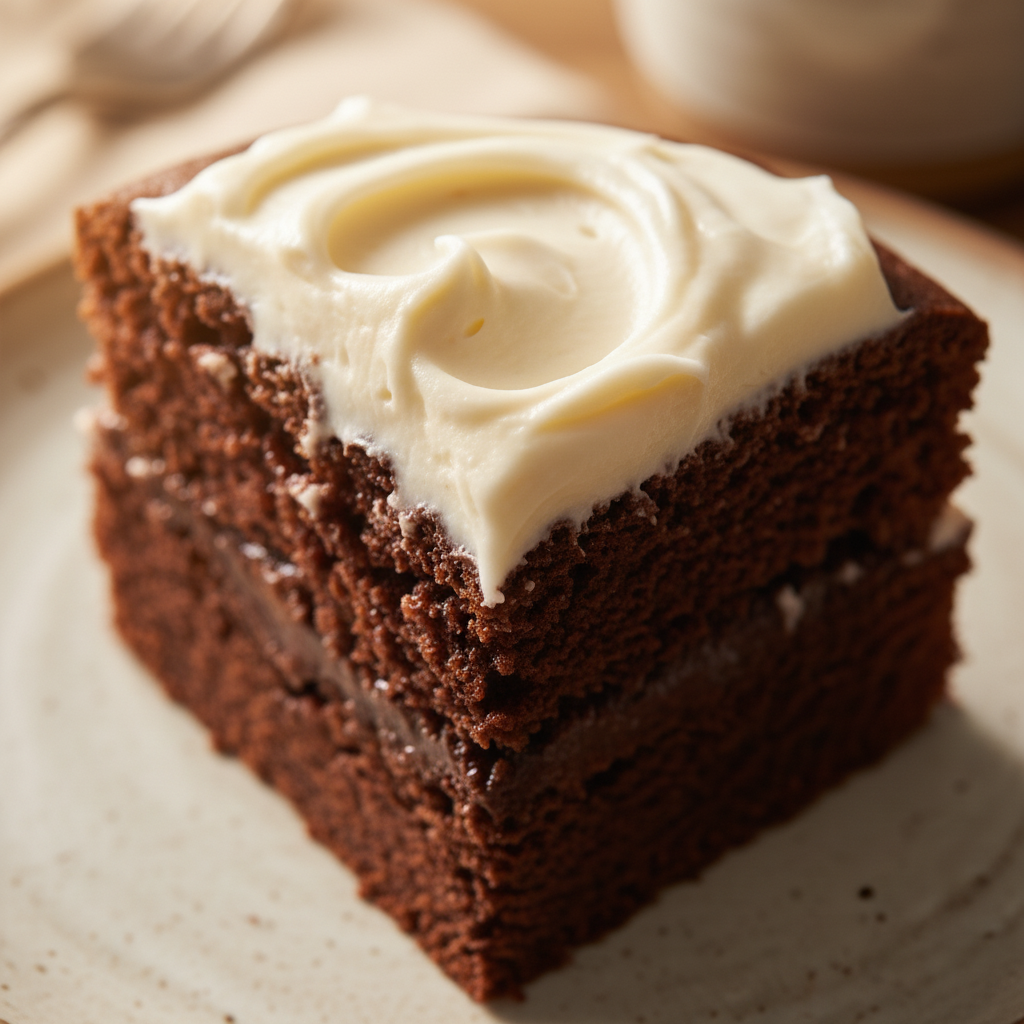
- For the frosting, beat 1 cup heavy cream with 0.5 cup icing sugar until stiff peaks form.
- Spread the frosting over the cooled cake and serve immediately.
Notes: Ensure the flame is at its absolute lowest setting. Use a diffuser or an old flat tawa underneath the cake pan if your stove runs hot. The cake is done when a toothpick inserted into the center comes out clean.
The Science of Stovetop Baking
The stovetop eggless cake relies on fascinating chemistry. Without eggs, we need alternative structure-builders and leavening agents. When I mix vinegar with baking soda, it creates carbon dioxide bubbles that expand in heat, providing lift. But timing is crucial. I can literally hear the reaction – a gentle fizzing sound as the acid meets the base. The ribbon stage is equally important; when I lift my whisk, the batter should fall back slowly, forming a temporary pattern before melting back into itself.
The smell of the ‘bloom’ is another key indicator – when cocoa powder meets hot water, it releases a deep chocolate aroma that signals proper activation of flavor compounds. I’ve learned to recognize this specific scent, which happens about 30 seconds after mixing. Properly bloomed cocoa creates a more intense flavor profile than simply mixing it with cold ingredients. For more on using cocoa, check my chocolate banana cake recipe.
The water bath method, when used, should maintain a very low simmer – not silent, but making soft, occasional bubbling sounds. Too much agitation means your heat is too high and will lead to uneven baking.
Ingredient Notes & Substitutions
For my eggless chocolate cake, I’ve tested numerous ingredients to find the perfect balance. All-purpose flour works best, but you can substitute cake flour for a more delicate crumb – just add an extra 2 tablespoons per cup. The sugar not only sweetens but contributes to moisture retention; I prefer caster sugar for its fine texture, though granulated works well too.
The key egg replacer in this recipe is the vinegar-baking soda combination. White vinegar is my go-to, but apple cider vinegar adds a subtle fruity note. For liquid, I use room temperature water, but coffee intensifies the chocolate flavor without adding coffee taste. As for fat, vegetable oil creates a moister cake than butter – a crucial point for stovetop baking where moisture loss can be higher. For more on egg replacements, see my flax egg guide.
When it comes to cocoa powder, natural unsweetened cocoa works perfectly with the baking soda. Dutch-processed cocoa has a deeper color but requires adjusting the leavening agents. For a dairy-free version, almond or oat milk substitutes wonderfully for regular milk, maintaining the cake’s tender crumb.
Equipment Essentials for No-Oven Success
The right equipment makes all the difference in stovetop baking. I rely on a heavy-bottomed, flat pan with a tight-fitting lid – my 25 cm (10-inch) cast iron skillet is perfect. The weight and material distribute heat evenly, preventing hot spots that cause uneven baking. If using a tawa (traditional Indian griddle), I recommend one that’s at least 23 cm (9 inches) in diameter with a slight concavity for optimal heat distribution.
A wire cooling rack that fits inside your pan creates an essential barrier between direct heat and your cake tin. I place this inside the larger pan before adding water for the water bath method. For the cake itself, I use a round 18 cm (7-inch) cake tin with at least 5 cm (2 inches) of height to allow for rising.
A good lid is crucial – it traps heat, creating an oven-like environment. I sometimes add a kitchen towel between the pan and lid to catch condensation that might otherwise drip onto the cake. Don’t forget basic tools: a silicon spatula for folding, a whisk for achieving ribbon stage, and a toothpick for testing doneness – when it comes out with a few moist crumbs rather than wet batter, your cake is perfect. For more baking essentials and tips, check my Nutella cake recipe.
Mastering Heat Control on a Gas Range
Controlling heat on a gas range requires precision and patience – something I learned through many failures. I start by preheating my pan on medium-low for 3-5 minutes before placing my cake tin inside. This gradual warming prevents thermal shock to your batter. Once the setup is complete, I maintain a consistent low flame – about one-quarter of maximum output on most home ranges.
The tawa diameter directly affects heat distribution. I’ve tested various sizes and found that a tawa that extends 5-7 cm (2-3 inches) beyond your cake tin on all sides provides ideal heat spread. Smaller tawas create hot spots, while oversized ones waste energy and make temperature control difficult.
I’ve developed a visual check system: if you see steam escaping rapidly from under the lid or hear aggressive bubbling in the water bath, reduce the heat immediately. Conversely, if there’s no visible steam after 10 minutes, slightly increase the flame. The perfect setting produces gentle, occasional wisps of steam and maintains water at a bare simmer – about 85°C (185°F) if you have a thermometer.
For the final 10 minutes of baking, I turn the heat to the lowest possible setting to prevent a burnt bottom while allowing the center to finish cooking – this gradient cooling approach mimics an oven’s residual heat. To ensure perfect baking, you can also refer to my eggless cookie bar tips.
Pro Tips for the Perfect Crumb
The secret to bakery-quality texture in a stovetop eggless cake lies in achieving the perfect crumb, which I’ve perfected through dozens of tests. The ribbon stage is non-negotiable – when you lift your whisk, the batter should fall back in ribbons that sit on the surface for a few seconds before disappearing. This indicates the proper air incorporation that replaces egg structure.
I never rush the mixing process. Combining dry ingredients with wet ingredients requires a gentle hand – I use a folding motion rather than vigorous stirring. Overmixing activates gluten, resulting in a tough, rubbery cake. The batter should look slightly lumpy but without visible flour pockets.
Temperature consistency is crucial for even baking. I place my cake tin on a wire rack inside the water bath to ensure 360-degree heat circulation. The water level should reach halfway up the cake tin sides – too little won’t provide enough steam, too much risks water seeping into your cake.
The toothpick test works differently for stovetop cakes. I insert it halfway between the center and edge – it should come out with a few moist crumbs, not wet batter. The cake will continue cooking from residual heat after removal, so slight underbaking is preferable to overbaking, which causes dryness in eggless recipes. For guidance on avoiding density, see my cookie dough article.
Stovetop Chocolate Ganache Variations
Once I mastered the eggless stovetop cake, I turned my attention to perfect ganache finishes that don’t require an oven or special equipment. My basic ratio is 1:1 chocolate to cream by weight (100g dark chocolate to 100ml heavy cream). I heat the cream in the same pan I used for baking until it just begins to simmer – tiny bubbles will form around the edges. Then I pour it over finely chopped chocolate, wait 30 seconds, and stir until glossy.
For a more intense ganache, I use a 2:1 ratio of chocolate to cream, creating a truffle-like consistency perfect for spreading. For a pourable glaze, I reverse the ratio to 1:2. Adding a tablespoon of unsalted butter to any variation creates a beautiful shine and prevents the matte appearance that can happen with dairy-free versions.
Flavor infusions elevate the ganache: I steep orange zest, cardamom pods, or cinnamon sticks in the cream for 10 minutes before straining and heating. For adults, a tablespoon of coffee liqueur or Irish whiskey adds complexity. My daughter Molly’s favorite is mint-infused ganache, made by steeping fresh mint leaves in the cream before straining. For tips on using coconut milk in ganache, see my Nutella cheesecake recipe.
Serving & Decoration Ideas
Transforming a simple stovetop eggless cake into a showstopper is all about thoughtful presentation. I let the cake cool completely before applying any decorations – patience is key as warm cake will melt your efforts. For a rustic chocolate cake, I dust the top with cocoa powder using a fine mesh sieve, creating an elegant finish with minimal effort.
Fresh berries add color and complement the chocolate intensity. I arrange raspberries, strawberries, or blackberries around the edge or in a circular pattern on top. For special occasions, I make chocolate curls using a vegetable peeler against a slightly warm chocolate bar – the curls can be arranged in a nest on top for dramatic effect.
Stenciling is another simple but impressive technique. I place paper doilies or homemade stencils on the cake surface, then dust with powdered sugar to create intricate patterns. For children’s birthdays, Molly loves when I add colorful sprinkles around the edges.
When serving, I find warm plates enhance the experience, especially in winter. I briefly warm dessert plates in my still-warm pan before plating. A small dollop of whipped coconut cream or dairy-free ice cream creates a temperature contrast that highlights the cake’s moist texture. For added indulgence, a drizzle of warm berry compote or caramel sauce transforms each slice into a restaurant-worthy dessert. For presentation tips and more, see my cinnamon sugar donut muffins.
Storage & Reheating for Eggless Bakes
Proper storage extends the life of stovetop eggless cakes, maintaining their moisture and flavor. I store my unfrosted cake at room temperature under a cake dome or inverted bowl for up to 3 days – any longer risks dryness. The key is ensuring it’s completely cooled before covering to prevent condensation from making the top sticky.
For longer storage, I wrap individual slices tightly in plastic wrap, then aluminum foil, and freeze for up to one month. This method preserves moisture better than freezing the entire cake. I thaw frozen slices at room temperature for 1-2 hours before serving.
If you’re making the cake ahead for a special occasion, I recommend baking it the day before and storing it unfrosted. Apply ganache or other decorations on the day of serving for the freshest appearance. Frosted cakes with ganache can be refrigerated, but bring to room temperature before serving – cold chocolate cake loses much of its flavor nuance. For further tips on moist cakes, check my easy eggless cake article.
Common Mistakes to Avoid
Through years of perfecting stovetop eggless cakes, I’ve made every mistake possible and learned valuable lessons along the way. The most common error is impatience with preheating – rushing this step leads to uneven heat distribution and ultimately, uneven baking. I always allow 5 minutes for my setup to reach a stable temperature before introducing the cake batter.
Another frequent misstep is lifting the lid during baking. Every peek releases accumulated heat and steam, extending baking time and potentially causing collapse. I resist the temptation to check until at least 80% of the recommended baking time has passed.
Many bakers underestimate the importance of batter consistency. If you don’t achieve the ribbon stage when mixing, the cake won’t have sufficient structure. I whisk vigorously for 2-3 minutes to incorporate enough air to replace the lifting function of eggs.
Incorrect pan size causes frustration – using a tin too large for your heating surface results in undercooked centers and overcooked edges. The cake tin should be at least 2.5 cm (1 inch) smaller in diameter than your heat source all around.
Perhaps the most insidious mistake is inaccurate measurements of leavening agents. Without eggs, the baking soda and vinegar reaction becomes critical. I use level measurements – a slight excess of baking soda creates a soapy aftertaste, while too little results in density. This precision makes the difference between a cake that rises beautifully and one that remains flat.
Adapting the Recipe for Induction Cooktops
Induction cooking presents unique challenges and advantages for eggless stovetop cakes. The precise temperature control of induction is actually perfect for this method, but requires adjustments to prevent overheating. I set my induction cooktop to 120°C (250°F) for the preheating phase, then reduce to 110°C (230°F) for baking – significantly lower than you might expect.
The rapid heating of induction means you’ll need less preheating time – just 2 minutes compared to 5 minutes on gas. However, you must use induction-compatible cookware. My cast iron pan works perfectly, but if using a tawa, ensure it has a flat bottom with ferrous metal content for proper magnetic connection.
Water baths behave differently on induction. I use 60°C (140°F) for the water bath setting, which maintains the gentle simmer needed without overheating. The advantage here is consistency – once set, induction holds this temperature precisely, eliminating the constant adjustments needed with gas.
Heat distribution with induction follows the coil pattern beneath the cooktop. To counteract potential hot spots, I rotate my cake setup 180 degrees halfway through cooking. For larger cakes, I recommend using a heat diffuser plate between the cooktop and your pan to spread heat more evenly.
The clean, button-controlled interface of induction cooktops eliminates visual flame cues. Instead, I rely on timing and subtle steam indicators. When adapting gas-based recipes to induction, I typically reduce cooking time by 10-15% and lower temperature settings by about 20°C (35°F).
Comparison: Stovetop vs. Oven-Baked Texture
After years of baking both stovetop and conventional eggless cakes, I’ve noticed distinct textural differences worth understanding. Stovetop cakes generally develop a more pronounced moisture gradient – slightly denser at the bottom and lighter toward the top. This isn’t a flaw but a characteristic that many of my family members actually prefer for its varied mouthfeel.
Oven-baked cakes tend to have more even air distribution and a consistent crumb structure throughout. In contrast, stovetop cakes often have slightly fewer but larger air pockets. This affects how they absorb fillings and frostings – stovetop versions soak up flavors more readily at the top while maintaining structural integrity below.
The crust development differs significantly. Oven cakes develop a uniform crust on top, bottom, and sides. My stovetop method creates a softer side crust with a more defined bottom – similar to a traditional steamed pudding. This makes stovetop cakes excellent candidates for syrup soaking or tres leches-style preparations.
Interestingly, I’ve found stovetop eggless cakes retain moisture longer during storage. The water bath method introduces steam during cooking, which seems to help preserve tenderness for an extra day compared to oven-baked versions. However, oven cakes have the edge in terms of dome development and height, making them slightly better for layer cakes.
For chocolate cakes specifically, the stovetop method intensifies flavor development through longer, more gentle cooking. The trapped moisture environment prevents aromatic compounds from escaping, resulting in a deeper chocolate profile that’s particularly noticeable when using high-quality cocoa.
Conclusion
My journey from failed attempts to perfect eggless stovetop chocolate cake has taught me that limitations often spark the most creative solutions. Without an oven or eggs, I’ve discovered techniques that produce results rivaling any conventional cake. The ribbon-stage technique, precise vinegar-baking soda chemistry, and careful heat management transform simple ingredients into something truly special.
What began as a necessity for my daughter Molly has become a signature skill in my kitchen. Visitors to our Castleton home are always surprised to learn their dessert was baked without an oven. The process has taught me patience and precision – qualities that enhance all my cooking endeavors.
I encourage you to embrace this method with confidence. Your first attempt may not be perfect, but each bake builds experience. Pay attention to the sensory cues I’ve shared – the smell of blooming cocoa, the visual ribbon-stage, the gentle simmer sounds – as these will guide you more reliably than rigid timings.
Whether you’re baking without eggs due to allergies, vegan choices, or simply because you’ve run out, or whether your kitchen lacks an oven due to space, travel circumstances, or power constraints, this technique proves that beautiful, delicious cakes are still within reach. The humble stovetop can indeed produce extraordinary results when approached with knowledge and care.
Love this recipe? Follow us on Facebook and Pinterest and explore more creative ideas on our food blog!
Frequently Asked Questions
Is there a way to make a cake without an oven?
Yes, you can absolutely make delicious cakes without an oven using stovetop methods. I use either a heavy pan with a tight-fitting lid or a water bath technique where a cake tin sits on a wire rack inside a larger pan with simmering water. The enclosed environment creates oven-like conditions. Controlling heat is crucial – low, steady heat produces the best results. I’ve been using this method for years with excellent outcomes for chocolate, vanilla, and fruit-based cakes.
What cake can I make with no eggs?
You can make virtually any cake without eggs! My go-to is chocolate cake, where the cocoa helps mask any textural differences. Vanilla, lemon, coffee, carrot, banana, and spice cakes also work beautifully egg-free. The key is using proper substitutes – for structure and lift, I rely on combinations of vinegar with baking soda, yogurt, buttermilk, or plant-based milks with acid added. For moisture and binding, applesauce, mashed banana, flaxseed mixture, or commercial egg replacers all work well depending on the cake type.
What do you do if you don’t have eggs to bake a cake?
When I don’t have eggs, I use reliable substitutes based on the cake’s needs. For chocolate cakes, vinegar (1 tbsp) and baking soda (1 tsp) create the perfect rise. For vanilla cakes, I use 60ml yogurt or 1/4 cup applesauce per egg. Banana bread works with 1/4 cup mashed banana per egg. For binding in denser cakes, 1 tablespoon ground flaxseed mixed with 3 tablespoons water (let sit for 10 minutes until gel-like) substitutes one egg. The key is understanding what function the eggs served in your original recipe – leavening, binding, moisture, or structure – and replacing accordingly.
Can I bake a cake on top of the stove?
Absolutely! I regularly bake cakes on the stovetop with great results. The most reliable method is using a heavy pan with a tight-fitting lid and a wire rack to elevate your cake tin. Add water to create a steam bath environment (water should reach halfway up the cake tin). Maintain low, consistent heat throughout the process. Another approach is the direct pan method, where you cook the cake in a covered pan at very low heat. The key differences from oven baking are longer cooking times and more careful heat management, but the results can be equally delicious.
How do I prevent my eggless cake from being too dense?
To prevent density in eggless cakes, I focus on several key techniques. First, achieve the ribbon stage when mixing – whip the wet ingredients and sugar until the mixture falls back in ribbons that hold their shape momentarily. Second, use the right amount of leavening – typically more baking powder than in conventional recipes. Third, never overmix once adding flour; fold gently just until combined. Fourth, ensure your vinegar-baking soda reaction happens right before baking. Finally, properly preheat your pan or water bath before adding the batter. These steps incorporate necessary air and structure that eggs would typically provide.
What’s the secret to a moist eggless chocolate cake?
The secret to a moist eggless chocolate cake lies in three elements: fat, acid, and proper cooking. I use oil instead of butter for superior moisture retention. Adding acid components like vinegar, yogurt, or buttermilk not only activates the baking soda but also creates tenderness. ‘Blooming’ the cocoa powder in hot liquid releases flavor compounds and improves moisture. During cooking, using a water bath method creates a humid environment that prevents the cake from drying out. Finally, not overcooking is crucial – an eggless cake should be removed when a few moist crumbs still cling to a toothpick.
Can I make a layered birthday cake using the stovetop method?
Yes, you can create beautiful layered birthday cakes using the stovetop method! I bake each layer separately in a smaller tin (15-18cm/6-7 inches works best). Once cooled, stack with your choice of frosting between layers. The stovetop cakes tend to be slightly denser than oven-baked, which actually makes them sturdier for layering. For the best results, chill each layer before assembling and use a slightly thicker frosting to help stabilize the structure. I’ve made three-layer celebration cakes this way that hold up beautifully to candles, cutting, and serving.