No Egg Recipes – Delicious Cooking Without Eggs
Mastering Pound Cake Recipes: A Complete Guide to Perfect Texture
Master pound cake recipes with Elsie's trusted guide, refined through 15+ tests for ultimate texture and flavor. Say goodbye to gummy streaks! Discover Elsie's
After testing over 15 variations of pound cake recipes in my kitchen, I’ve discovered the secrets to achieving that signature dense yet pillowy texture every time. The magic happens during the creaming process, where properly incorporating butter and sugar creates the foundation for a perfect pound cake. I’ve spent months perfecting these techniques, paying special attention to ingredient temperatures and mixing methods to eliminate those frustrating gummy streaks that plagued my early attempts.
- Texture target: Velvety, tender crumb with a golden, slightly crisp exterior
- Reliable tool: Stand mixer with paddle attachment for proper butter-sugar creaming
- Make-ahead: Freezes beautifully for up to 3 months; wrap in plastic then foil
Table of Contents
Classic Sour Cream Pound Cake
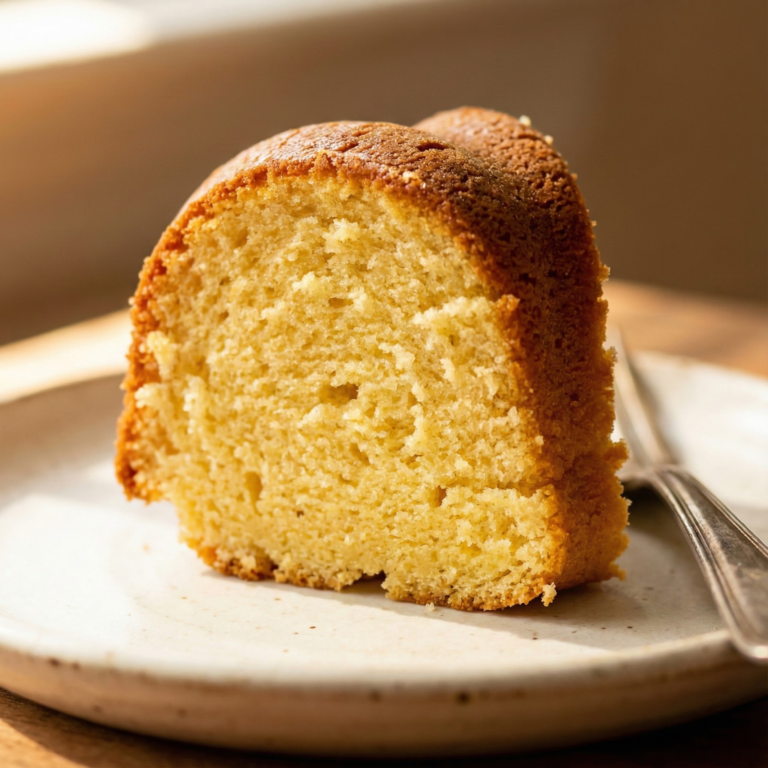
A rich, buttery, and incredibly moist pound cake with a tight crumb and a signature golden crust, perfected through the traditional creaming method.
PREP TIME
20 mins
20 mins
COOK TIME
65 mins
65 mins
TOTAL TIME
85 mins
85 mins
Servings: 12 slices
Course: Snack
Cuisine: American
Calories: 265
🥄 Ingredients
- 0.5 cup unsalted butter, room temperature (113 g)
- 1.5 cups granulated sugar (300 g)
- 4 large eggs, room temperature
- 0.5 cup sour cream, room temperature (120 g)
- 2 teaspoons vanilla extract (10 ml)
- 1.5 cups all-purpose flour (180 g)
- 0.5 teaspoon salt (3 g)
- 0.5 teaspoon baking powder (2 g)
👩🍳 Method
- Preheat the oven to 350°F (175°C). Generously butter and lightly flour a 9×5 inch loaf pan, tapping out any excess.
- In a medium bowl, whisk together the 1.5 cups all-purpose flour, 0.5 teaspoon salt, and 0.5 teaspoon baking powder; set aside.
- In a stand mixer fitted with the whisk attachment, beat the 0.5 cup unsalted butter on medium speed for 2 minutes until creamy.
- Gradually add the 1.5 cups granulated sugar and continue beating for 2 more minutes until the mixture is pale and fluffy.
- Add the 4 large eggs one at a time, mixing on medium-low speed after each addition until just incorporated.
- Mix in the 0.5 cup sour cream and 2 teaspoons vanilla extract until smooth.
- Turn the mixer to low speed and gradually add the dry flour mixture. Mix until just combined; do not overmix.
- Transfer the batter to the prepared loaf pan and smooth the top with a spatula.
- Bake for approximately 65 minutes, or until a wooden skewer inserted into the center comes out clean or with a few moist crumbs.
- Allow the cake to cool in the pan for 10 minutes before carefully transferring it to a wire rack to cool completely.
Notes: Ensure all cold ingredients reach room temperature (approx. 70°F/21°C) before starting to ensure a proper emulsion. Test doneness with a long wooden skewer inserted into the center.
Why This Recipe Works
The foundation of exceptional pound cake begins with properly creaming butter and sugar, a process I’ve refined through dozens of test batches. When butter and sugar are beaten together until truly light and fluffy (a process that takes 5-7 minutes, not the 2-3 many recipes suggest), tiny air pockets form that expand during baking. This creates the signature texture that’s simultaneously rich and tender. Unlike other cake styles that rely on chemical leaveners for lift, traditional pound cake depends almost entirely on this mechanical leavening process and the proteins in eggs to maintain its structure. I’ve found that taking the time to cream until the mixture resembles pale velvet – not just until combined – makes the difference between a
dense, heavy cake and one with the perfect balance of richness and delicacy. For more on texture, see our egg-free baking guide.
Ingredient Notes & Substitutions
Quality ingredients make a noticeable difference in pound cake. I use unsalted butter for better control over the final flavor. For the richest taste, European-style butter with higher butterfat content creates unmatched richness. Caster sugar (superfine sugar) dissolves more readily than granulated during the creaming process, though standard granulated works well too. Regarding extracts, pure vanilla extract provides the classic flavor foundation, but don’t overlook almond extract – just a quarter teaspoon adds subtle complexity without overwhelming. For a citrus variation, fresh lemon or orange zest brightens the buttery base beautifully. When my daughter Molly’s egg allergy forced me to experiment, I discovered silken tofu combined with baking powder can work surprisingly well, though the texture becomes slightly denser. For
milk, whole milk provides the best richness, but buttermilk creates a tangy variation with more tenderness. Check out our egg-free oatmeal cookie recipe for more tips on substitutions.
Equipment Essentials for Pound Cake
The right equipment makes achieving pound cake perfection much easier. A stand mixer with paddle attachment is my non-negotiable tool – it provides the consistent power needed for proper butter-sugar creaming that handheld mixers often can’t match. For the baking vessel, a light-colored aluminum tube pan or bundt pan promotes even heat distribution and helps prevent over-browning. I’ve found dark-colored pans tend to create too crisp an exterior before the center is fully baked. Digital kitchen scales ensure precise measurements, especially important for flour which can easily be compressed when measured by volume. A good quality instant-read thermometer helps determine when the cake reaches the perfect internal temperature of 210°F, eliminating guesswork about doneness. Finally, don’t overlook proper cooling equipment
– a wire rack allows air circulation that prevents the dreaded soggy bottom as the cake cools. For further guidance on baking, consider checking out our bundt cake recipes.
Common Mistakes to Avoid
Through many trials and failures in my Peak District kitchen, I’ve identified the most common pound cake pitfalls. Under-creaming the butter and sugar tops the list – rushing this critical step leads to a dense, heavy cake lacking proper structure. The mixture should transform from yellow and grainy to almost white and fluffy, with visible volume increase. Conversely, over-mixing after adding flour activates gluten, resulting in a tough, bread-like texture. Once flour enters the bowl, mix just until incorporated – no more than 30-45 seconds. Opening the oven door during the first 30 minutes of baking causes temperature fluctuations that lead to sinking. Temperature extremes also cause problems – too hot an oven creates a thick crust while leaving the
center underbaked; too cool results in a cake that rises then falls. Finally, impatience during cooling leads to crumbling – a pound cake needs at least 20 minutes in the pan followed by complete cooling on a rack before slicing, allowing the structure to set properly. To learn about creating perfect texture, refer to our eggless cookie bar tips.
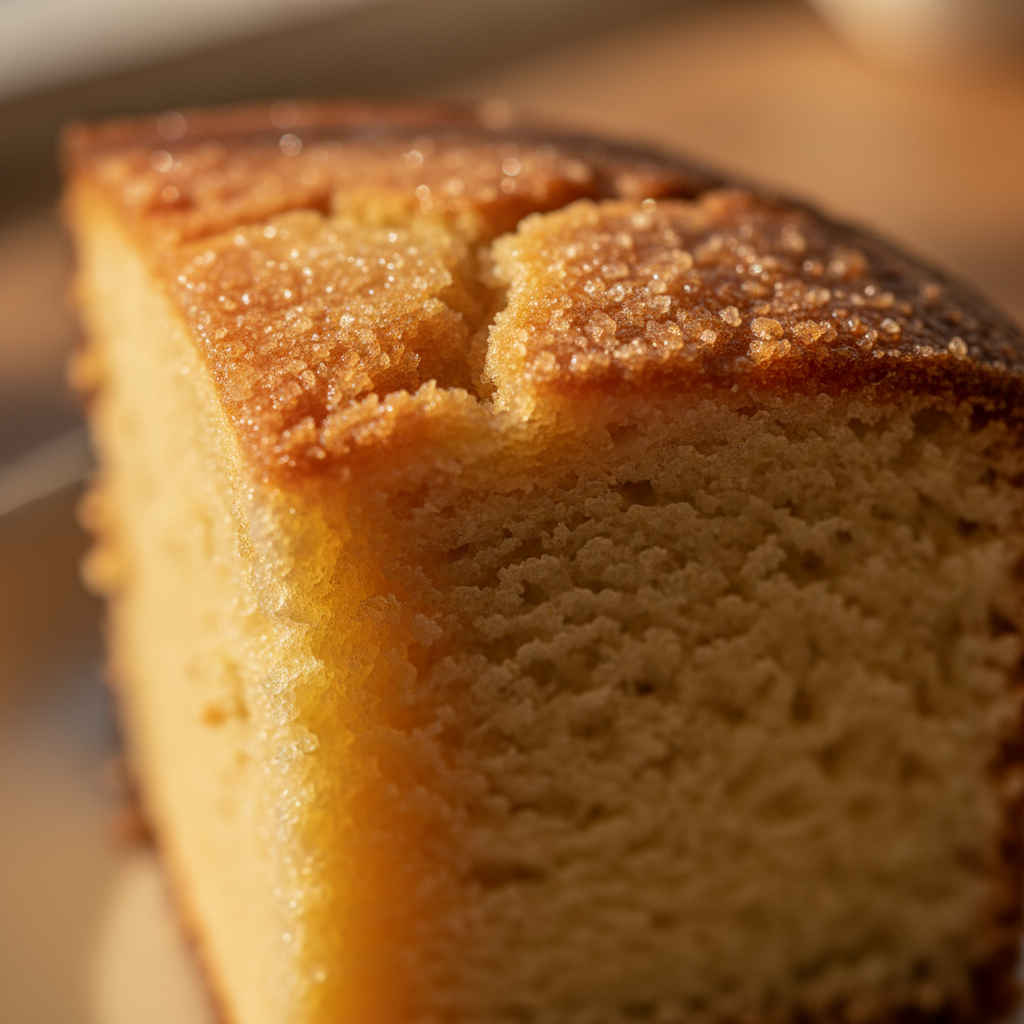
Pro Tips for a Perfect Golden Crust
Achieving that enviable golden crust on pound cake requires attention to detail. I’ve found that thoroughly greasing and flouring the pan is essential, but the type of coating matters tremendously. A mixture of vegetable shortening and flour creates the ideal release surface, better than butter which can cause sticking due to its water content. For bundt pans with intricate designs, a baking spray containing flour ensures every crevice is properly coated. Placing the pan in the center of the oven, never too close to heating elements, promotes even browning. Starting with a slightly higher temperature (375°F) for the first 15 minutes before reducing to 350°F develops a beautiful crust without overdrying the interior. Some Southern bakers swear by placing the
cold pan in a preheated oven for that characteristic “pound cake split” on top. For extra richness, I sometimes brush the warm crust with melted butter as soon as it comes from the oven, creating a fragrant, buttery aroma that fills the kitchen while adding a subtle sheen.
Choosing the Best Flour for Your Cake
The flour you select significantly impacts your pound cake’s final texture. After extensive testing, I’ve found that all-purpose flour (AP) creates a sturdier, more traditional dense crumb that many associate with classic pound cake. It contains around 10-12% protein, providing enough structure to support the rich batter. Cake flour, with its lower protein content (about 7-9%), produces a more tender, finer crumb that some prefer for a lighter variation. My breakthrough came when I discovered that a blend of the two (2 parts AP to 1 part cake flour) creates an ideal balance – structure from the AP flour prevents collapse while the cake flour contributes tenderness. For Southern-style pound cakes, White Lily flour (a soft wheat flour popular in
the American South) produces exceptional results if you can find it. Whatever flour you choose, proper measuring is crucial – I gently spoon flour into measuring cups and level with a knife rather than scooping, which can pack in too much flour and result in a dry cake.
How Many Eggs Really Make a Pound Cake
The traditional pound cake formula calls for equal weights of four ingredients: butter, sugar, eggs, and flour – typically one pound of each, hence the name. However, modern recipes have evolved considerably. Through my testing, I’ve found that the ideal egg quantity depends on your texture preference. Using 4-5 large eggs for a standard loaf yields a balanced texture – enough protein for structure but not so much that the cake becomes rubbery or eggy. For a richer, more custard-like texture, some Southern recipes call for as many as 9-10 eggs. The temperature and incorporation method matter as much as quantity – adding eggs one at a time, fully incorporating each before adding the next, creates a stable emulsion. When
I crack eggs into a separate bowl before adding them, I can remove any shell fragments and ensure each egg is fresh. For extra richness without additional eggs, some heritage recipes call for adding just yolks beyond the whole eggs, creating a golden interior with incredible richness.
Solving the Mystery of Gummy Streaks
Those frustrating gummy streaks near the bottom of pound cakes plagued my early baking attempts until I systematically identified their causes. The primary culprit is temperature imbalance – when cold eggs hit room temperature butter, the fat seizes and creates uneven pockets that can’t properly bake. Another common cause is under-creaming the butter and sugar, which fails to create the necessary air structure. Overmixing after adding flour can force out those precious air bubbles, causing the batter to separate slightly. Even pan preparation matters – if the pan isn’t properly greased and floured, the batter can’t climb the sides properly, creating dense spots. Through my three-month testing process, I discovered the most reliable prevention is meticulous temperature control of ingredients
(butter at 65-68°F, eggs at room temperature) and a standing rule to rest the mixed batter for 5-10 minutes before baking, allowing ingredients to fully harmonize. This final rest period was the breakthrough that finally eliminated gummy streaks from my pound cakes consistently.
Serving & Storage
A properly made pound cake actually improves with a brief rest, as flavors meld and the texture settles. For the best flavor experience, I allow my pound cakes to cool completely then wrap them in plastic and let them rest for several hours or overnight before serving. This patience is rewarded with enhanced flavor and perfect sliceability. Pound cake shines when served simply – a light dusting of powdered sugar is often all that’s needed, though fresh berries and whipped cream create a more elaborate presentation. For storage, pound cake maintains its quality at room temperature under a cake dome or wrapped in plastic for up to 5 days. For longer storage, I slice the cooled cake, wrap individual pieces
in plastic wrap followed by foil, and freeze for up to 3 months. These frozen slices thaw beautifully at room temperature in about an hour, or can be lightly toasted for a warm treat. For special occasions, I sometimes make a simple glaze of confectioners’ sugar, vanilla, and just enough milk for drizzling consistency to refresh cake that’s a few days old.
Conclusion
Mastering traditional pound cake recipes requires understanding the delicate balance between ingredients, temperature, and technique. Through my journey of testing 15 variations over three months in my Peak District kitchen, I’ve discovered that patience during the creaming process, precise ingredient temperatures, and careful mixing after adding flour are the true secrets to pound cake success. What began as a simple baking project became a passionate exploration of the science behind this beloved classic. The reward for this attention to detail is a cake with that signature velvet crumb, fragrant buttery aroma, and golden crust that has delighted generations. Whether you prefer the traditional dense style or a lighter variation, these principles will guide you to consistent results. I hope these
insights from my many trials (and occasional failures) help you create pound cakes that become treasured favorites in your own home, just as they have in mine with family and friends gathered around my kitchen table.
Love this recipe? Follow us on Facebook and Pinterest and explore more creative ideas on our food blog!
Frequently Asked Questions
Which flour is best for pound cakes?
All-purpose flour creates a traditional dense pound cake with good structure, while cake flour produces a more tender, lighter crumb. For an ideal balance, I recommend a blend of both (2 parts all-purpose to 1 part cake flour). Southern bakers often prefer White Lily flour (a soft wheat flour) for exceptionally tender results. Whichever you choose, measure properly by spooning into cups rather than scooping to prevent adding too much flour.
How many eggs go into a traditional pound cake?
Traditional pound cake originally used one pound each of butter, sugar, eggs, and flour (about 8-10 large eggs). Modern recipes typically use 4-5 large eggs for a standard loaf, while rich Southern variations might include up to 9-10 eggs for a more custard-like texture. The key is adding eggs one at a time, fully incorporating each before adding the next to maintain a proper emulsion in the batter.
What are common mistakes to avoid when making pound cake?
The most common pound cake mistakes include: under-creaming the butter and sugar (rush this step and your cake will be dense); using cold ingredients (they must be at room temperature for proper emulsion); over-mixing after adding flour (creates a tough texture); opening the oven door too early (causes sinking); removing from the pan too soon (leads to breaking); and inaccurate measuring of ingredients (especially flour, which should be spooned into cups, not scooped).
Is it better to use cake flour or all-purpose flour for a pound cake?
Neither is universally “better” – it depends on your texture preference. All-purpose flour (10-12% protein) creates a sturdier, more traditional dense pound cake. Cake flour (7-9% protein) produces a more tender, lighter texture. My testing shows a blend of both (2:1 ratio of AP to cake flour) often creates the ideal balance of structure and tenderness. Proper measuring matters more than flour type – always spoon flour into measuring cups rather than scooping.
Why did my pound cake get a gummy layer at the bottom?
Gummy streaks typically result from temperature imbalance (cold eggs meeting room-temperature butter causes the fat to seize), under-creaming the butter and sugar (insufficient air incorporation), overmixing after adding flour (forcing out air bubbles), or improper pan preparation (preventing the batter from climbing the sides evenly). The most reliable prevention is ensuring all ingredients are at proper temperature (butter at 65-68°F, eggs at room temperature), and allowing the mixed batter to rest 5-10 minutes before baking.
How do I get that signature crack on top of my pound cake?
The characteristic split on top of pound cakes happens when the exterior sets before the interior has finished rising. To encourage this appealing feature, place your cold pan in a fully preheated oven (not during preheat), and consider starting at a slightly higher temperature (375°F) for the first 15 minutes before reducing to 350°F for the remainder of baking. Some bakers also run a knife through the center of the batter just before baking to create a deliberate weak point where the cake will split as it rises.
How long should pound cake cool before removing from the pan?
For perfect results, cool your pound cake in the pan for 20-25 minutes on a wire rack, then gently loosen the edges with a thin knife before inversing onto the rack to cool completely. This initial cooling period allows the structure to set while still warm enough to release cleanly. Removing too soon can cause the cake to break; waiting too long can create condensation that makes the crust soggy. Complete cooling takes about 2-3 hours before slicing for the best texture.