No Egg Recipes – Delicious Cooking Without Eggs
Delicious Eggless Chocolate Chip Cookies: My Perfect Recipe
Elsie's perfected eggless chocolate chip cookies deliver crisp edges with soft, chewy centers. Developed through countless kitchen trials for her daughter's
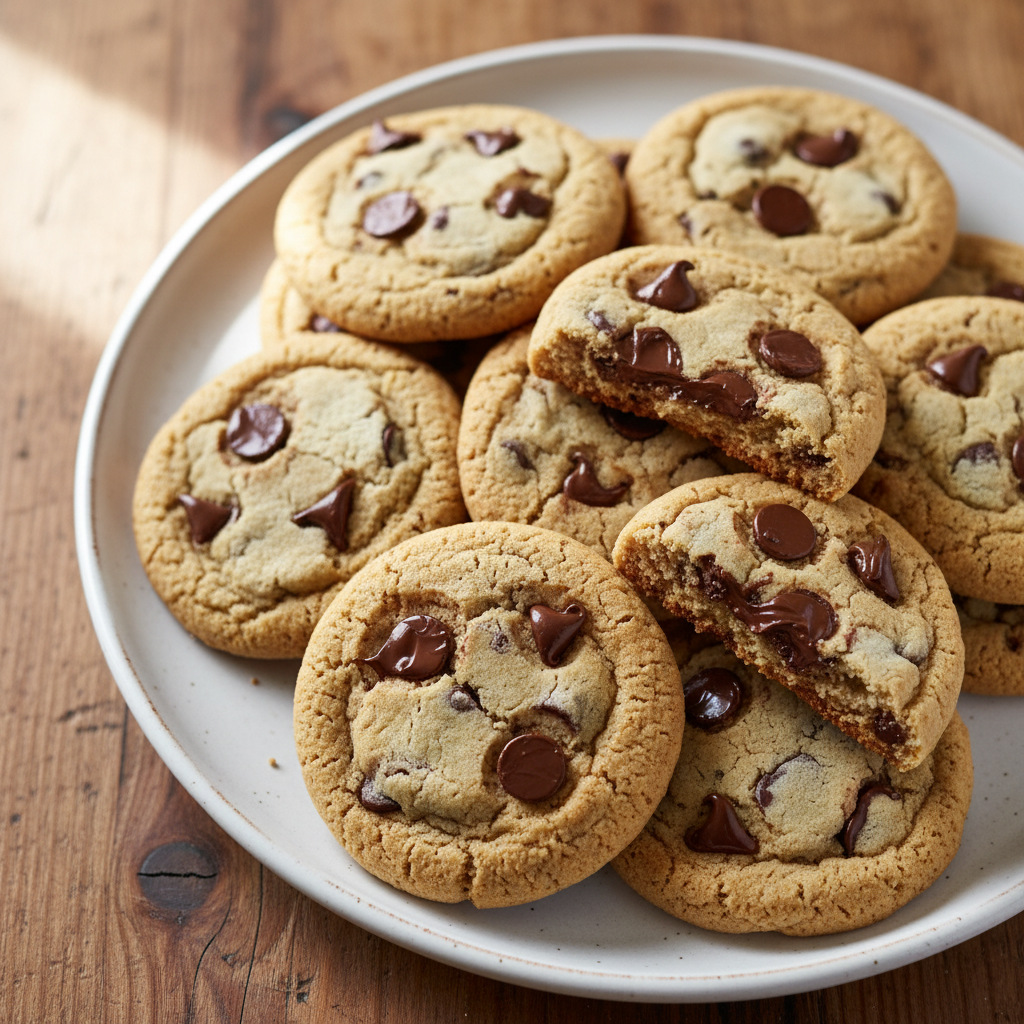
After countless batches in my Peak District kitchen, I’ve finally perfected eggless chocolate chip cookies that are just as delicious as traditional ones. When my daughter Molly was diagnosed with an egg allergy, I was determined to create cookies she could enjoy without compromise. These cookies deliver that perfect balance: crisp edges with soft, chewy centers and plenty of melty chocolate chips throughout. The best part? No one ever guesses they’re made without eggs!
- Texture target: Slightly underbaked centers with golden, crisp edges
- Reliable swap: Yogurt provides moisture and binding without altering flavor
- Make-ahead: Dough balls freeze perfectly for 3 months; bake straight from frozen
Table of Contents
Table of Contents
Eggless Chocolate Chip Cookies
Soft and chewy chocolate chip cookies made without eggs, perfect for those with allergies or dietary restrictions.
PREP TIME
10 mins
10 mins
COOK TIME
15 mins
15 mins
TOTAL TIME
25 mins
25 mins
Servings: 12 cookies
Course: Snack
Cuisine: American
Calories: 160
🥄 Ingredients
- 1/2 cup (113g) salted butter, softened
- 1/4 cup (50g) white sugar
- 3/4 cup (150g) brown sugar, lightly packed
- 1/4 cup (60ml) water, room temperature
- 2 teaspoons (10ml) vanilla extract
- 1 3/4 cups (210g) all-purpose flour, spooned and leveled
- 3/4 teaspoon (3.75ml) baking soda
- 1/4 teaspoon (1.25ml) baking powder
- 1/2 teaspoon (2.5ml) salt
- 1 cup (170g) chocolate chips (1/2 cup dark and 1/2 cup semi-sweet)
👩🍳 Method
- Cream together softened butter and sugars for several minutes until light and fluffy, scraping down the sides of the bowl.
- Gradually add in water and vanilla extract and beat to combine. The mixture will appear curdled at first, but continue beating on medium-high speed for a few more minutes until it comes back together.
- In a separate mixing bowl, whisk together the all-purpose flour, baking soda, baking powder, and salt.
- Stir the dry ingredients into the wet ingredients until just combined. Be careful not to overmix.
- Stir in the semisweet chocolate chips and dark chocolate chips.
- Chill the cookie dough in the refrigerator for at least 30 minutes, or up to 2 hours.
- Preheat oven to 350°F (175°C) and line a baking sheet with parchment paper.
- Use a cookie scoop or spoon to portion out the dough into 2-tablespoon balls. Place them on the prepared baking sheet, leaving about 2 inches between each cookie.
- Bake for 12-15 minutes, or until the edges are golden brown. The centers will look puffy and underbaked, but they will continue to cook as they cool.
- Let the cookies cool on the baking sheet for 5 minutes before transferring them to a wire rack to cool completely.
Notes: Cookies should be golden brown around the edges with a slightly soft center. Store in an airtight container at room temperature for up to 3 days or freeze for longer storage.
Why This Recipe Works
The science behind these egg-free cookies took me months to perfect. Plain yogurt serves as the primary egg replacer, providing the perfect amount of moisture while contributing minimal flavor. The combination of brown and white sugars creates that classic cookie texture: brown sugar for chewiness and moisture retention, white sugar for those crispy edges we all love. A slightly higher flour ratio compensates for the missing structure eggs would typically provide. I’ve also incorporated a longer creaming process for the butter and sugars, which incorporates air and helps create lift in the absence of eggs. The addition of cornstarch is my secret weapon for tenderness, replacing the softening effect eggs would normally contribute. Finally, a brief chilling time allows the flour to fully hydrate and prevents excessive spreading during baking, resulting in perfectly shaped cookies every time.
Ingredient Notes & Substitutions
After many trials, I’ve discovered which ingredients are crucial and where you can make adaptations. For the butter, I always use unsalted so I can control the salt level precisely. If you only have salted butter, simply reduce the added salt. The yogurt should be plain and full-fat for best results; Greek yogurt works well, too, though you might need to add a tablespoon of milk if the dough seems dry. I’ve found that sour cream makes an excellent substitute in a pinch.
For sweeteners, the combination of brown and white sugar is important for texture, but you can use all brown sugar if you prefer a more caramel-like flavor and softer texture. The vanilla extract enhances all the flavors, but you can substitute vanilla bean paste for more intense flavor. For flour, all-purpose gives reliable results, but if you want a slightly nuttier flavor, substitute up to 1/4 cup with whole wheat flour. The cornstarch is essential for tenderness; don’t skip it! For chocolate, I prefer using a mix of chocolate chips and chopped chocolate bars for varied texture and melting patterns, but any chocolate you enjoy works perfectly. For dairy-free needs, plant-based butter and dairy-free yogurt work well, though the texture may be slightly different.
Equipment Notes
Having the right tools makes a significant difference when making these eggless cookies. An electric mixer, either stand or hand-held, is essential for properly creaming the butter and sugar. In my early attempts, I tried to mix by hand and never achieved the same texture. A kitchen scale provides the most accurate measurements, especially for flour, which can be easily over-measured using cups. If you don’t have a scale, use the spoon-and-level method for measuring flour.
Good quality baking sheets are worth the investment. I prefer aluminum sheets as they conduct heat evenly. Lining them with parchment paper or silicone baking mats prevents sticking and promotes even browning. An ice cream scoop or cookie scoop ensures uniform cookie size, which is crucial for even baking. If you don’t have one, a tablespoon works too, though less precisely. A cooling rack is important for stopping the cooking process and achieving the right texture. In my early batches, I left cookies on the hot baking sheet too long, resulting in overbaked bottoms.
Pro Tips & Troubleshooting
Through many failures and successes, I’ve discovered several pro tips that make a huge difference. First, temperature matters tremendously. Butter should be softened but not melted; I leave it out for exactly 45 minutes in my cool kitchen. The yogurt should be at room temperature to incorporate properly without chilling the creamed butter mixture. When mixing, cream the butter and sugars until truly light and fluffy, about 3-4 minutes. This creates air pockets that help the cookies rise.
If your cookies spread too much, your butter was likely too warm, or you didn’t chill the dough long enough. Pop the dough in the refrigerator for at least 30 minutes before baking. Conversely, if your cookies don’t spread at all, you might have used too much flour. Try flattening the dough balls slightly before baking. For cookies that are too pale, your oven temperature might be too low. Invest in an oven thermometer for accuracy.
The most common issue I’ve encountered is dryness. Without eggs, the moisture balance is crucial. If your dough seems crumbly, add a tablespoon of milk or additional yogurt. The dough should feel like Play-Doh: pliable but not sticky. For the perfect chocolate distribution, reserve some chocolate chips to press into the tops of the dough balls just before baking. This creates those beautiful bakery-style chocolate puddles on top.
Variations & Flavor Twists
One of the joys of mastering this base recipe is creating delicious variations. My family’s favorite is the chocolate-orange version, where I add the zest of one orange and substitute dark chocolate chunks for regular chips. For a festive holiday twist, I add 1/2 teaspoon of cinnamon, 1/4 teaspoon of nutmeg, and a pinch of cloves to the dough.
For chocolate lovers, try adding 2 tablespoons of cocoa powder to the flour mixture for double chocolate cookies. White chocolate and dried cranberries are another winning combination that Molly adores. For a salty-sweet version that disappears quickly at village gatherings, fold in 1/2 cup of roughly chopped pretzels and sprinkle the tops with flaky sea salt before baking.
Nut lovers can add 1/2 cup of toasted chopped nuts; walnuts and pecans work particularly well. For a more indulgent treat, try adding 1/4 cup of toffee bits to the dough. I’ve even created a breakfast-inspired version with 1/2 cup of granola and a handful of dried fruit. The possibilities are endless once you understand the base recipe and how it behaves.
Serving & Storage
These eggless chocolate chip cookies are at their absolute best when served slightly warm, about 10-15 minutes after coming out of the oven. At this point, the edges have set but the centers remain perfectly soft, and the chocolate is still melty. For an extra special treat, especially when serving guests, I sometimes warm cookies for 10 seconds in the microwave before serving.
For storage, once completely cooled, place cookies in an airtight container at room temperature. They’ll stay fresh for up to 5 days, though they rarely last that long in our house! To maintain maximum freshness, add a slice of bread to the container; it will keep the cookies soft without making them soggy. If you need to stack the cookies, place a piece of parchment paper between layers.
The cookie dough freezes beautifully. I often make a double batch and freeze half as pre-portioned dough balls. Place them on a baking sheet, freeze until solid, then transfer to a freezer bag. They’ll keep for up to 3 months. When ready to bake, place the frozen dough balls directly on a baking sheet and add 2-3 minutes to the baking time. This has been a lifesaver for unexpected visitors or when Molly wants freshly baked cookies after school.
Common Mistakes to Avoid
Through my egg-free baking journey, I’ve made plenty of mistakes that you can now avoid. The biggest error is improperly measuring flour. Too much flour results in dry, cakey cookies that don’t spread. I once made a batch that looked more like scones than cookies! Always use the spoon-and-level method or, ideally, weigh your flour.
Another common mistake is not fully creaming the butter and sugar. This crucial step incorporates air into the dough, which is especially important without eggs for structure. In my early attempts, I rushed this step and ended up with dense, flat cookies. Cream for a full 3-4 minutes until the mixture is noticeably lighter in both color and texture.
Skipping the chilling step is tempting when you’re eager for cookies, but it almost always leads to excessive spreading. Even 30 minutes makes a significant difference. Overbaking is perhaps the most heartbreaking mistake. These eggless cookies can go from perfect to dry in just one minute. Remove them from the oven when the edges are golden but the centers still look slightly underdone. They’ll continue cooking on the hot baking sheet. Finally, don’t forget to adjust your oven rack position. The middle rack provides the most even heat distribution, preventing burnt bottoms and underdone tops.
Science Behind Eggless Baking
Understanding the science behind eggless baking transformed my approach to these cookies. Eggs typically serve three key functions in traditional cookies: they provide moisture, act as binders, and help with leavening. In this recipe, each of these functions is carefully replaced.
Yogurt provides the moisture that eggs would normally contribute. Its high water content prevents the cookies from becoming dry, while its protein content helps with binding. The fat in full-fat yogurt also contributes to tenderness. The leavening that eggs would provide comes from a careful balance of baking soda and the extended creaming process. Creaming butter and sugar creates tiny air pockets that expand when heated, providing lift.
The cornstarch in the recipe serves as a tenderizer. It inhibits some of the gluten formation that would otherwise make the cookies tough, mimicking how egg yolks typically coat flour proteins. Brown sugar contains molasses, which is hygroscopic, meaning it attracts and retains moisture. This property helps keep the cookies soft and chewy even without eggs. The slight acidity in brown sugar also reacts with the baking soda, providing additional leavening. These scientific principles explain why certain egg substitutions work better than others and why the specific ratio of ingredients in this recipe creates the perfect eggless cookie texture.
Achieving the Perfect Cookie Texture
The perfect eggless chocolate chip cookie has a specific texture profile: crisp edges, chewy middles, and soft centers. Achieving this without eggs requires understanding how each component contributes to texture. After countless experiments in my kitchen, I’ve identified the key factors.
Sugar type plays a crucial role. Brown sugar promotes chewiness and moisture retention, while white sugar encourages crispness. My ratio of roughly 60% brown to 40% white sugar creates that perfect textural balance. Butter temperature dramatically affects spread and texture. Too cold, and the cookies won’t spread enough; too warm, and they’ll spread too much. The butter should be at cool room temperature, soft enough to leave a slight indent when pressed with a finger.
Baking time and temperature are critical for texture development. A higher temperature (375°F/190°C) sets the edges quickly while leaving the centers soft. I bake just until the edges are golden, but the centers still look slightly underdone. The carryover cooking as they cool on the hot baking sheet completes the process perfectly. Finally, the cooling technique affects the final texture. I let the cookies rest on the baking sheet for exactly 5 minutes, allowing them to set up enough to transfer to a cooling rack without breaking. This prevents the bottoms from becoming too crisp from the hot pan. These precision techniques might seem fussy, but they’re the difference between good and exceptional eggless cookies.
Conclusion
What began as a necessity when my daughter was diagnosed with an egg allergy has become one of our family’s greatest joys. These eggless chocolate chip cookies aren’t just a compromise or substitute; they’ve become our go-to recipe that everyone requests, whether they avoid eggs or not. Through countless batches, adjustments, and even spectacular failures, I’ve learned that egg-free baking isn’t about limitation but creativity and precision.
The journey to perfect these cookies taught me valuable lessons about ingredient interactions, the importance of technique, and the joy of inclusive baking. Now, when Molly brings friends home or when I contribute to our village gatherings, everyone can enjoy the same delicious treats without worry. The smile on my daughter’s face when she bites into a warm cookie she knows was made especially with her in mind makes every experimental batch worth it.
I encourage you to try these eggless chocolate chip cookies, even if you don’t have dietary restrictions. They might just become your new favorite. And remember, baking is both a science and an art. Don’t be discouraged by initial results that aren’t perfect. Each batch is an opportunity to learn and improve. Happy baking from my Peak District kitchen to yours!
Love this recipe? Follow us on Facebook and Pinterest and explore more creative ideas on our food blog!
Frequently Asked Questions
Can I make this recipe vegan?
Yes, you can easily make this recipe vegan by substituting plant-based butter for regular butter (block-style works better than tub varieties) and using dairy-free yogurt (such as coconut, almond, or soy yogurt) instead of regular yogurt. Make sure your chocolate chips are vegan (look for ones without milk solids). The rest of the ingredients are already vegan-friendly. The texture might be slightly different, but the cookies will still be delicious. For best results, you may need to chill the dough a bit longer, as plant-based butters often have different melting properties.
How long does the cookie dough need to chill for the best results?
For the best results, chill eggless chocolate chip cookie dough for at least 30 minutes and up to 24 hours. A 30-minute chill is sufficient to prevent excessive spreading and allows the flour to fully hydrate. However, a longer chill time (2-24 hours) develops deeper flavor as the sugar dissolves more completely into the dough. If you’re short on time, even 15 minutes in the freezer helps. If the dough has been refrigerated for several hours, let it sit at room temperature for 10 minutes before scooping for easier handling
What is the best way to store eggless chocolate chip cookies?
Store completely cooled eggless chocolate chip cookies in an airtight container at room temperature for up to 5 days. To maintain moisture and softness, add a slice of bread to the container (replace when it becomes stale). For longer storage, freeze cookies in a single layer until solid, then transfer to a freezer-safe container with parchment paper between layers. Frozen cookies keep well for up to 3 months. Thaw at room temperature or microwave individual cookies for 10-15 seconds for that fresh-baked warmth and texture.
Can I freeze the cookie dough for later?
Yes, you can freeze eggless chocolate chip cookie dough for later use. After making the dough, portion it into individual cookie-sized balls using a cookie scoop. Place these balls on a parchment-lined baking sheet and freeze until solid (about 1-2 hours). Then transfer the frozen dough balls to a freezer-safe bag or container. The dough can be stored frozen for up to 3 months. When ready to bake, place the frozen dough balls directly on a baking sheet and add 2-3 minutes to the original baking time. No need to thaw first!