No Egg Recipes – Delicious Cooking Without Eggs
How to make an eggless vanilla cake
Learn how to make an eggless vanilla cake that's moist, reliable, and allergy-friendly, tested in a home kitchen by Elsie Marlow. Get Elsie's trusted method.
I learned to bake without eggs because my daughter Molly has an allergy, and what began as a necessity became one of my favorite kitchen challenges. In this guide, I will show you how to make an eggless vanilla cake that is moist, tender, and reliably simple to reproduce. I write as Elsie Marlow, a home cook from Castleton in the Peak District, and I write with the hands-on experience of many happy and failed bakes behind me. For other simple egg-free baking projects, perhaps you’d be interested in learning how to make edible eggless cookie dough safely or crafting some easy, chewy egg-free granola bars.
Table of Contents
Table of Contents
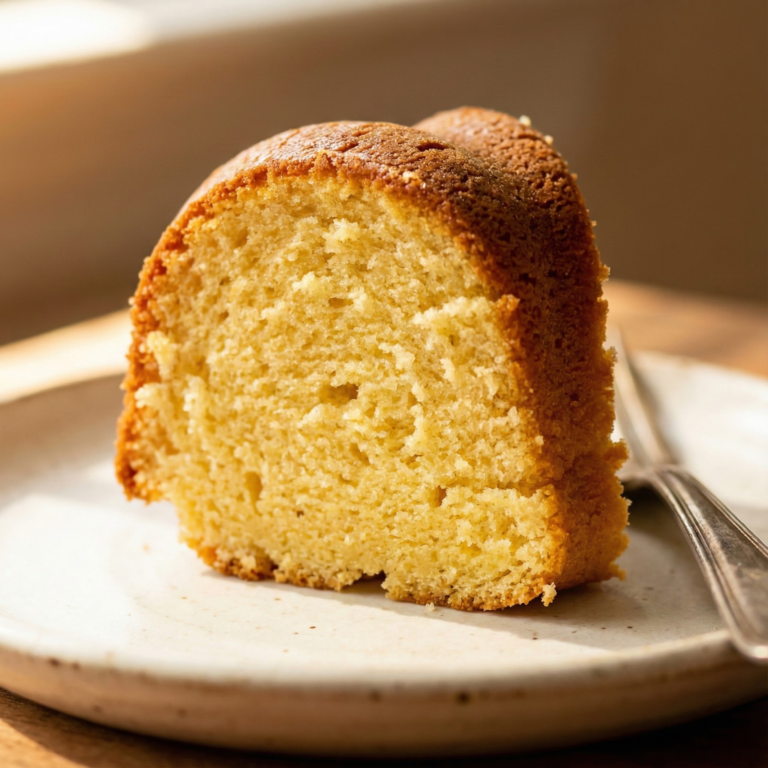
Eggless Vanilla Cake
This easy and reliable Eggless Vanilla Cake recipe yields a beautifully moist, fluffy, and flavorful cake, perfect for birthdays, celebrations, or whenever a delicious egg-free dessert is desired. With simple ingredients and clear instructions, even novice bakers can achieve success.
PREP TIME
10 mins
10 mins
COOK TIME
30 mins
30 mins
TOTAL TIME
40 mins
40 mins
Servings: 12 servings
Course: Snack
Cuisine: American
Calories: 485
🥄 Ingredients
- 3 cups (420 g) all-purpose flour
- 4.5 teaspoons (18 g) baking powder
- 0.25 teaspoon (1.5 g) baking soda
- 0.75 teaspoon (3 g) salt
- 1.5 cups (360 ml) whole milk (or plant-based milk)
- 4.5 teaspoons (22.5 ml) apple cider vinegar (or white vinegar)
- 1.5 cups (300 g) granulated sugar
- 0.75 cup (173 g) unsalted butter, softened (or plant-based butter in blocks)
- 1.5 teaspoons (7.5 ml) pure vanilla extract
- 3 tablespoons (45 g) sour cream or plain yogurt (or plant-based sour cream or yogurt)
👩🍳 Method
- Before You Get Started: Read the entire recipe thoroughly. Ensure all refrigerated ingredients (milk, butter, sour cream) are at room temperature. Pre-measure all ingredients; using a kitchen scale is highly recommended for accuracy.
- Preheat the Oven and Prepare the Pans: Preheat your oven to 350°F (175°C). Line two 8-inch (20 cm) round cake pans with parchment paper rounds. Grease the pans using butter and flour or a high-quality baking spray that contains flour.
- Mix Dry Ingredients: Sift the all-purpose flour, baking powder, and baking soda into a large bowl. Add the salt and whisk to combine thoroughly. Set aside.
- Combine Milk and Vinegar: In a small bowl, combine the whole milk and apple cider vinegar. Stir gently and set aside for a few minutes; it may appear slightly curdled, which is normal and desirable.
- Cream Butter and Sugar: Using an electric hand mixer or a stand mixer with the paddle attachment, beat the softened unsalted butter at medium to high speed for about 3-4 minutes until it is creamy and pale. Add the granulated sugar and continue to beat on high speed for another 4 minutes until the mixture is light and fluffy, scraping down the sides and bottom of the bowl as needed. Beat in the pure vanilla extract and sour cream (or plain yogurt) for about 1 minute until well combined.
- Add Dry Ingredients and Milk Mixture: Reduce the mixer speed to low. Add the flour mixture in three batches, alternating with the milk and vinegar mixture, starting and ending with the flour mixture. Beat until just combined, approximately 30-45 seconds in total. Be careful not to overmix the batter.
- Distribute the Batter: Evenly divide the batter between the two prepared cake pans (approximately 3 cups or 600 g of batter in each pan). To avoid overflowing, ensure pans are filled only up to 3/4 of their capacity.
- Bake: Bake for 30-35 minutes, or until a wooden toothpick inserted into the center of the cakes comes out clean. Let the cakes cool in their pans on a wire rack for 10 minutes before carefully removing them from the pans. Allow the cakes to cool completely, right-side up, on the wire rack before removing the parchment paper.
- Make The Frosting: Prepare your favorite buttercream or frosting for this cake. A classic vanilla buttercream is always a good choice, but chocolate, strawberry, or a light whipped cream frosting also pair beautifully. (Frosting recipe not included in this brief, but can be added separately).
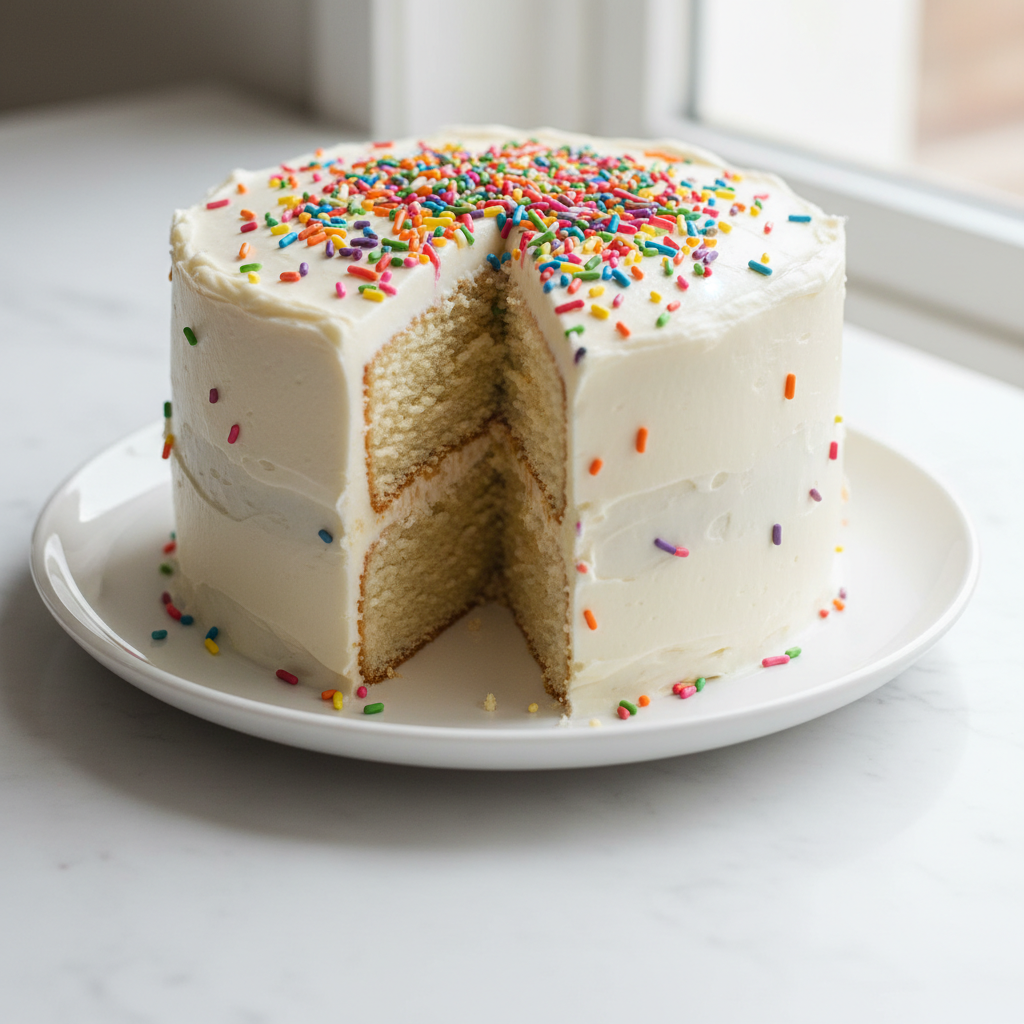
- Assemble and Decorate: Once the cake layers are completely cool, level them with a serrated knife or cake leveler if necessary. Place four strips of parchment paper around the edges of your serving platter to keep it clean. Add a small amount of frosting to the center of the platter to act as glue, then place the first cake layer. Spread about 1.5 cups of frosting evenly over the first layer. Place the second layer on top, pressing gently. Frost the top and sides of the cake with the remaining buttercream, using an offset spatula for smooth coverage. Add sprinkles or other decorations as desired. Refrigerate the cake for at least 30 minutes before slicing to help it hold its shape. Remove the parchment strips before serving. Store covered at room temperature for up to 2 days or in the refrigerator for up to 5 days, bringing it to room temperature before serving for the best flavor and texture.
Notes: Bring all refrigerated ingredients to room temperature before starting. Use a kitchen scale for precise measurements. Do not overmix the batter to ensure a light and fluffy texture. The cake is done when a toothpick inserted into the center comes out clean.
Why This Eggless Vanilla Cake Recipe Works So Well
This recipe is built around structure, moisture, and gentle aeration. I rely on the chemical lift from baking powder and baking soda, and on the tiny curdling reaction between milk and vinegar to create a light crumb without eggs. Creaming softened unsalted butter with granulated sugar traps air, and the addition of sour cream or plain yogurt adds acidity and fat for tenderness. I also emphasize room temperature ingredients and precise measuring, because small variances change texture quickly.
Over the years, I have refined timing, mixing speed, and visual cues so the cake rises evenly and stays moist. The result is a reliable, birthday-worthy layer cake that feels like a traditional vanilla sponge while being fully egg-free, useful as an egg-free vanilla dessert or a foundation for a vegan vanilla cake with dairy swaps. Understanding the science, such as why an acid reaction helps, is key to many egg-free bakes, similar to how we approach mayonnaise without eggs.
Ingredient Notes & Substitutions for Your Eggless Vanilla Cake
Use the best-quality core ingredients you can find. For all-purpose flour, spoon it into the cup or, better yet, weigh it with a kitchen scale to avoid a dry, dense cake. If you choose a plant-based milk, soy or oat provides the richest mouthfeel similar to whole milk; almond will be lighter.
When I say unsalted butter, you may substitute a firm, block plant-based butter of baking quality rather than a tub spread. For sour cream or plain yogurt, you can use a dairy version or a plain, unsweetened plant-based yogurt; I like the texture plain yogurt gives in the batter because it gently loosens the crumb.
Use pure vanilla extract for depth, not imitation. If you are aiming for fully dairy-free or vegan, replace whole milk with an unsweetened plant-based milk, replace unsalted butter with a high-quality plant-based butter in blocks, and use a plant-based sour cream or yogurt. When testing substitutes, I always note texture and crumb by sight and touch; the batter should feel slightly thick and ribbon-like, not watery, and once baked, the top should spring back lightly when pressed. I recommend photographing critical steps in your bake – the creamed butter and sugar, the curdled milk mixture, and the final cut slice – to document what works in your kitchen. These images are practical trust signals, showing you and others how your batter and finished cake should look during the process.
Essential Equipment for Baking a Perfect Eggless Cake
A few tools make consistent results much easier. I use a kitchen scale for the most reliable measurements; measuring cups can work if you spoon and level flour, but scales remove guesswork. A stand mixer with a paddle attachment or an electric hand mixer speeds creaming of unsalted butter and granulated sugar to the pale, fluffy stage; you can do it by hand, but it takes more time and muscle.
Two 8-inch round pans provide even layer heights, and I line them with parchment circles, then grease the sides lightly. An offset spatula helps for later frosting, and a serrated knife or cake leveler makes leveling tidy layers. Cooling racks are essential so the cake cools quickly and evenly. I also keep a large mixing bowl, a fine mesh sieve for the dry ingredients, and a small bowl for combining whole milk and apple cider vinegar. For visual doneness cues, a wooden toothpick and a gentle spring-back test are enough; full internal thermometers are unnecessary for most home bakes but may help if you prefer absolute precision.
Pro Tips & Troubleshooting for Eggless Baking Success
I learned many lessons the hard way and now save myself and others a lot of wasted battery and time. First, always bring refrigerated ingredients to room temperature. Cold unsalted butter or chilled sour cream will not incorporate properly into the batter and can lead to lumps or under-risen cakes.
Second, do not overmix after adding dry ingredients; overworking the batter develops gluten and produces a dense, chewy crumb rather than a tender one. Mix on low speed and stop when the ingredients are just combined.
Third, pay attention to oven temperature accuracy. Home ovens can run hot or cool; use an inexpensive oven thermometer and preheat fully before baking. Fourth, distribute batter evenly between pans and avoid filling beyond three-quarters full. If the top is browning too quickly, tent with foil halfway through the bake.
Fifth, trust visual cues: the cake should pull away slightly from the pan edges, the top should be lightly golden, and a toothpick inserted into the center should come out clean or with a few moist crumbs, not wet batter. If your cake sinks in the middle, it may have been underbaked, overmixed, or exposed to a sudden draft when hot. If it is dry, you likely overbaked it or used too much flour by volume. To rescue a slightly dry slice, serve with a moist frosting, a spoonful of jam between layers, or a gently brushed syrup of sugar and milk. I keep a small bowl of extra frosting on hand for trimming scraps when I level the cakes.
Finally, keep notes: write oven temperature, altitude, and any substitutes you used. Over time you will learn how your kitchen changes the bake, and you will adapt easily. For instance, if your batter seems too dry, you might consider referencing techniques used for our fudgy eggless brownie, which prioritizes moisture.
Flavor Variations & Customization Options
This vanilla base is extremely versatile. For a citrus lift, fold in a teaspoon of finely grated lemon zest and a tablespoon of lemon juice into the milk and vinegar mixture for subtle brightness. For a gentle almond note, swap half the vanilla extract for almond extract, but use it sparingly since it is strong. To make a chocolate layer, replace 60 to 80 g of all-purpose flour with natural cocoa powder and drop the sugar slightly if you prefer less sweetness.
Serving & Storage Suggestions for Your Baked Cake
Once assembled and frosted, I refrigerate the cake for at least 30 minutes to set the buttercream and make clean slicing easier. For room temperature serving, remove the cake from the refrigerator about 30 to 60 minutes before serving so the flavors open and the texture softens.
Store leftover cake at room temperature for up to two days if your filling and frosting are not perishable; otherwise, refrigerate for up to five days and bring to room temperature before serving. If you need to freeze layers, wrap them tightly in plastic wrap and place them in a sealed container; frozen, unfilled layers can last up to two months. To defrost, unwrap and thaw in the refrigerator overnight, then bring to room temperature before decorating. If you want to prepare in advance, bake the layers a day ahead and keep them covered at room temperature in a single layer; I often do the crumb coat the night before and finish the decoration the next day for a neater finish.
Converting a Mug Cake Recipe to a Full-Sized Cake
Scaling a mug cake up requires attention to ratios rather than simply multiplying the microwaving time. Mug cakes rely on rapid heat to puff and set quickly, while an oven bake needs slower, even heat to cook through. When converting, scale ingredients proportionally by weight, favoring a scale over cup measures for accuracy.
Increase leavening slightly compared to a single-serving mug cake because layer cakes are larger and heavier; however, follow the tested proportions in the ingredient list for best results rather than guessing. Also, distribute batter evenly into two 8-inch pans to maintain a similar surface area and bake profile. Expect oven baking to produce a more even crumb and better rise than microwaving. If your mug cake used an egg substitute like applesauce, note that applesauce adds moisture but not structure, so for a full-sized cak,e rely on the acid and leavening strategy described in this guide rather than simply adding applesauce in place of eggs without adjusting other elements. Our thorough guidance on eggless brownies also
touches on texture-building without eggs.
Creating an Egg-Free Vanilla Cake at Home
Method Overview: This cake uses a creaming method to incorporate air, with a small acid reaction in the milk mixture to mimic some of the moisture and lift eggs would provide. After preheating and preparing pans, the dry ingredients are combined and sifted or whisked, unsalted butter is creamed with granulated sugar until pale and fluffy, then pure vanilla extract and sour cream or plain yogurt are incorporated.
The flour mixture and the milk-plus-vinegar mixture are then added alternately on low speed until just combined, careful not to overmix. Batter is distributed evenly between prepared pans and baked until a toothpick comes out clean and the tops spring back gently. Allow the cakes to cool briefly in pans, then transfer to a wire rack to cool completely before decorating. This high-level overview follows tested principles that produce a tender, evenly risen crumb without eggs while preserving the aroma of vanilla and the soft mouthfeel that families expect from a classic layer cake. It’s a delightful process, much like crafting no-egg banana ice cream or our egg-free Italian pasta dough.
Conclusion
Baking an egg-free vanilla layer cake can be straightforward and rewarding when you use precise measurements, warm ingredients, and gentle mixing. I started this journey to keep my daughter safe and included at celebrations, and today I bake for neighbors, school events, and my own family with confidence. This recipe base is adaptable, forgiving, and suited for special occasions or a weekday treat. Keep notes, take photos of key stages, and learn how your oven behaves. If something goes wrong, I almost always try again the next week with a small tweak. Cooking without eggs should not feel limiting; it should feel like an invitation to experiment and share. Happy baking from my kitchen to yours.
For more inspiration on egg-free creations, explore other recipes like soft & chewy no-egg sugar cookies or our delightful guide to Thai food for a different kind of culinary adventure.
Love this recipe? Follow us on Facebook and Pinterest and explore more creative ideas on our food blog!
Frequently Asked Questions
How can I make a soft and fluffy eggless vanilla cake at home?
Use room temperature ingredients, cream the softened unsalted butter and granulated sugar until pale and airy, measure flour by weight, and avoid overmixing once the flour is added. The small acid reaction from mixing whole milk with apple cider vinegar plus the right amount of baking powder and a touch of baking soda provide lift and a tender crumb.
What are the best dairy-free substitutes for milk, butter, and sour cream in an eggless vanilla cake?
Choose a rich plant-based milk such as soy or oat for body, a block-style plant-based butter for structure, and a plain unsweetened plant-based yogurt or sour cream substitute for acidity and moisture. Brands like Miyoko’s and Earth Balance are reliable for baking when you need solid consistency.
Can you bake a delicious cake without any eggs, and what is the secret to its texture?
Yes. The secret is balancing leavening agents and fat, using creaming to trap air, and adding a bit of acid to the liquid to develop lift. A tender texture comes from precise measuring, avoiding overmixing, and using a small portion of sour cream or yogurt to retain moisture.
Are there specific tips for ensuring an eggless cake rises properly?
Sift or thoroughly whisk the baking powder into the all-purpose flour, keep baking powder fresh, preheat the oven fully, and distribute batter evenly between pans. Do not open the oven in the first part of the bake and avoid overfilling pans. A correct oven temperature and properly creamed unsalted butter and granulated sugar are essential.
What’s the difference between using apple cider vinegar and white vinegar in eggless cake recipes?
Both acids work to slightly curdle milk and create an acid-base reaction that helps with lift. Apple cider vinegar has a milder, slightly fruity note while white vinegar is neutral. In most cakes the flavor difference is negligible, but apple cider vinegar is often preferred for its gentle flavor profile. For many egg-free recipes, including things like eggless brownies, the choice of acid can subtly influence the final flavor and lift.
How do I prevent my eggless vanilla cake from becoming dry or dense?
Avoid measuring too much flour by spooning and leveling or by using a scale, do not overbake, and stop mixing as soon as the flour is incorporated. Use the specified amount of sour cream or plain yogurt to maintain moisture and check for doneness with a toothpick and a gentle spring-back test.
Can I adapt a mug cake recipe to make a larger eggless vanilla cake?
You can, but convert all ingredients by weight and adjust leavening proportionally. Oven-baked layer cakes require different heat and mixing profiles than microwaved mug cakes, so follow a tested layer cake formula rather than directly scaling a mug recipe without modification. Our detailed approach to egg-free cakes, similar to crafting edible cookie dough, emphasizes precise ingredient ratios for success.