No Egg Recipes – Delicious Cooking Without Eggs
Easy Christmas Cake Decorating Ideas: Simple Steps for Elegant Festive Desserts
Unlock easy Christmas cake decorating ideas with Elsie Marlow's proven methods. Learn 9 simple steps to create stunning, elegant festive desserts without
After years of Christmas cake decoration disasters, I’ve finally cracked the code to creating stunning holiday centerpieces without the stress. My easy Christmas cake decorating ideas will transform your festive baking from daunting to delightful. I’ve simplified the process through many trial-and-error seasons, focusing on achievable techniques that deliver professional-looking results, even if you’re decorating your first Christmas cake.
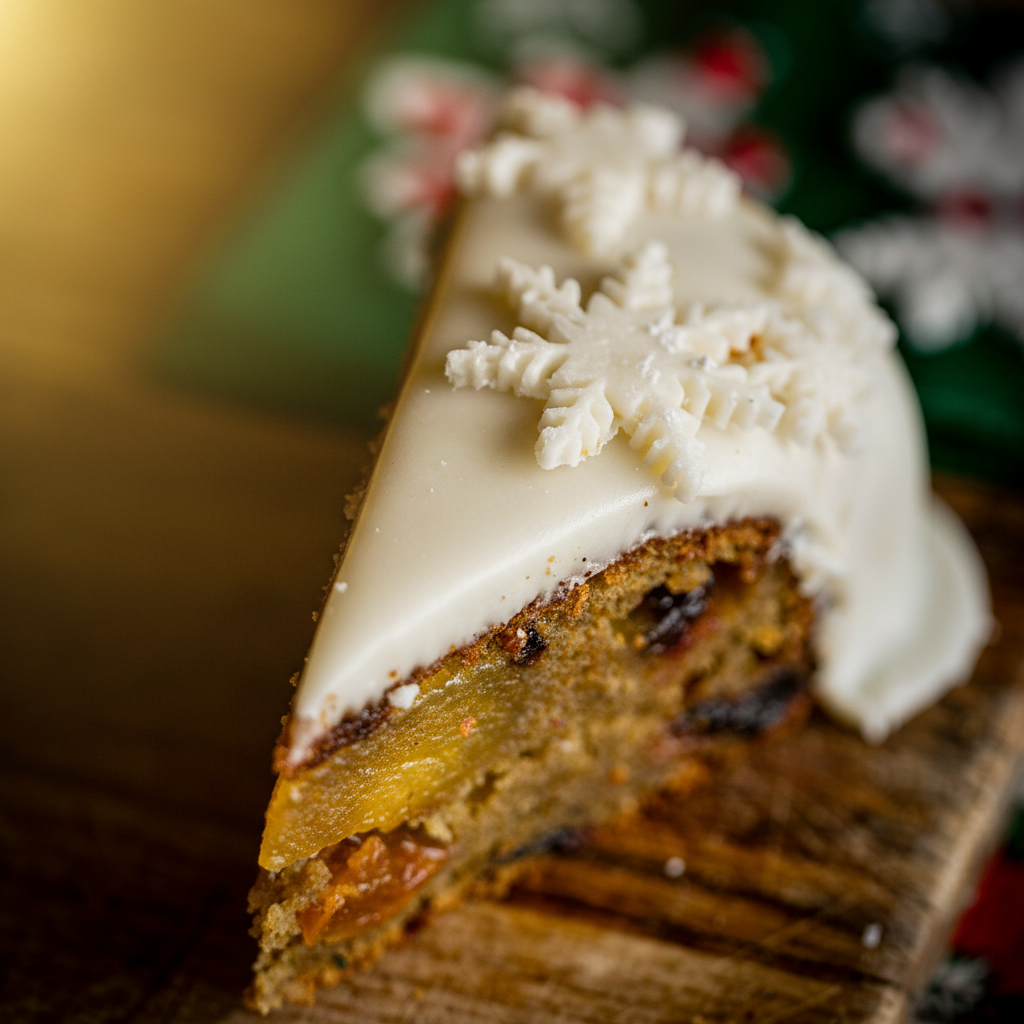
- Visual target: Smooth, pristine fondant with elegant festive accents
- Essential tool: Fondant smoothers for professional-looking finishes
- Time-saver: Pre-made decorative elements that look handcrafted
Table of Contents
Table of Contents
Simple Christmas Cake Decoration
A stress-free guide to elegantly decorating a Christmas fruit cake using marzipan, fondant, ribbons, and festive toppers, perfect for home bakers seeking beautiful results without intricate skills.
PREP TIME
20 mins
20 mins
COOK TIME
0 mins
0 mins
TOTAL TIME
20 mins
20 mins
Servings: 1 x 20 cm / 8 inch cake
Course: Snack
Cuisine: British
Calories: 450
🥄 Ingredients
- 1 x 20 cm / 8 inch Christmas fruit cake
- 4 tablespoons smooth apricot jam (60 ml)
- 1 roll golden marzipan or natural marzipan (approx. 500 g / 17.6 oz)
- 2 rolls white fondant icing (approx. 500 g / 17.6 oz each, total 1 kg)
- 2 tablespoons confectioners' sugar, sifted (15 g)
- Snowflake cutters
- Green ribbon (20 mm / 3/4 inch wide)
- Optional: Green ribbon (40 mm / 1 1/2 inch wide)
- Green mini Christmas trees
- Optional: Mixed color mini Christmas trees
👩🍳 Method
- Place the Christmas fruit cake on a cake stand or plate.
- Heat the apricot jam in a microwave for 15-30 seconds or in a small saucepan for 30-60 seconds until smooth. Stir well.
- Using a pastry brush, brush the warm apricot jam evenly all over the top and sides of the cake.
- Unroll the marzipan and carefully place it on top of the cake. Smooth it down all over, using the marzipan wrapper to prevent sticky fingers. (Pro Tip: Using ready-rolled marzipan simplifies this step!)
- Flatten any lumps or folds of marzipan around the sides of the cake.
- Use the rounded handle-end of a table knife to gently push the marzipan in where the cake meets the stand, then carefully cut off any excess.
- Unroll one roll of fondant icing and place it over the marzipan-covered cake. Smooth it down and cut off any excess as you did with the marzipan. (Pro Tip: Ready-rolled icing is a great time-saver!)
- Wrap a single layer of the green ribbon (20 mm / 3/4 inch wide, or the optional 40 mm / 1 1/2 inch wide) around the base of the cake. Cut the ribbon 1-2 cm (0.4-0.8 inches) longer than the cake’s diameter and secure it with a small piece of tape.
- Unroll the second roll of fondant icing onto a work surface lightly dusted with confectioners’ sugar.
- Using snowflake cutters (prepare about 8-10 snowflakes using 3 different sizes from the fondant).
- Arrange the cut snowflakes artfully on one side of the cake, securing each with a tiny blob of apricot jam.
- Arrange the miniature Christmas trees on the other side of the cake (use 3 different sizes for visual interest). Secure each tree with a small blob of apricot jam.
- The cake is now ready to be presented and served.
- Remove the ribbon and miniature trees before slicing and serving the cake.
- Remove the ribbon and miniature trees before slicing and serving the cake.
Notes: Use smooth apricot jam (without bits); plum jam or marmalade can be substituted. One roll of marzipan is usually enough; use two for a thicker layer. If feeding the cake with liquor, wait 2 days after the last feeding before marzipaning and icing. Store the decorated cake by wrapping it with baking parchment and foil, then placing it in a cake tin in a cool room. It will last 3-4 weeks. Remember to remove trees before storing.
Why Simple Christmas Cake Decorating is Best
When I started my Christmas cake journey, I attempted intricate royal icing designs that left me frustrated and my kitchen looking like a snowstorm hit it. That’s when I had my eureka moment: simplicity creates the most stunning holiday cakes. Simple decorations allow the cake’s rich flavors to shine while still creating visual impact. They’re also more practical – elaborate decorations can be fragile and difficult to transport or store.
I’ve discovered that guests appreciate clean, elegant designs more than overly complicated ones that look impressive but are challenging to cut and serve. Plus, simpler decorations are more timeless and sophisticated, making your cake suitable for any festive gathering, from casual family dinners to more formal holiday parties.
The beauty of simple decorating is that it’s more forgiving of imperfections. A minimal approach means fewer opportunities for mistakes and less stress when something doesn’t turn out exactly as planned. I remember the year I abandoned my complex snowflake piping design for a simple white fondant with silver ribbon – it was not only easier but received more compliments than any previous cake!
Essential Tools for Easy Cake Decoration
Through years of Christmas baking, I’ve learned that having the right tools makes all the difference between frustration and success. You don’t need a professional kit – just a few key items that I’ve found indispensable after many holiday seasons.
For smooth fondant application, invest in a fondant smoother and non-stick rolling pin. These two tools transformed my decorating process from tedious to enjoyable. A sharp craft knife (used exclusively for food) helps create clean edges, while a set of basic smoothing tools helps achieve those professional-looking finishes that once seemed impossible in my home kitchen.
For measuring, I rely on a fondant measuring tape – a game-changer I discovered after years of uneven coverage. Other essentials include: a turntable (even an inexpensive one makes covering your cake significantly easier), food-safe brushes for applying edible glues and dusts, and a good offset spatula for applying marzipan or buttercream undercoats.
Storage containers for your decorations will save much heartache – I learned this the hard way after finding my handmade decorations crushed the night before a family gathering. Finally, consider edible glue or royal icing as your ‘adhesive’ – they’re essential for securing decorations without slippage. I keep a small bottle of edible glue on hand throughout the holiday season for quick fixes.
Mastering Basic Marzipan and Fondant Application
The foundation of a beautifully decorated Christmas cake lies in properly applying your marzipan and fondant layers. After numerous cakes with bumpy surfaces, I’ve perfected a method that creates the smooth canvas you need for elegant decorations.
Begin with a level cake – trim if necessary. Warm apricot jam serves as an excellent adhesive for your marzipan layer. Apply it thinly but thoroughly across the top and sides of your cake. Roll your marzipan to about 5mm thickness on a surface lightly dusted with confectioners’ sugar. I’ve found that measuring the height and circumference of your cake, then adding an extra inch all around, gives you the perfect amount of marzipan to work with.
Lift the marzipan carefully using your rolling pin and center it on your cake. Work from the top down, smoothing gently with your hands first, then with a fondant smoother to eliminate air bubbles. Trim excess marzipan at the base using a sharp knife. Allow this layer to dry for 24 hours – a step I once skipped to my regret, resulting in a sweating cake with slipping fondant.
For fondant application, follow the same principles but roll slightly thinner (about 3-4mm). After placing it on your cake, work quickly to smooth from center outward. I gently lift and stretch the fondant around the sides rather than pressing down, which prevents folds and pleats. Patience is crucial here – rushing this step has ruined more than one of my holiday cakes. Allow your fondant to settle before adding decorations, giving you the pristine canvas that will make even simple decorations look spectacular. If you prefer an egg-free cake base to decorate, try an eggless Nutella cake.
Elegant Ribbon and Topper Techniques
Ribbons transform a simple cake into something special with minimal effort – a discovery that revolutionized my Christmas baking. Select food-safe ribbons in festive colors or metallics that complement your holiday table. I typically choose satin ribbons in 1-2 inch widths for the perfect proportion against a standard Christmas cake.
To apply ribbon without it absorbing moisture from the cake, I first wrap a strip of parchment paper around the cake’s circumference, then secure the ribbon over this protective layer. For a professional touch, secure ribbon ends with a tiny dot of edible glue rather than overlapping them, creating a seamless look that took me years to perfect.
For toppers, simplicity yields elegance. A single perfect holly sprig (artificial food-safe or real if properly cleaned), a cluster of sugared cranberries, or a miniature ornament creates a focal point without overwhelming. After experimenting with complex arrangements that toppled during transport, I’ve found that securing toppers with royal icing gives stability without compromising appearance.
Create dimension by layering different ribbon widths or combining matte and glossy finishes. One year when I ran short on ribbon, I discovered that braiding three thin strips created a beautiful textured effect that guests thought was intentional! Remember that less is more – a single exquisite topper with quality ribbon creates more impact than multiple competing decorations.
Creative Snowflake and Miniature Tree Placement
Snowflakes and miniature trees create a winter wonderland effect on Christmas cakes while being surprisingly simple to execute. After struggling with piped designs that required steady hands I don’t possess, I discovered that pre-made or easy-to-make decorations arranged thoughtfully create stunning results.
For snowflakes, I use either store-bought edible versions or make simple ones with white fondant and a snowflake cutter. The secret to professional-looking placement is asymmetry with purpose – I create a cascade effect starting from one side of the cake top and flowing downward. Adding edible pearl dust or a light dusting of edible glitter brings dimension that catches the light beautifully.
Miniature trees can be crafted from green-tinted fondant or marzipan shaped into cones, then textured with scissors or a small knife to create branch effects. I position these in varying heights, typically grouping three together (odd numbers create more visual interest – a tip I learned after many symmetrical, less impressive attempts). Dusting the trees lightly with confectioners’ sugar creates a fresh snowfall effect.
When arranging multiple decorative elements, I follow the designer’s rule of thirds, concentrating decorations in one area rather than spacing them evenly around the cake. This creates a focal point that draws the eye. The year I stopped trying to achieve perfect symmetry was the year my cakes began looking truly professional. For added dimension, I sometimes place tiny decorations on different levels using small fondant balls as hidden supports.
Pro Tips for a Flawless Finish
Over years of Christmas cake decorating, I’ve collected techniques that elevate amateur efforts to professional-looking results. The most transformative discovery was the importance of a perfectly smooth fondant surface as your starting point. I now dedicate time to this foundation, using fondant smoothers in gentle, circular motions rather than rushing through this crucial step.
For pristine edges where the fondant meets the cake board, I use a technique called ‘crimping under.’ After trimming excess fondant, I tuck the edge slightly under the cake using an offset spatula, creating a clean finish that looks intentional rather than messy. This simple step took my cakes from obviously homemade to potentially professional.
Color consistency matters tremendously. When using multiple decorative elements in the same color, make them all at once from the same batch of fondant or icing. The slight variation between batches becomes obvious when placed together – a lesson learned when my ‘white’ decorations ranged from cream to bluish-white in one disappointing Christmas cake.
I’ve also found that leaving some negative space creates elegance. Every inch doesn’t need decoration – restraint signals confidence. For truly spectacular results, I finish with a light dusting of edible luster dust in strategic areas, creating subtle highlights that catch the light beautifully. This final touch adds dimension without overwhelming the design, elevating simple decorations to something special.
Serving and Storing Your Masterpiece
After investing time creating a beautiful Christmas cake, proper serving and storage ensures it remains pristine until the moment of presentation. I learned this importance after watching a beautifully decorated cake collapse when moved improperly from refrigerator to table.
For serving, use a sharp knife dipped in hot water and wiped clean between cuts. This creates clean slices without dragging fondant or decorations. I place a small card beside my cake noting that any non-edible decorations (like ribbons or certain toppers) should be removed before slicing – a simple precaution that prevents embarrassment.
If you need to transport your cake, place it on a non-slip mat inside a cake box. For extra stability, I insert dowels through the cake into the board for long journeys – a technique adopted after a disaster involving a sloped road and a sliding cake.
For storage between decoration and serving, keep your cake in a cool, dry place away from direct sunlight or heat sources that could melt fondant or cause colors to fade. I use a large, clean cake box rather than plastic wrap, which can stick to decorations. If storing for more than a few days, place food-safe silica gel packets near (not touching) the cake to absorb moisture. When serving after storage, allow the cake to come to room temperature for the best flavor – the difference in taste between a cold and room-temperature Christmas cake is remarkable.
Troubleshooting Common Decorating Challenges
Every Christmas cake decorator faces challenges, and I’ve encountered most of them through years of holiday baking. Elephant skin – those wrinkles that develop in fondant – once ruined what should have been a perfect cake. I’ve since learned this happens when fondant dries too quickly. The solution: knead a tiny amount of vegetable shortening into your fondant before rolling and work in a room without drafts.
Bulging sides caused many tears before I discovered they result from filling or frosting being too soft or applied too thickly. Now I chill my cake after crumb coating and ensure fillings are properly set before applying fondant. When fondant cracks – another common frustration – I’ve found it’s usually because it’s rolled too thin or has dried out. I keep fondant covered with plastic wrap until the moment it’s needed.
Color bleeding from cake to fondant ruined one of my early attempts. The solution was simple but not obvious: a barrier layer of white chocolate ganache or marzipan between colored cake and white fondant prevents migration. For those disappointing air bubbles that appear mysteriously after perfect application, I keep a clean pin handy to prick them, then gently smooth the area with a fondant tool.
Perhaps the most common issue is fondant sticking to work surfaces. After trying various methods, cornstarch works better than confectioners’ sugar for preventing sticking without drying out the fondant. When decorations refuse to stick where placed, I abandoned commercial edible glues for homemade royal icing, which provides a stronger bond that sets quickly but gives a few moments for repositioning. If you’re converting recipes to be egg-free while troubleshooting, consult our flax egg recipe for reliable substitutes.
Seasonal Variations and Personalized Touches
The basic techniques for Christmas cake decoration can be adapted endlessly to reflect personal style or specific holiday themes. My family still talks about the year I created a cake celebrating our Scandinavian heritage, using simple blue and white decorations instead of traditional red and green – proof that breaking from convention can create memorable results.
Color schemes can transform the same decorating techniques completely. Beyond traditional Christmas colors, consider winter whites and silver for sophisticated elegance, deep burgundy and gold for opulence, or blue and silver for a frozen winter wonderland theme. I’ve found that limiting your palette to two or three complementary colors creates more cohesive, professional results than incorporating every festive shade. For a different holiday centerpiece, consider a complementary dessert such as a no-bake Nutella cheesecake.
Personalization makes cakes especially meaningful. One year I incorporated tiny fondant replicas of family heirloom ornaments around the cake’s base – a detail that touched my grandmother to tears. Family names, significant dates, or even inside jokes can be incorporated through fondant lettering or decorative elements. For children, I’ve added food-safe toy figures or created simple scenes that reflect their current interests.
Regional variations add unique character – incorporating local traditions or ingredients specific to your heritage creates talking points. When reflecting our time living in Germany, I added miniature fondant lebkuchen figures and marzipan stollen shapes as decorative elements, sparking conversations about holiday traditions around the world. The most successful decorated cakes tell a story or evoke emotion beyond simply looking beautiful – something I’ve found creates more memorable holiday celebrations.
Conclusion
My journey from Christmas cake decoration disasters to creating elegant festive centerpieces proves that anyone can master these techniques with the right approach. The secret isn’t artistic talent or professional training – it’s embracing simplicity and focusing on quality execution of basic techniques. When I stopped trying to compete with professional bakery displays and instead concentrated on clean lines, thoughtful placement, and quality materials, my cakes transformed.
Remember that the most beautiful Christmas cakes often feature the simplest decorations applied with care. A perfectly smooth fondant surface with a single, exquisitely placed decoration creates more impact than a cluttered design with multiple competing elements. Trust in the power of negative space and restraint – principles that took me years to appreciate.
Don’t be discouraged by initial attempts that don’t match your vision. Each cake teaches valuable lessons that improve your next creation. I keep a notebook of techniques that worked (and those that definitely didn’t), creating a personal reference that’s more valuable than any cookbook. The joy on my family’s faces when I bring out our Christmas cake makes every careful fondant smooth and ribbon adjustment worthwhile.
Most importantly, enjoy the process. Christmas cake decoration should be a pleasurable part of your holiday preparations, not another source of stress. With these accessible techniques and a focus on simple elegance, you’ll create cakes that become a cherished part of your holiday tradition – beautiful, delicious centerpieces that bring joy to your celebrations.
Love this recipe? Follow us on Facebook and Pinterest and explore more creative ideas on our food blog!
Frequently Asked Questions
How far in advance can I decorate my Christmas cake?
You can fully decorate a Christmas cake with marzipan and fondant up to a month in advance if stored properly. Apply the marzipan layer first, let it dry for 24 hours, then add fondant and decorations. Store in a cool, dry place away from direct sunlight in a cake box rather than plastic wrap (which can stick to decorations). For best preservation, avoid decorations that might bleed color or fresh elements that could deteriorate.
What are good substitutes for apricot jam in cake decoration?
Excellent substitutes for apricot jam include warmed honey (particularly clear varieties), quince jelly, or warmed and strained marmalade with the pieces removed. For darker cakes, seedless raspberry or blackcurrant preserves work well. In a pinch, you can also use a simple syrup made from equal parts sugar and water, boiled until the sugar dissolves. The key is choosing something sticky enough to act as an adhesive but not so wet that it softens your cake surface.
Can I decorate my Christmas cake without marzipan?
Yes, you can definitely decorate a Christmas cake without marzipan. Alternative bases include a layer of rolled fondant directly on a buttercream-covered cake, white chocolate ganache (which sets firm and provides an excellent smooth base), or even royal icing for a more traditional approach. If you’re skipping marzipan for allergy reasons, rolled fondant without almond extract works well. The key is ensuring you have a smooth, sealed surface before applying your final decorative layer.
What are the best types of ribbons for Christmas cake decoration?
The best ribbons for Christmas cake decoration are food-safe satin or grosgrain ribbons in 1-2 inch widths. Always place a strip of parchment paper between the ribbon and cake to prevent moisture transfer. Wired-edge ribbons hold their shape beautifully for bows. For food safety, use ribbons specifically labeled as food-safe, or remove them before serving. Metallic ribbons (gold, silver) offer elegance, while velvet ribbons provide rich texture. Always secure ribbons with a tiny dab of royal icing rather than pins.
How do I prevent fondant from cracking?
To prevent fondant from cracking, first ensure it’s properly kneaded until pliable and slightly warm from hand contact before rolling. Roll to about 3-4mm thickness – too thin fondant cracks easily. Work in a draft-free room at moderate temperature (fondant cracks in both very dry and very humid conditions). Before application, brush a thin layer of vegetable shortening on your cake surface. Handle fondant gently when placing on your cake, allowing it to drape naturally rather than stretching it. Finally, smooth from the center outward using fondant smoothers for even pressure.
What are some alternative simple toppers if I don’t want snowflakes or trees?
Beautiful alternatives to snowflakes or trees include: crystallized fruits (cranberries, orange slices) for a natural look; metallic or pearlized fondant baubles arranged in a small cluster; a simple fondant bow or ribbon rose; chocolate curls or shards brushed with edible gold or silver dust; a single perfect artificial poinsettia bloom; fondant stars in varying sizes; or even a small sprig of fresh rosemary dusted with confectioners’ sugar to resemble a frosty branch. Vintage brooches or Christmas ornaments (secured safely and removed before serving) also make stunning toppers.
How should I store a decorated Christmas cake to keep it fresh?
Store a decorated Christmas cake in a cool, dry place away from direct sunlight and heat sources. Use a dedicated cake box rather than plastic wrap, which can damage decorations. For cakes with fondant, avoid refrigeration as condensation forms when brought back to room temperature, causing colors to run and fondant to soften. If your climate is particularly warm, you can refrigerate briefly but allow several hours for the cake to return to room temperature before serving. Place food-safe silica packets near (not touching) the cake if storing for more than a week to absorb excess moisture.