No Egg Recipes – Delicious Cooking Without Eggs
Perfect Eggless Cookie Bars: A Foolproof Guide
Elsie's ultimate fail-proof eggless cookie bars, perfected over countless trials in her kitchen. Get 9 trusted tips for soft, chewy results every time. Bake a
After countless trials in my Castleton kitchen, I’ve finally perfected these eggless cookie bars that even the pickiest eaters can’t resist. When my daughter Molly was diagnosed with an egg allergy, I was determined to create treats she could enjoy without compromise. These bars deliver that classic cookie texture and flavor without a single egg in sight. The best part? They’re actually simpler to make than traditional drop cookies, requiring less fuss and delivering consistent results every time.
- Texture target: Soft centers with slightly crisp edges and no crumbly disasters
- Reliable swap: Simple pantry ingredients replace eggs while maintaining perfect moisture balance
- Make-ahead: Bars stay fresh for days and freeze beautifully for last-minute treats
Table of Contents
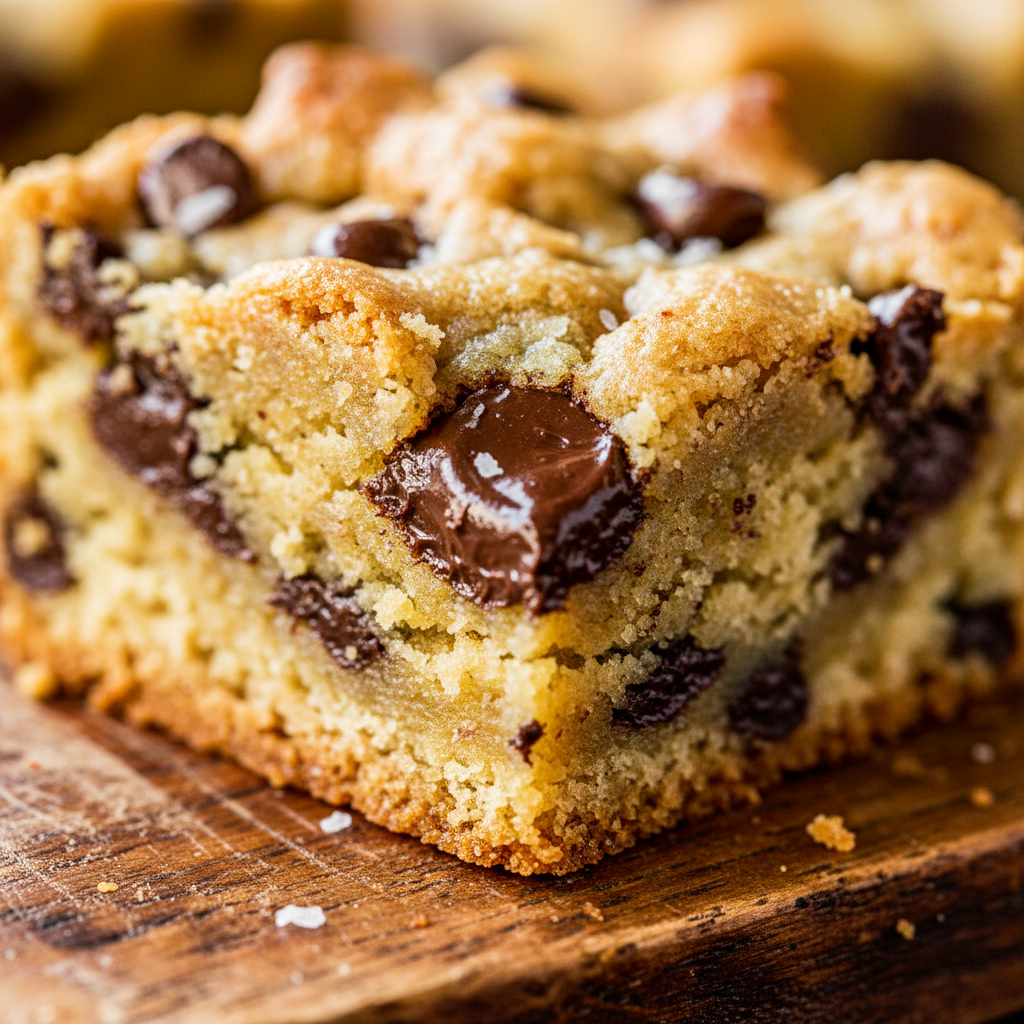
Eggless Chocolate Chip Cookie Bars
These delightful eggless chocolate chip cookie bars are incredibly soft, chewy, and packed with chocolatey goodness. Perfect for those with egg allergies or anyone looking for a quick, fuss-free dessert, this recipe guarantees a delicious treat every time. It's so easy, you'll be making these bars on repeat!
PREP TIME
10 mins
10 mins
COOK TIME
30 mins
30 mins
TOTAL TIME
40 mins
40 mins
Servings: 9–12 bars
Course: Snack
Cuisine: American
Calories: 485
🥄 Ingredients
- 2.5 cups (350 grams) all-purpose flour
- 1 teaspoon (6 grams) baking soda
- 1.5 teaspoons (6 grams) cornstarch
- 1 teaspoon (4 grams) salt
- 1 cup (230 grams) unsalted butter, slightly softened
- 0.5 cup (100 grams) granulated sugar
- 1 cup (200 grams) brown sugar
- 4 tablespoons (60 grams) plain regular yogurt
- 2 teaspoons (10 grams) pure vanilla extract
- 1 cup (200 grams) semisweet chocolate chips (or more or less to taste)
- Sea salt flakes (optional)
👩🍳 Method
- Preheat the oven to 350°F (175°C). Line a 9-inch x 9-inch (23 cm x 23 cm) baking pan with parchment paper, allowing the paper to extend above the walls of the pan for easy removal. Lightly spray with baking spray.
- In a medium bowl, combine the 2.5 cups (350 grams) all-purpose flour, 1 teaspoon (6 grams) baking soda, 1.5 teaspoons (6 grams) cornstarch, and 1 teaspoon (4 grams) salt. Whisk well and set aside.
- Using an electric hand mixer or stand mixer, beat the 1 cup (230 grams) unsalted butter, 0.5 cup (100 grams) granulated sugar, and 1 cup (200 grams) brown sugar on medium speed until the mixture is smooth and creamy, about 3 to 4 minutes. Scrape down the sides and bottom of the bowl as needed.
- Add the 4 tablespoons (60 grams) plain regular yogurt and 2 teaspoons (10 grams) pure vanilla extract to the butter mixture; mix until fully incorporated.
- Reduce the mixer speed to low, then gradually beat in the prepared flour mixture until just combined. Be careful not to overmix the dough.
- Stir in the 1 cup (200 grams) semisweet chocolate chips using a spatula or wooden spoon until they are evenly distributed throughout the dough.
- Scrape the cookie dough into the prepared baking pan and spread it into an even layer using the back of a spoon or your hands. If desired, sprinkle with more chocolate chips on top.
- Bake for 25 to 30 minutes, or until the edges are lightly golden and a toothpick inserted into the center comes out relatively clean (a few moist crumbs are okay). Do not overbake.
- Remove the pan from the oven and allow the bars to cool completely in the pan on a wire rack. Once cooled, use the parchment paper overhang to lift the entire slab of cookie bars out of the pan. Cut into 9 to 12 bars.
- If desired, sprinkle the finished bars with sea salt flakes before serving.
Notes: Allow the bars to cool completely in the pan for the neatest slices. A toothpick inserted into the center should come out relatively clean. Store leftovers in an airtight container at room temperature for up to 4 days, or freeze for up to 2 months.
Why You’ll Love These Eggless Cookie Bars
My journey to perfecting egg-free baking began out of necessity, but these bars have become a household favorite for reasons beyond allergy accommodation. The beauty of these cookie bars is their incredible versatility and foolproof nature. Unlike traditional cookies that can spread unpredictably, these bars maintain consistent texture from batch to batch. Discover tips for cookie perfection.
What makes these truly special is their texture – soft and chewy in the center with those slightly crisp edges that cookie lovers crave. I’ve had friends and family members who can eat eggs request these specifically because they’re just that good. Even my neighbor Martha, who’s quite the traditional baker, asked for the recipe after tasting them at our summer garden party.
For parents of kids with allergies like me, there’s also an emotional component – seeing Molly’s face light up when she can enjoy desserts alongside everyone else makes every experimental batch worth it. And for busy home cooks, the time-saving aspect is a genuine benefit – no scooping individual cookies or waiting between batches.
Pro Tips for Perfect Eggless Cookie Bars
After baking these bars weekly for nearly two years, I’ve discovered several techniques that elevate them from good to exceptional. First, don’t rush the butter and sugar mixing stage – cream them together until genuinely fluffy. This creates air pockets that help with rise and texture. Learn more about texture tips.
Temperature matters tremendously in eggless baking. Your yogurt or other liquid ingredients should be at room temperature to prevent the melted butter from solidifying when mixed. I learned this the hard way after several batches with mysterious butter chunks!
When spreading the dough in your pan, dampen your fingers slightly to prevent sticking. The dough should feel soft and slightly tacky but not wet or overly sticky. If it’s too dry, add a tablespoon of milk; if too wet, a touch more flour.
For that perfect balance of chewy center and crisp edge, the baking time is critical. You want to remove the bars when the edges look set but the center appears slightly underdone – it will continue cooking as it cools. In my oven, this sweet spot is usually around 22-24 minutes, but start checking at 20 minutes since ovens vary significantly.
Let the bars cool in the pan for at least 30 minutes before cutting. I know it’s tempting to dive in immediately (Molly certainly tries!), but patience rewards you with clean cuts and perfect texture.
Troubleshooting Common Baking Issues
Even with my tried-and-tested recipe, occasional challenges can arise. After dozens of batches and a fair share of mishaps, I’ve learned how to troubleshoot the most common issues with eggless cookie bars.
If your bars turn out too cakey, you’ve likely added too much leavening agent. Without eggs, the balance of baking soda and baking powder becomes more delicate. Start with less than you think you need – you can always adjust in future batches.
For bars that seem too dense or heavy, the culprit is usually overmixing. Once the flour is added, mix just until combined. I learned this lesson after an unfortunately brick-like batch I made while distracted by a phone call!
Crumbly bars typically indicate insufficient moisture or binding agent. If this happens, try increasing the yogurt or adding a tablespoon of milk next time. The batter should look soft and somewhat glossy before baking.
If the edges brown too quickly while the center remains underdone, your oven temperature may be too high. I recommend using an oven thermometer for accuracy – I discovered my oven runs 25°F hotter than the setting indicates, which was causing inconsistent results.
For bars that sink in the middle after cooling, you’ve likely underbaked them. The center should be set but still soft when you remove them from the oven – a toothpick inserted should come out with a few moist crumbs, not wet batter.
Creative Variations & Flavor Twists
The beauty of these eggless cookie bars is their adaptability. My family never tires of them because I’m constantly experimenting with new flavor combinations. Here are some of our favorites from countless kitchen adventures. Check out this oatmeal cookie recipe.
For a seasonal autumn treat, I reduce the chocolate slightly and add diced apples sautéed with cinnamon and a touch of maple syrup. The moisture from the apples creates an almost caramel-like effect around them as they bake.
During the holidays, white chocolate and cranberries transform these into festive treats. The tart berries balance the sweetness perfectly. I sometimes add orange zest to brighten the flavor profile even further.
For chocolate lovers like my husband, try a double chocolate version by replacing 1/3 of the flour with cocoa powder. The result is a brownie-cookie hybrid that disappears within hours of baking.
My daughter’s favorite variation includes a peanut butter swirl on top – simply warm some peanut butter until pourable, drizzle over the batter before baking, and swirl with a knife. The nutty flavor complements the chocolate beautifully.
For textural contrast, consider adding toasted nuts or even crispy cereal. My surprise hit was adding crushed pretzels to the batter and on top – the sweet-salty combination with that extra crunch was absolutely addictive.
Serving Suggestions & Storing Your Bars
These versatile eggless treats shine in multiple settings, from lunchbox surprises to elegant desserts. For everyday enjoyment, I cut them into generous squares and serve them as an afternoon pick-me-up with a glass of milk or cup of tea.
To elevate them for guests, I warm individual portions for about 15 seconds in the microwave, then top with a scoop of vanilla ice cream and a drizzle of warm caramel sauce. The contrast between warm cookie, cold ice cream, and buttery sauce creates a restaurant-worthy dessert that never fails to impress.
For picnics or packed lunches, I cut them smaller and layer them between sheets of parchment in an airtight container. They travel beautifully without crumbling or becoming sticky.
When it comes to storage, these bars actually improve over the first 24 hours as the flavors meld. Keep them in an airtight container at room temperature for up to 3 days. The texture stays remarkably consistent thanks to the moisture from the yogurt.
For longer storage, these freeze exceptionally well. I wrap individual pieces in parchment, then place them in a freezer bag. They’ll keep for up to 3 months. To enjoy, simply let them thaw at room temperature for about an hour, or microwave for 20-30 seconds for that just-baked warmth.
One of my favorite discoveries was that frozen pieces can be crumbled over ice cream for an impromptu cookie crunch topping – a tip I stumbled upon during one particularly hot Peak District summer day!
Dairy-Free and Gluten-Free Adaptations
After mastering the egg-free aspect of these bars, I turned my attention to making them accessible for friends with additional dietary restrictions. Through considerable experimentation, I’ve developed reliable adaptations that don’t compromise on taste or texture.
For a dairy-free version, replace butter with a high-quality plant-based butter stick (not spread). I’ve found that the brands specifically formulated for baking yield the best results. Coconut oil works in a pinch but produces a slightly different texture and adds a subtle coconut flavor.
Replace regular yogurt with any plant-based yogurt – coconut and almond-based varieties work particularly well. If using coconut yogurt, which tends to be thinner, reduce the amount slightly to avoid excess moisture.
For the chocolate, many dark chocolate varieties are naturally dairy-free, but always check labels. Several companies now make excellent dairy-free chocolate chips that melt beautifully.
When adapting to gluten-free, a one-to-one gluten-free flour blend with xanthan gum works remarkably well. Without eggs, gluten-free baking can become crumbly, so I add an extra tablespoon of yogurt to compensate.
The most successful fully allergen-friendly version (egg-free, dairy-free, and gluten-free) requires slightly more patience during baking. I reduce the oven temperature by 25°F and extend the baking time by about 5 minutes to ensure proper setting without drying out the edges.
The Science Behind Eggless Baking
Understanding the science of eggless baking transformed my approach from guesswork to precision. Eggs typically perform three critical functions in baking: they provide structure through protein coagulation, add moisture, and act as emulsifiers that bind water and fat.
In these cookie bars, we strategically replace each function. The protein structure comes partially from the flour and is enhanced by the yogurt’s protein content. This is why the type of flour matters – all-purpose flour with its moderate protein level creates the perfect chewy-yet-tender balance.
The moisture function is the easiest to replace. Both yogurt and brown sugar contribute significantly here. Brown sugar is hygroscopic, meaning it attracts and retains moisture, which is crucial for that soft, chewy texture we want in cookie bars.
The emulsification role is perhaps the trickiest to replicate. This is where proper mixing technique becomes essential. By thoroughly creaming the butter and sugar, we create an emulsion that can better incorporate the remaining ingredients.
Leavening works differently without eggs too. While eggs trap air during mixing and expand during baking, we rely more heavily on chemical leaveners. The acid in yogurt reacts with baking soda to create carbon dioxide bubbles that provide lift.
Temperature plays a fascinating role as well. Without eggs’ stabilizing proteins, the melting points of fats become more critical. This explains why chilling the dough before baking sometimes helps achieve better texture – it allows the fats to melt at the right moment during baking.
Conclusion
My journey into eggless baking began as a necessity for my daughter Molly, but it’s evolved into a passion that’s transformed how I approach all my baking. These eggless cookie bars represent more than just a recipe – they embody the belief that dietary restrictions shouldn’t mean compromise or exclusion from life’s sweet moments.
What I love most about sharing this recipe is hearing how it’s been adapted in other homes. One reader added chai spices for an aromatic twist, while another created a tropical version with dried mango and coconut. Each variation reminds me that good recipes are living things that grow and change as they move through different kitchens.
I encourage you to approach these bars with both precision and creativity. Follow the core techniques for that perfect texture, then make them your own with different mix-ins or toppings. And please, do share your experiences – the successes and even the mishaps. It’s through this community of sharing that we all become better bakers.
Remember that baking without eggs isn’t about limitation – it’s about discovering new paths to deliciousness. Whether you’re accommodating allergies, working with what’s in your pantry, or simply curious about egg alternatives, I hope these bars bring as much joy to your kitchen as they have to mine in our cozy Peak District home.
Love this recipe? Follow us on Facebook and Pinterest and explore more creative ideas on our food blog!
Frequently Asked Questions
Can you make cookie bars without eggs?
Absolutely! I’ve been making eggless cookie bars for years since my daughter’s allergy diagnosis. The key is using the right moisture and binding alternatives. In my recipe, yogurt provides moisture while helping ingredients bind together. The result is a bar that’s just as delicious as traditional versions, with that perfect chewy texture everyone loves.
How do you make cookie bars chewy?
The secret to chewy eggless cookie bars lies in three factors: using brown sugar for moisture retention, not overbaking (remove them when the edges are set but center still looks slightly underdone), and incorporating the right binding agent (like yogurt) to replace eggs. I also add a touch of cornstarch which helps create that soft, tender texture without drying out.
Should cookie bars be gooey in the middle?
Cookie bars should be soft and somewhat gooey when they first come out of the oven, but they’ll continue cooking and setting as they cool. For the perfect texture, look for edges that are golden and set, with a center that looks slightly underdone but not raw. After cooling completely, they should be chewy and moist in the center without being truly gooey or raw.
What can I use instead of egg in cookie bars?
My go-to egg replacement for cookie bars is plain yogurt (about 1/4 cup per egg). Other effective options include applesauce, mashed banana, flaxseed meal mixed with water (1 Tbsp flax + 3 Tbsp water), or commercial egg replacers. Each alternative brings slightly different properties – yogurt adds moisture without strong flavor, while banana adds sweetness and distinct taste.
How do you store cookie bars?
Store eggless cookie bars in an airtight container at room temperature for up to 3 days. Place parchment paper between layers to prevent sticking. For longer storage, wrap individual bars in parchment paper and place in a freezer bag for up to 3 months. Thaw at room temperature for about an hour or microwave for 20-30 seconds to enjoy that fresh-baked taste.
Do cookie bars need to be refrigerated?
Most cookie bars, including these eggless ones, don’t require refrigeration and actually maintain better texture at room temperature. The exception would be if you’ve added perishable toppings or fillings like cream cheese. In hot, humid environments, refrigeration can prevent spoilage, but bring them to room temperature before serving for the best texture and flavor experience.