No Egg Recipes – Delicious Cooking Without Eggs
Quick Dessert Recipes Microwave: The Ultimate Chocolate Mug Cake Guide
Craving a sweet fix? Discover Elsie's fail-proof chocolate mug cake perfected after 100s of tests. Get quick dessert recipes microwave solutions for any
Craving something sweet but don’t want to wait? My chocolate mug cake has become my go-to quick dessert recipes microwave solution after years of testing. I’ve perfected this single-serving treat through countless late-night experiments in my Peak District kitchen, learning exactly how to achieve that perfect balance of moist, fluffy cake in just minutes. No more disappointing, rubbery disasters – just consistent, delicious results every time you need a chocolate fix.
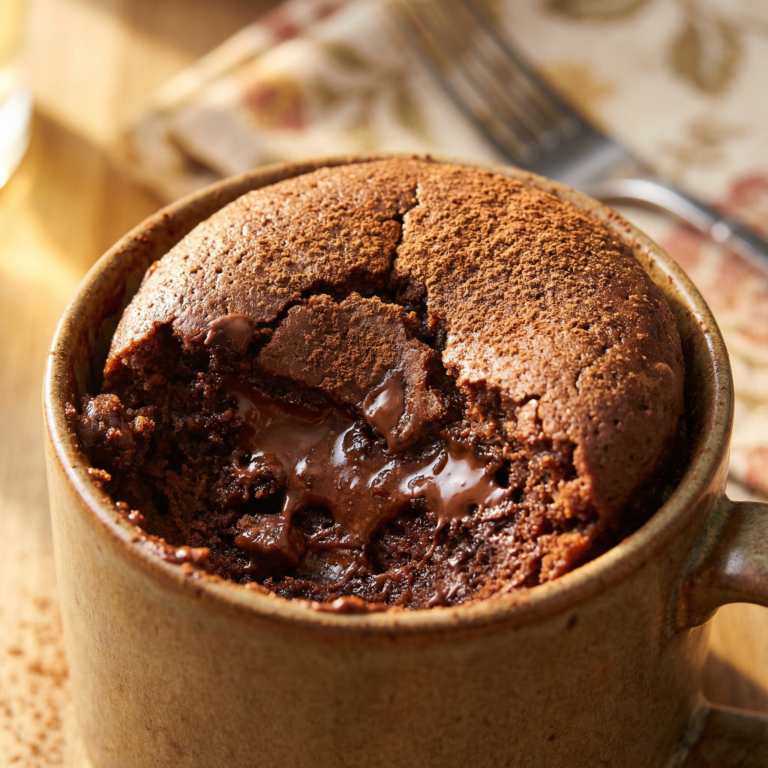
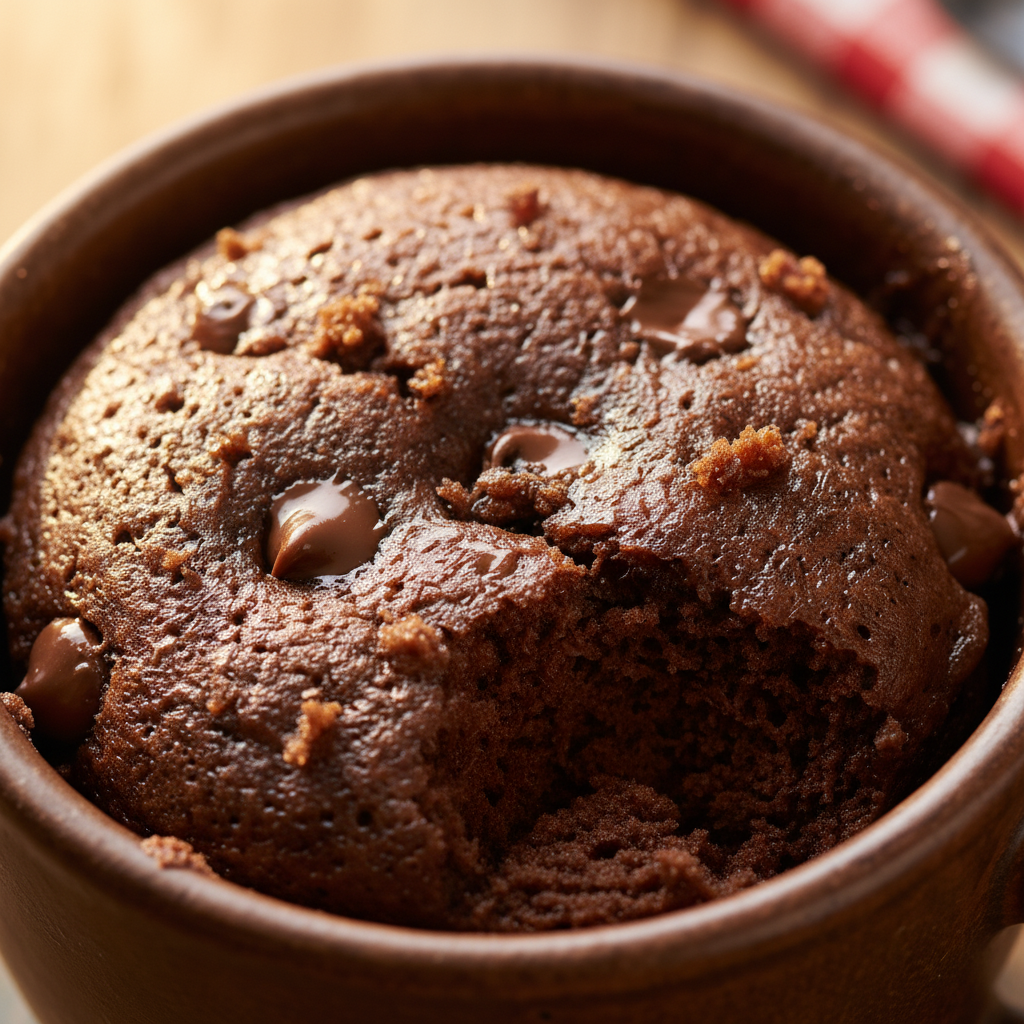
- Texture target: Moist, tender crumb with a slightly molten center
- Reliable swap: Olive oil instead of butter for a richer, never-dry result
- Make-ahead: Pre-mix dry ingredients in small jars for 60-second assembly
Table of Contents
Easy Microwave Chocolate Mug Cake
Satisfy your chocolate cravings in minutes with this simple, single-serving microwave chocolate mug cake. Perfect for a quick treat with minimal cleanup.
PREP TIME
5 mins
5 mins
COOK TIME
2 mins
2 mins
TOTAL TIME
7 mins
7 mins
Servings: 1 mug cake
Course: Snack
Cuisine: American
Calories: 603
🥄 Ingredients
- 30 g (1/4 cup) all-purpose flour
- 50 g (1/4 cup) white sugar
- 10 g (2 tablespoons) unsweetened cocoa powder
- 0.6 g (1/8 teaspoon) baking soda
- 0.6 g (1/8 teaspoon) salt
- 45 ml (3 tablespoons) milk
- 26 ml (2 tablespoons) canola oil
- 15 ml (1 tablespoon) water
- 1.2 ml (1/4 teaspoon) vanilla extract
👩🍳 Method
- Gather all ingredients and ensure your microwave-safe mug is ready.
- In a large microwave-safe mug, combine the all-purpose flour, white sugar, unsweetened cocoa powder, baking soda, and salt. Stir well with a small whisk or fork to break up any clumps.
- Add the milk, canola oil, water, and vanilla extract to the dry ingredients in the mug. Stir thoroughly until the batter is smooth and no dry pockets of flour remain, making sure to scrape the bottom.
- Place the mug in the microwave and cook on high power for approximately 1 minute 45 seconds. Cooking times may vary depending on your microwave’s wattage; start checking at 1 minute 30 seconds. The cake should be done in the middle and slightly springy to the touch.
- Carefully remove the mug from the microwave (it will be hot!) and enjoy your freshly made chocolate mug cake!
Notes: For a lighter version, use 22.5 grams (1.5 tablespoons) of unsweetened applesauce instead of canola oil, and 52 ml (3 tablespoons plus 1 teaspoon) of water instead of milk. Cook until just set in the middle; it will continue to cook slightly outside the microwave. Allow to rest for 1 minute before serving for the best texture.
Why This Microwave Chocolate Mug Cake Works
My journey to the perfect mug cake wasn’t without its hiccups. My first attempts were dense hockey pucks or erupting volcanoes that left my microwave splattered with chocolate. Through trial and error, I’ve discovered the science behind why this recipe consistently delivers.
The secret lies in precise ingredient ratios. Too much flour creates a dense, chewy cake while too little leaves you with chocolate soup. After testing dozens of variations, I found that using 4 tablespoons of flour to 3 tablespoons of liquid creates the ideal structure while maintaining moisture.
Another game-changer was understanding microwave heat distribution. Microwaves heat from the outside in, which is why many mug cakes end up with overcooked edges and gummy centers. My method incorporates a 10-second rest halfway through cooking, allowing the heat to distribute more evenly through the batter.
For egg-free baking (a necessity with my daughter Molly’s allergy), I discovered that a small amount of oil provides the necessary fat without the binding properties that can lead to rubbery textures when microwaved. This creates a tender crumb that rivals conventional cakes. If you’re interested in more egg-free options, check out the flax egg recipe for reliable substitutes.
Ingredient Notes & Smart Substitutions
Each ingredient in this mug cake serves a specific purpose. I’ve tested countless variations to understand how each component affects the final product, especially important when catering to my daughter’s egg allergy.
For the flour, all-purpose works perfectly, but for a gluten-free alternative, I’ve had excellent results with a 1:1 gluten-free flour blend containing xanthan gum. The cake loses a bit of structure but maintains its delicious taste and tender texture. If you’re looking for more recipes suited for gluten-free diets, be sure to explore this vanilla cake recipe.
Cocoa powder provides that rich chocolate flavor we all crave. Dutch-processed cocoa creates a deeper, more intense chocolate experience, while regular unsweetened cocoa works perfectly for a lighter flavor profile. After many tests, I’ve found that a tablespoon and a half is the sweet spot for chocolate intensity without bitterness.
Since we’re not using eggs, the liquid components become crucial. Milk provides moisture and helps activate the leavening agents. Dairy-free folks can substitute any plant milk – I particularly enjoy the subtle nutty note that almond milk adds. My daughter and I often use oat milk for its natural sweetness and creamy texture.
Speaking of sweetness, granulated sugar works well, but brown sugar adds a caramel-like depth that elevates the entire dessert. For a less refined option, coconut sugar creates a wonderful complexity, though it does slightly alter the flavor profile.
Oil is essential for creating that moist texture. While vegetable oil is neutral, a light olive oil adds a subtle richness that enhances the chocolate. In a pinch, melted coconut oil works beautifully, imparting a slight tropical note that pairs wonderfully with chocolate.
Essential Equipment for Your Quick Dessert Recipes Microwave Success
While microwave mug cakes are known for their simplicity, I’ve learned through many kitchen experiments that having the right tools makes all the difference between a mediocre snack and a truly satisfying dessert experience. For those interested in cookie recipes that don’t require eggs, you might find useful insights in this guide on cookies without eggs.
First, let’s talk about the mug itself. After several overflows and uneven bakes, I discovered that a wide, straight-sided ceramic mug with a 12-16 ounce capacity works best. The straight sides allow for more even cooking, while the larger volume prevents those frustrating spillovers. Glass mugs can work but tend to retain heat longer, potentially leading to overcooking.
I always recommend using a small whisk rather than a fork for mixing. This seemingly minor detail makes a significant difference in incorporating air into the batter and ensuring all ingredients are properly combined. When Molly helps me in the kitchen, she loves using the whisk to get that perfectly smooth batter.
A measuring spoon set is non-negotiable for consistent results. After ruining several cakes with eyeballed measurements, I’m now strict about using proper measuring tools. Even a small variance in flour or liquid can dramatically affect the texture.
While optional, a small offset spatula helps when adding fillings or toppings in layers. It’s perfect for creating that Instagram-worthy swirl of peanut butter or Nutella in the center of your cake.
Finally, keep a microwave-safe plate handy to place under your mug. It catches any potential overflow and makes cleanup significantly easier – a lesson I learned the hard way after spending too many evenings scrubbing my microwave turntable!
Pro Tips & Troubleshooting for a Perfect Mug Cake
Over years of mug cake experiments (and plenty of failures), I’ve developed solutions for every common issue you might encounter. Let me share my troubleshooting wisdom so you can avoid the same pitfalls.
If your cake turns out dry, you’re likely overcooking it. Microwaves vary dramatically in power, and even 10 seconds can make the difference between perfection and disappointment. Start with less time than you think you need – you can always add more 10-second intervals if necessary. My 900-watt microwave creates perfect results at 60 seconds, but yours might need adjustment.
For a gummy or dense texture, the culprit is usually overmixing. I made this mistake countless times before learning that gentle folding until ingredients are just combined produces the best texture. When my daughter Molly helps, I remind her that some tiny streaks of flour are actually preferable to overmixing.
Experiencing overflow? Your mug is likely too small or your leavening agent (baking powder) is too much. After cleaning chocolate from my microwave more times than I’d like to admit, I now ensure at least 1-2 inches of space remains at the top of the mug after adding all ingredients.
Uneven cooking – with gooey centers and overcooked edges – happens when microwave heat doesn’t distribute properly. My game-changing technique is to microwave at 50% power for a slightly longer time. This allows heat to penetrate more evenly instead of cooking the edges too quickly.
For the best texture every time, let your mug cake rest for 1-2 minutes after cooking. This allows residual heat to finish the cooking process gently while the structure sets. I know it’s tempting to dig in immediately (I’ve burned my tongue more than once from impatience), but this brief rest makes a noticeable improvement.
Creative Variations & Flavor Twists
Once you’ve mastered the basic chocolate mug cake, a world of flavor possibilities opens up. After countless kitchen experiments with my daughter Molly, these variations have become our favorites.
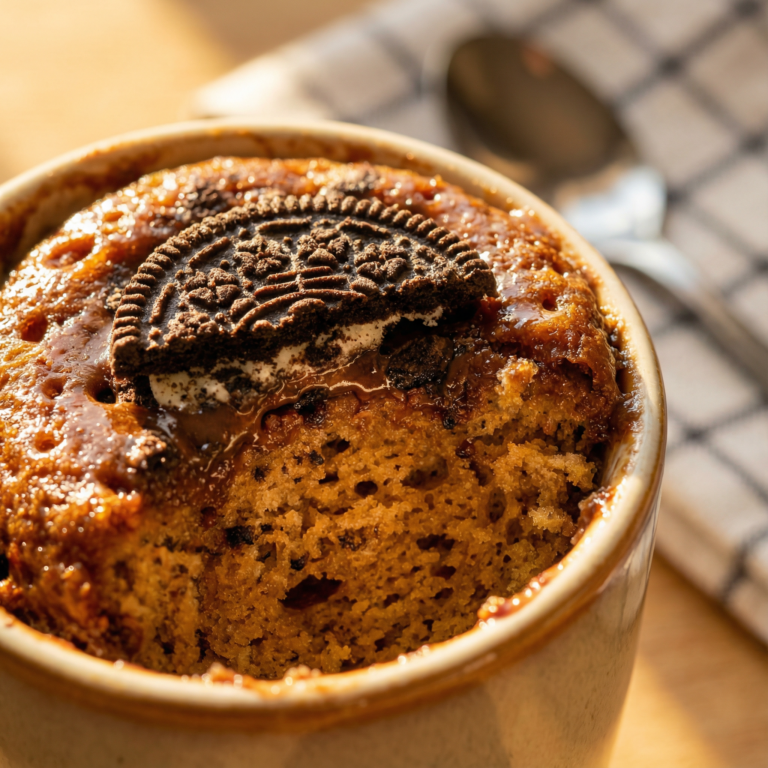
For a decadent upgrade, try the molten center approach. After adding half your batter to the mug, place a small piece of chocolate or a teaspoon of Nutella in the center, then top with the remaining batter. The result is a glorious molten center that flows when you dig in – a discovery that made Molly literally dance around our kitchen.
Cinnamon lovers can create a quick cinnamon roll inspired version by omitting the cocoa powder, adding a teaspoon of cinnamon to the batter, and creating a brown sugar cinnamon swirl to fold through. This has become our Sunday morning special when we’re craving something sweet but don’t want to wait for traditional cinnamon rolls.
For coffee enthusiasts, replace half the milk with strong brewed coffee and add a quarter teaspoon of espresso powder to the dry ingredients. This mocha variation intensifies the chocolate flavor while adding sophisticated depth.
Fruit additions bring freshness to balance the richness. Fold in fresh raspberries or a tablespoon of mashed banana before cooking. The banana adds natural sweetness and moisture, perfect when you’re looking to reduce added sugar.
My personal favorite is the maple walnut version. I replace the granulated sugar with pure maple syrup and fold in chopped walnuts for contrasting texture. The subtle earthiness of the maple complements the richness of the chocolate beautifully. You can discover additional tips in this Nutella cake guide that can elevate your desserts.
Serving Suggestions & Storage Tips
While a warm chocolate mug cake is delicious on its own, the right toppings and serving techniques can transform this quick treat into something truly special. After years of experimenting, I’ve discovered some winning combinations that elevate this simple dessert.
For a classic approach, top your warm cake with a scoop of vanilla ice cream. The contrast between hot and cold creates a sensory delight as the ice cream begins to melt into the cake. When Molly has friends over, I set up a mini topping bar with ice cream, whipped cream, and various sprinkles for personalized desserts.
Fresh berries add brightness and a touch of acidity that cuts through the richness. Raspberries and strawberries work particularly well, but during winter months, I use defrosted frozen berries with equally delicious results.
A drizzle of sauce takes your mug cake to the next level. Try warm caramel, chocolate ganache, or my personal favorite – a simple 2-ingredient raspberry sauce made by heating raspberries with a spoonful of jam until they break down.
Surprisingly, a small dollop of Greek yogurt works beautifully, especially with less sweet variations. The tanginess complements the chocolate and adds a creamy element.
While mug cakes are designed for immediate consumption, there are occasions when you might want to prepare in advance. You can mix the dry ingredients ahead of time and store them in small jars or containers. When the craving hits, simply add the wet ingredients and microwave. I often prepare several of these dry mixes on Sunday for quick weeknight treats.
If you somehow have leftovers, cover the mug with plastic wrap and refrigerate for up to two days. To reheat, microwave for 15-20 seconds. The texture won’t be quite as perfect as fresh, but it still satisfies a chocolate craving in a pinch.
Mastering Your Microwave for Best Results
Understanding your specific microwave is crucial for consistently perfect mug cakes. After moving to our cottage in the Peak District, I had to completely relearn my timings with our new microwave – what worked in my previous kitchen led to overcooked edges and undercooked centers in the new one.
First, know your microwave’s wattage, which typically ranges from 700 to 1200 watts. Higher wattage means faster cooking times. My 900-watt microwave produces perfect results in 60 seconds, but an 1100-watt model might need only 45-50 seconds. If you’re unsure of your microwave’s power, start with 45 seconds and add more time as needed.
Placement matters more than you might think. The center of the turntable typically receives the most even heating. When I place my mug slightly off-center, I often get uneven results with one side more cooked than the other.
Using the power settings on your microwave is a game-changer for mug cakes. I’ve found that cooking at 80% power for a slightly longer time creates more even results than full power for a shorter duration. This technique prevents the rubbery texture that plagued my early attempts.
For older microwaves with hot spots, consider the rotate-and-rest method. Cook for half the time, rotate the mug a half turn, then continue cooking. I discovered this technique after noticing that the back of my mug always cooked faster than the front.
Microwave-safe mugs make a difference too. Thick ceramic mugs retain heat better and help distribute it more evenly throughout the cake. Thin porcelain or glass can lead to overcooking because they don’t moderate the heat as effectively.
Finally, the microwave’s cleanliness affects performance. Food residue can absorb energy that should be directed at your cake. I do a quick wipe-down before making these treats to ensure optimal performance.
Making a Delicious Dessert in 10 Minutes
When time is short but the dessert craving is real, nothing beats the efficiency of a microwave chocolate mug cake. I’ve refined this process through countless late-night sweet tooth emergencies and unexpected dinner guests.
The beauty of this dessert lies in its simplicity. From the moment the craving hits to that first delicious bite, you’re looking at less than 10 minutes total. I’ve timed myself many times and can consistently have a warm, freshly-made cake ready in about 7 minutes from start to finish.
Organization is key to speed. I keep frequently-used ingredients like flour, sugar, and cocoa powder in easily accessible containers. Measuring ingredients directly over the mug saves both time and cleanup – a technique I perfected after many late-night cravings when I didn’t want to wake Molly with excessive kitchen noise.
Multi-tasking can further streamline the process. While the cake cooks, I quickly rinse the measuring spoons and prepare any toppings I plan to use. This means everything is ready the moment the cake is done.
For an even faster option on exceptionally busy days, I sometimes use the stir-and-microwave method. This involves adding all dry ingredients to the mug, followed by all wet ingredients, then quickly stirring just until combined. While the texture isn’t quite as perfect as when ingredients are properly creamed together, it saves a couple of minutes and still satisfies the craving.
The efficiency extends to cleanup as well. With just one mug and a few measuring tools to wash, you’re not facing a sink full of dishes like with traditional baking. This makes it perfect for those evenings when you want something sweet without the kitchen aftermath.
Tips for a Simple 3-Ingredient Cake Option
While my standard chocolate mug cake recipe produces fantastic results, I’ve developed an even simpler version for those moments when ingredients are scarce or time is extremely limited. After much experimentation, I’ve perfected a 3-ingredient approach that still delivers impressive results.
The foundation of this simplified version is pancake mix, which already contains most of the dry ingredients you need. Through trial and error, I discovered that 3 tablespoons of pancake mix combined with 1 tablespoon of cocoa powder and 3 tablespoons of milk creates a surprisingly delicious cake. The leavening agents already present in the mix eliminate the need for separate baking powder.
For the liquid component, milk works perfectly, but you can use any milk alternative. When Molly’s vegan friend comes over, we use almond milk with excellent results. The fat content in the milk helps create moisture without needing additional oil.
The cocoa powder is non-negotiable for a chocolate version, providing that rich flavor we all crave in a chocolate dessert. In a real pinch, I’ve used chocolate milk instead of regular milk and reduced the cocoa powder, though the flavor isn’t quite as intense.
The mixing technique becomes even more important with fewer ingredients. Stir just until the batter comes together – typically 15-20 strokes. Overmixing is especially problematic with this simplified version, leading to a tougher texture.
Microwave timing remains similar to the standard recipe, but watch carefully as the pancake mix can cook slightly faster. Start with 45 seconds and add more time if needed. I’ve found that this version actually benefits from slightly undercooking, resulting in a more pudding-like center that’s quite delightful.
While this 3-ingredient version won’t have the same depth of flavor as a more complex recipe, it’s perfect for emergencies or when cooking with young children. Molly could make this version by herself from age 8, giving her kitchen confidence and independence.
Quick Dessert Ideas for a 5-Minute Craving
Beyond the classic chocolate mug cake, I’ve developed several other microwave dessert options for those moments when you need something sweet with minimal effort. These 5-minute solutions have saved many evening cravings in our Peak District cottage.
For fruit lovers, a microwave berry crumble satisfies with minimal effort. Simply place a handful of fresh or frozen berries in a mug, top with a quick mixture of oats, a spoonle of flour, brown sugar, and a dot of butter. Microwave for 1 minute, and you have a warm, bubbling fruit dessert that tastes deceptively time-intensive.
Another quick favorite is the peanut butter mug cookie. Mix a tablespoon of peanut butter with a tablespoon of brown sugar and a few drops of vanilla, add a small egg yolk (or half a tablespoon of milk for egg-free), a pinch of salt, and just enough flour to create a dough consistency. Microwave for 45-60 seconds for a chewy, warm cookie experience. This has become Molly’s requested after-school treat.
For a lighter option, try microwaved stuffed apples. Core half an apple, fill with a mixture of oats, cinnamon, and maple syrup, then microwave for 2 minutes. The apple becomes tender while maintaining some texture, and the filling gets deliciously caramelized. It’s surprisingly elegant for such a quick preparation.
A microwave banana bread pudding takes just minutes but tastes like it took hours. Tear half a slice of bread into pieces in a mug, add half a mashed ripe banana, a splash of milk, a sprinkle of cinnamon, and microwave for about 1 minute until set. The result is comforting and feels much more indulgent than the effort would suggest.
Even a simple microwave chocolate sauce takes just 30 seconds to prepare and transforms any store-bought item. Combine chocolate chips with a splash of milk in a mug, microwave in 15-second intervals until melted, then drizzle over ice cream, fruit, or cookies for an instant dessert upgrade.
Conclusion
Creating the perfect microwave chocolate mug cake has been a journey of discovery in my Peak District kitchen. What started as a solution for quick dessert cravings has evolved into a repertoire of reliable recipes that satisfy both my family and unexpected guests. Through countless tests, spills, and occasional microwave disasters, I’ve refined these techniques to ensure you get perfect results every time.
Remember that the beauty of mug cakes lies in their adaptability. Don’t hesitate to experiment with the flavors and additions that speak to your personal preferences. Whether you’re accommodating dietary restrictions like my daughter Molly’s egg allergy or simply working with what’s in your pantry, these microwave desserts can be customized to suit almost any situation.
The most important lesson I’ve learned is that microwave baking, while different from conventional methods, doesn’t have to mean compromising on quality or taste. With the right techniques, ingredient ratios, and a little patience, you can create truly delicious desserts in minutes. These quick treats have changed my approach to weeknight desserts, allowing for spontaneity and satisfaction without the commitment of traditional baking.
I hope these recipes and tips inspire your own microwave baking adventures. There’s something magical about transforming simple ingredients into something warm, comforting, and delicious in just minutes. From my kitchen to yours, happy baking!
Love this recipe? Follow us on Facebook and Pinterest and explore more creative ideas on our food blog!
Frequently Asked Questions
What makes a microwave dessert quick and satisfying?
A quick and satisfying microwave dessert combines simple ingredients, proper measurements, and precise timing. The key is using ingredients that cook well in microwave conditions (like those with adequate moisture), measuring accurately to ensure proper cooking, and understanding your specific microwave’s power level. The most satisfying recipes often include textural contrast (like a slightly molten center in a chocolate mug cake) and intense flavors that develop quickly without lengthy baking. Proper mug size and shape also contribute significantly to success, with wide, straight-sided mugs producing the most even results.
How can I ensure my microwave mug cake cooks evenly?
To ensure even cooking, use a wide, straight-sided mug rather than a narrow, tall one, which allows better heat distribution. Position your mug in the center of the microwave turntable where heating is most consistent. Consider cooking at 80% power for slightly longer rather than full power, which reduces the risk of overcooked edges and raw centers. For particularly powerful microwaves, try the pause-and-stir method: cook for half the time, quickly stir the partially-cooked batter, then finish cooking. Finally, allow your cake to rest for 1-2 minutes after cooking to let residual heat complete the process evenly.
Are there healthy alternatives for microwave desserts?
Yes, several healthy swaps can make microwave desserts more nutritious without sacrificing taste. Replace refined flour with whole wheat or oat flour for added fiber. Substitute coconut or maple sugar for refined sugar, or try mashed banana or applesauce for natural sweetness. Greek yogurt can replace oil for moisture while adding protein. For chocolate mug cakes, use raw cacao powder instead of processed cocoa for additional antioxidants. Nut flours (like almond flour) can create grain-free options with healthy fats. Finally, incorporating fresh fruit as toppings or mix-ins adds natural sweetness, fiber, and vitamins.
What are the best toppings for a chocolate mug cake?
The best toppings create textural and flavor contrasts with your warm, rich chocolate cake. Classic options include a scoop of vanilla ice cream or freshly whipped cream, which melt beautifully into the warm cake. Fresh berries like raspberries or strawberries add brightness and acidity to balance the richness. Chopped nuts provide crunch and healthy fats. A drizzle of peanut butter, caramel sauce, or chocolate ganache adds decadence. For sophisticated flavor, try a sprinkle of flaky sea salt, a dusting of espresso powder, or a splash of liqueur (for adults). Even a simple dust of powdered sugar or cocoa can make the presentation more special.
Can I prepare microwave dessert batter ahead of time?
While microwave desserts are designed for immediate preparation, you can streamline the process by preparing components ahead of time. For mug cakes, pre-mix all dry ingredients and store them in airtight containers or small jars for up to 3 months. When ready to use, simply add the wet ingredients and microwave. The complete batter (wet and dry combined) isn’t ideal for storing as the leavening agents activate upon mixing with liquids. However, if necessary, complete batter can be refrigerated for a few hours, though the finished cake may be slightly denser than one made with fresh batter.
How do different microwave wattages affect cooking time?
Microwave wattage significantly impacts cooking time – higher wattage means faster cooking. A 1200-watt microwave might cook a mug cake in 45 seconds, while an 800-watt model could take 75-90 seconds for the same recipe. For optimal results, know your microwave’s wattage (usually listed on the door or back panel) and adjust accordingly. If a recipe specifies wattage, use this formula: multiply the recommended cook time by the recipe’s listed wattage, then divide by your microwave’s wattage. When unsure, start with less time and add additional 10-second increments until done. Higher-wattage microwaves also benefit from cooking at 70-80% power for more even results.
What is the secret to a perfectly moist mug cake?
The secret to a perfectly moist mug cake lies in several key techniques. First, include enough fat in your recipe – whether from oil, butter, or nut butter – as fat creates moisture and prevents rubbery texture. Second, avoid overmixing the batter, which develops gluten and results in toughness. Third, slightly undercook your cake, as microwaves continue cooking food after they stop due to residual heat. A cake that looks just barely set at the top will continue to cook to perfection during a 1-minute rest. Finally, include ingredients that add moisture, such as a small amount of yogurt, sour cream, or even grated zucchini or applesauce, which release water content during cooking.