No Egg Recipes – Delicious Cooking Without Eggs
Chocolate Mug Cake: My 5-Minute Perfected Recipe After Many Failed Attempts
After countless tries, Elsie perfected her 5-minute Chocolate Mug Cake. Get her trusted method for a moist, fudgy, egg-free treat every time. Discover the
After countless late-night chocolate cravings and even more microwave mishaps, I’ve finally perfected my chocolate mug cake recipe. What started as rubbery disappointments and overflowing messes has evolved into a reliable 5-minute dessert that satisfies my sweet tooth without fail. Through trial and error in my Peak District kitchen, I’ve discovered exactly what makes a chocolate mug cake rise beautifully, stay moist, and deliver that intense chocolate flavor we all crave when dessert urgency strikes.
- Texture target: Moist, fudgy center with a light cakey exterior
- Reliable tool: The perfect mug size and microwave timing for zero overflow
- Make-ahead: Dry ingredients can be pre-mixed and stored for instant satisfaction
Table of Contents
Ultimate Fudgy Chocolate Mug Cake
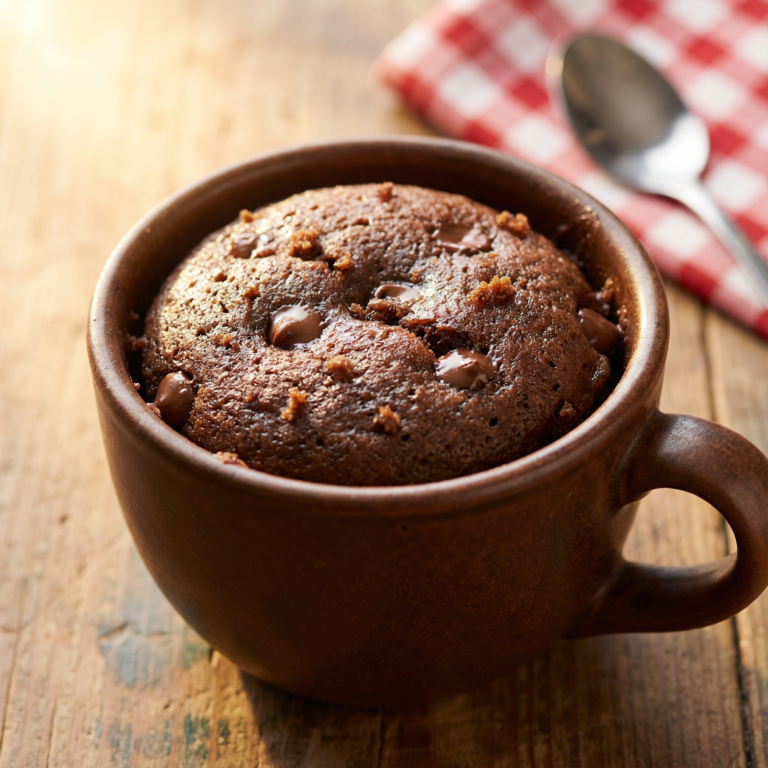
Satisfy your chocolate cravings in minutes with this incredibly easy, fudgy, and moist chocolate mug cake. Perfect for a single serving, this recipe uses common pantry staples and comes with tips for delicious variations and avoiding common pitfalls.
PREP TIME
4 mins
4 mins
COOK TIME
1 mins
1 mins
TOTAL TIME
5 mins
5 mins
Servings: 1 serving
Course: Snack
Cuisine: American
Calories: 363
🥄 Ingredients
- 3 tablespoons all-purpose flour (23 g)
- 2 tablespoons granulated sugar (25 g)
- 1 tablespoon unsweetened cocoa powder (7.5 g)
- 0.25 teaspoon baking powder (1 g)
- dash salt (0.5 g)
- 3 tablespoons milk (any kind of milk) (45 ml)
- 1 tablespoon canola oil (or melted vegan butter) (15 ml)
- 0.125 teaspoon vanilla extract (0.6 ml)
- 1 teaspoon vegan chocolate chips or your favorite flavor baking chips (5 g)
👩🍳 Method
- Lightly spray the bottom of a microwave-safe mug or coffee cup with cooking spray. Set aside.
- In the prepared mug, combine the all-purpose flour, granulated sugar, unsweetened cocoa powder, baking powder, and salt. Stir thoroughly with a fork until all dry ingredients are well combined and no lumps remain.
- Add the milk, canola oil (or melted vegan butter), and vanilla extract to the dry mixture in the mug. Stir carefully with the fork, scraping the bottom and sides, until the batter is smooth and no dry pockets of flour are visible.
- Gently stir in the vegan chocolate chips, or sprinkle them on top of the batter.
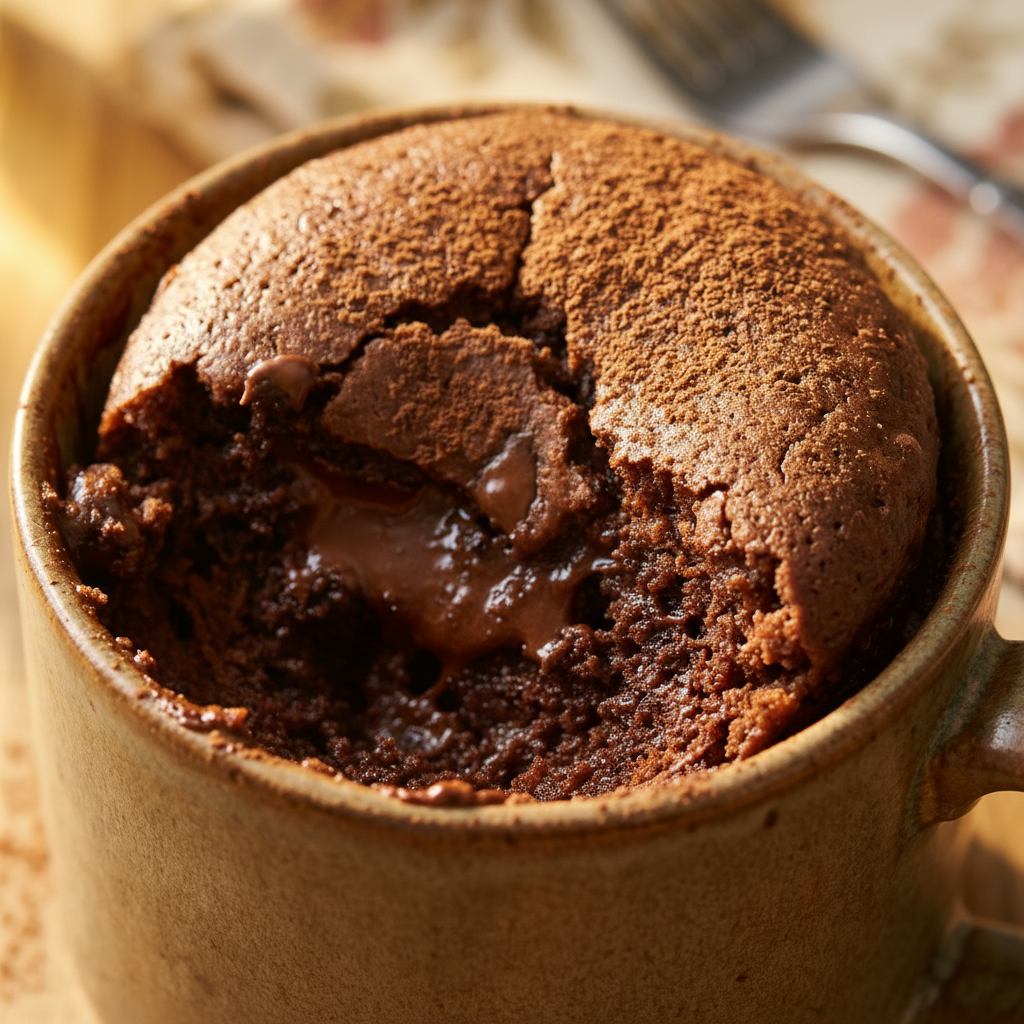
- Place the mug in the microwave. Cook on high for 70 to 90 seconds. The cake should be just set at the edges but still slightly gooey in the center for a fudgy consistency. (Note: Microwave times vary, so start with 70 seconds).
- Allow the mug cake to rest in the microwave for 1 minute after cooking. This helps it finish setting and prevents it from being too jiggly. Carefully remove from the microwave and enjoy warm.
- Serve immediately, perhaps topped with a scoop of vegan vanilla ice cream or a dollop of coconut whipped cream.
Notes: Microwave wattages vary; start with 70 seconds and adjust as needed. The cake is done when just set but still slightly moist in the center for a fudgy texture. Allowing it to rest for a minute in the microwave helps it set further. For a more intense chocolate flavor, use Dutch-processed cocoa powder.
Why This Recipe Works Every Time (and the Mistakes I Made So You Don’t Have To)
The journey to my perfect chocolate mug cake wasn’t without its disasters. My first attempts produced everything from rubbery hockey pucks to volcanic eruptions that left my microwave looking like a crime scene. The breakthroughs came when I finally understood the science behind microwave baking.
Most recipes fail because they use too much egg (making the cake rubbery) or too much baking powder (causing overflow). I discovered that just a pinch of baking powder gives the perfect rise without the mess. The oil-to-flour ratio is another critical factor – too much flour creates dryness, while too little leaves you with chocolate soup. For vegan alternatives, explore some effective egg substitutes.
I’ve also found that microwaving in 30-second increments, rather than one continuous cooking time, allows for more even heating. This prevents the dreaded rubbery edges with raw centers that plagued my early attempts. My daughter Molly, despite her egg allergy, can now enjoy this treat because I’ve eliminated eggs entirely without sacrificing texture.
The real magic happens when you let the cake rest for one full minute after microwaving. This resting period allows the residual heat to finish the cooking process gently, resulting in that perfect fudgy texture every single time.
Ingredient Notes & Smart Substitutions
The quality of your chocolate makes all the difference in this simple dessert. I use unsweetened cocoa powder rather than hot chocolate mix (which contains too much sugar and milk powder). Dutch-processed cocoa gives a richer color and smoother flavor, but regular unsweetened cocoa works perfectly well too.
For those watching calories, applesauce works surprisingly well as an oil replacement. The natural sweetness complements the chocolate, though the texture becomes slightly less decadent. Similarly, Greek yogurt can replace some of the milk for added protein and a subtle tanginess that balances the sweetness. For a delicious eggless cake alternative, check out my favorite recipe.
Sugar alternatives perform differently in microwave baking. Honey and maple syrup add moisture but can make the cake denser. Granulated stevia or monk fruit sweeteners work well for a low-carb option, though you’ll need about 25% less than the sugar amount as they’re significantly sweeter.
For gluten-sensitive bakers, a simple one-to-one gluten-free flour blend works beautifully. I’ve found that almond flour creates a richer, more moist cake but requires reducing the oil slightly. Oat flour lends a heartier texture and subtle nutty flavor that pairs wonderfully with chocolate.
Vanilla extract isn’t just a flavor enhancer, it actually amplifies the chocolate taste. In a pinch, a tiny pinch of instant coffee or espresso powder will achieve a similar flavor-boosting effect without adding any coffee taste.
Essential Equipment for the Perfect Mug Cake
While the beauty of a mug cake lies in its simplicity, a few equipment considerations can elevate your results from good to exceptional. First and foremost, the mug itself matters tremendously. Through countless trials, I’ve found that a 12-ounce ceramic mug with straight sides produces the most even cooking. The straight sides allow the cake to rise properly, while ceramic distributes heat more evenly than glass or metal.
A small whisk or fork is essential for proper mixing. Unlike traditional cakes where overmixing leads to toughness, mug cakes need thorough blending to avoid pockets of dry ingredients. I keep a dedicated small silicone whisk in my drawer specifically for mug cakes.
Measuring spoons are non-negotiable for consistent results. The difference between one tablespoon and one-and-a-half tablespoons of oil can mean the difference between fudgy perfection and greasy disappointment. When Molly and I make these together, I’ve taught her the importance of level measurements. Check out my mug cake technique for more tips.
Perhaps surprisingly, a small spatula can be incredibly useful. It helps scrape down the sides of the mug to ensure all ingredients are incorporated and prevents dry spots in your finished cake. This small detail makes a noticeable difference in texture consistency.
Finally, knowing your microwave’s wattage is crucial for timing adjustments. Most recipes are developed for 1000-watt microwaves. If yours is more or less powerful, you’ll need to adjust accordingly (I’ll cover specific timing tips in a later section).
Pro Tips for a Flawless Finish
After baking hundreds of mug cakes in my Peak District kitchen, I’ve collected some professional-level insights that transform this simple treat into something truly special. First, mix your dry ingredients separately before adding wet ingredients. This small step prevents those disappointing pockets of baking powder or salt that can ruin an otherwise perfect bite.
For an intensely chocolatey experience, bloom your cocoa powder by mixing it with a tablespoon of hot water before adding other ingredients. This technique, borrowed from traditional baking, awakens the complex flavor compounds in cocoa, creating deeper, more aromatic chocolate notes.
The order of ingredient addition actually matters. Add oil before milk to create an emulsion that traps air and creates a lighter texture. When I rush and dump everything together, the difference is noticeable, resulting in a denser cake.
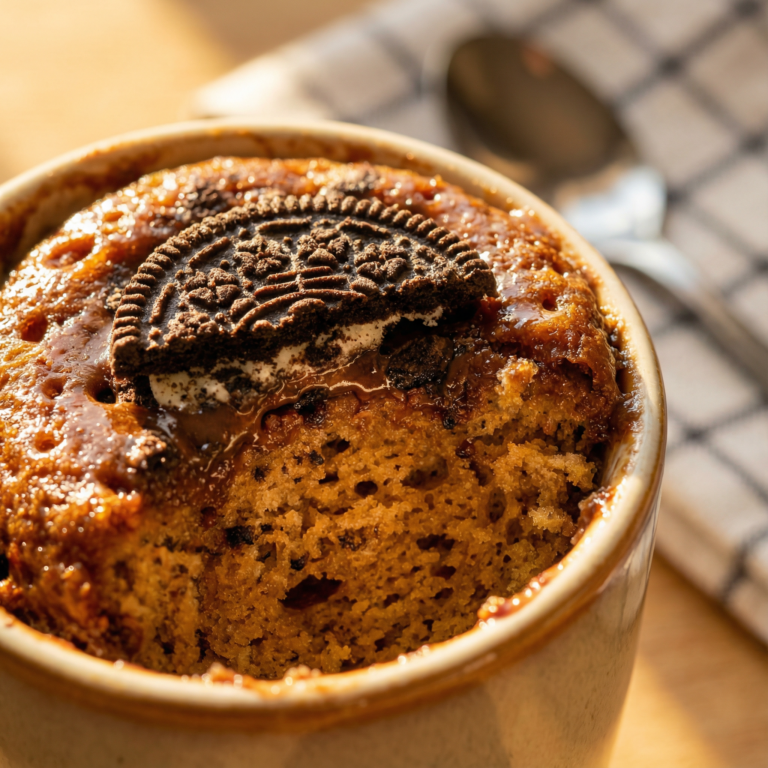
For a bakery-worthy presentation, sprinkle chocolate chips in two layers – some in the middle of the batter and some on top. The middle chips create pockets of molten chocolate, while the top ones create an appealing finish that looks intentional rather than last-minute.
When microwaving, place the mug slightly off-center on the turntable. This prevents potential hot spots in your microwave from affecting one side of the cake more than others. After cooking, that one-minute rest I mentioned earlier isn’t just for texture – it’s also the perfect time to add any temperature-sensitive toppings like a scoop of vanilla ice cream that will create an irresistible warm-cold contrast.
Creative Flavor Variations & Topping Ideas
The beauty of mastering a basic chocolate mug cake lies in the endless possibilities for customization. In my kitchen experiments, I’ve developed several variations that have become family favorites. For a Mexican-inspired treat, add a quarter teaspoon of cinnamon and a tiny pinch of cayenne to the dry ingredients. The warmth of cinnamon with the subtle heat creates a sophisticated flavor profile.
Fruit additions create delightful flavor combinations. Fresh raspberries or sliced strawberries folded into the batter just before cooking burst during heating, creating pockets of fruity brightness that contrast beautifully with the chocolate. For banana lovers, mash half a ripe banana into the wet ingredients for natural sweetness and moisture.
Nut butters transform both texture and flavor. A tablespoon of peanut butter added to the center of the batter before cooking creates a molten core that’s absolutely indulgent. Almond or cashew butter offer more subtle, sophisticated alternatives that Molly particularly enjoys.
For toppings, look beyond the obvious whipped cream and ice cream. Crushed cookies, toasted coconut flakes, or candied orange peel add textural contrast and complementary flavors. A tablespoon of warm cherry preserves spooned over the finished cake creates a black forest-inspired dessert in seconds. Take a look at my no-bake Nutella cheesecake for a rich chocolate option as well.
Don’t overlook the power of contrasting textures. A sprinkle of flaky sea salt on top cuts through the sweetness and amplifies the chocolate flavor. Cacao nibs add intense chocolate flavor with a pleasing crunch, while a drizzle of tahini brings unexpected nuttiness and visual appeal.
For special occasions, a splash of coffee liqueur or amaretto in the batter (reducing the milk accordingly) creates a sophisticated dessert worthy of company, proving that this humble cake can be elevated to impressive heights with minimal effort.
How to Prevent a Rubbery or Dry Mug Cake
The most common complaint about mug cakes is their tendency to become rubbery or dry, issues I battled persistently before perfecting my recipe. The primary culprit behind rubbery texture is overcooking. Microwave power varies significantly, and even 10 seconds too long can transform a tender cake into something resembling a rubber eraser. I’ve learned to undercook slightly, stopping when the center still looks a bit moist, as residual heat continues the cooking process.
Ingredient ratios play a crucial role in preventing dryness. The proper balance of wet to dry ingredients creates that perfect moist crumb we all crave. Too much flour absorbs moisture and leads to dryness, while insufficient fat fails to create the necessary tender structure. I measure carefully every time, even after years of making this recipe.
The mixing method also impacts texture significantly. Overmixing develops gluten, which creates chewiness, while undermixing leaves dry pockets. I’ve found that about 30 seconds of gentle but thorough mixing achieves the ideal consistency. The batter should look smooth but not aerated – tiny lumps are actually preferable to overmixing.
Microwave power settings offer another opportunity for texture control. Using 80% power extends the cooking time slightly but heats more gently, reducing the risk of toughness. In powerful microwaves, this technique has saved countless cakes from ruin.
If you discover your mug cake is consistently dry, try adding an extra teaspoon of oil or milk to your next attempt. Conversely, if rubberiness persists, reduce your cooking time by 5-10 seconds and ensure you’re not overmixing. These small adjustments make remarkable differences in the final product.
Adjusting Your Mug Cake for Different Dietary Needs
Living with Molly’s egg allergy taught me that dietary restrictions shouldn’t mean dessert deprivation. My standard mug cake recipe is already egg-free, which solves one common allergen issue. For those avoiding dairy, plant-based milk substitutes work beautifully with minimal recipe adjustments. Almond milk creates a lighter cake, while full-fat coconut milk delivers exceptional richness.
Creating a vegan chocolate mug cake requires replacing both dairy and ensuring your chocolate doesn’t contain milk solids. Plant-based milk and oil instead of butter work perfectly, while ensuring your cocoa powder is not processed with dairy (most pure cocoa powders are naturally vegan).
For gluten-free adaptations, a one-to-one gluten-free flour blend substitutes perfectly in this recipe. I’ve found that adding an extra teaspoon of milk helps counter the slightly higher absorption rate of most gluten-free flours. Almond flour creates a more dense, moist cake that many prefer, though it won’t rise as much as wheat flour versions.
Reduced-sugar options require thoughtful substitutions. Simply decreasing sugar often affects texture, so I recommend using a natural sweetener like mashed banana (which adds moisture and binding properties) or a measured amount of monk fruit sweetener, which bakes remarkably similarly to sugar.
For keto-friendly versions, almond flour or coconut flour can replace wheat flour, though coconut flour is highly absorbent and requires doubling the liquid ingredients. A granulated erythritol-based sweetener maintains proper texture while keeping carbs minimal.
With paleo requirements, coconut sugar or maple syrup work as sweeteners, while almond or coconut flour replaces grain-based flour. A tablespoon of almond butter improves binding in the absence of gluten, creating a satisfying texture despite the substitutions.
How to Get the Best Rise from Your Mug Cake
Achieving that perfect rise in a mug cake can be surprisingly technical, but after many flat failures, I’ve unlocked some reliable methods. First, container selection significantly impacts rise. A straight-sided mug with at least 1-2 inches of headspace above the batter allows for expansion without overflow. Tapered mugs often lead to uneven rising and potential spillover.
Fresh baking powder is absolutely essential. Unlike conventional ovens, microwaves give us just one quick chance for leavening action. I test my baking powder’s effectiveness by putting a pinch in warm water; if it fizzes vigorously, it’s still active. If the reaction is weak, it’s time for a new container.
Proper mixing technique creates the foundation for good rise. Mix wet and dry ingredients until just combined, being careful not to overmix, which deflates the tiny air bubbles that contribute to fluffiness. A common mistake is stirring too vigorously, which works for traditional cakes but hinders mug cake texture.
Microwave power and timing directly affect rise quality. Starting with 30 seconds, then adding 10-second increments until just set, prevents the deflating that comes with overcooking. In my trials, I’ve found that full power for a shorter time creates better rise than reduced power for longer periods.
The much-debated question of whether to include an egg significantly impacts rise. My egg-free version relies on the chemical reaction between baking powder, liquid, and acid (from the cocoa powder) for leavening. This creates a more tender crumb that, while it doesn’t rise quite as dramatically as egg-containing versions, avoids the rubbery texture often associated with microwaved eggs.
For maximum rise, ensure all ingredients are at room temperature. Cold milk or oil can inhibit the chemical reactions necessary for proper leavening. This small detail, which I learned after many mediocre attempts, makes a noticeable difference in the final height and texture.
Serving & Storage Tips for Leftovers and Make-Ahead Magic
While most mug cakes disappear immediately (the fate of virtually all test batches in my kitchen), occasionally you might find yourself with leftovers or wanting to prepare components ahead of time. For the rare leftover cake, allow it to cool completely, then cover the mug with plastic wrap. At room temperature, it will maintain reasonable quality for about 24 hours, though the texture gradually becomes more dense.
For make-ahead convenience, I often prepare dry ingredient mixes in small containers or zip-top bags. These pre-measured portions remain fresh for up to three months in a cool, dry pantry. When cravings strike, I simply empty the mix into a mug, add wet ingredients, and have dessert in minutes with no measuring required. This has been a game-changer for busy weeknights.
Surprisingly, mug cake batter can be refrigerated briefly before cooking. If dinner runs late or plans change, mixed batter can wait in the refrigerator for up to 2 hours. Just add 5-10 seconds to the cooking time to account for the chilled temperature. Beyond that timeframe, the baking powder will lose its effectiveness, resulting in a dense cake.
For serving, temperature timing matters tremendously. The ideal serving window is 2-3 minutes after cooking. This allows the molten center to set slightly while maintaining that warm, comforting quality that makes mug cakes so appealing. For a temperature contrast that elevates the experience, add cold ice cream or whipped cream just before serving.
When serving to guests, presentation transforms this humble dessert into something special. Transfer the cake to a small dessert bowl, dust with powdered sugar or cocoa, and add a mint leaf for color. No one will believe this impressive dessert took less than five minutes from start to finish.
For children’s parties or casual gatherings, setting up a mug cake station with pre-measured dry mixes and various toppings creates an interactive dessert experience that’s both fun and practical. This approach has saved me countless hours when hosting Molly’s friends for sleepovers.
Conclusion
Perfecting the chocolate mug cake has been a journey worth every failed attempt and microwave cleanup session. What began as a simple quest to satisfy late-night chocolate cravings has evolved into a reliable method for creating genuinely delicious, consistently successful desserts in minutes. The best part? This isn’t just quick convenience food, but a legitimately good cake that happens to be incredibly fast to make.
Throughout my recipe development process, I’ve kept Molly’s egg allergy in mind, proving that dietary restrictions never need to limit dessert enjoyment. Whether you’re making this for yourself as a well-deserved treat after a long day, sharing with a loved one, or teaching children the joy of simple baking, this recipe adapts beautifully to your needs.
The humble mug cake represents something I deeply value in home cooking, accessibility. It requires no special equipment, minimal ingredients, and just a few minutes, yet delivers that moment of pure pleasure that good food brings to our lives. In my Peak District kitchen and hopefully now in yours, this chocolate mug cake recipe stands ready to transform an ordinary evening into something a little bit special, one microwave minute at a time.
Love this recipe? Follow us on Facebook and Pinterest and explore more creative ideas on our food blog!
Frequently Asked Questions
How to make a chocolate mug cake in the microwave?
To make a chocolate mug cake in the microwave, mix the dry ingredients (flour, sugar, cocoa powder, baking powder, salt) in a microwave-safe mug. Add wet ingredients (milk, oil, vanilla) and stir until just combined. Microwave for 70-90 seconds on high power, stopping when the center is slightly underdone. Let stand for 1 minute before enjoying. For best results, use a straight-sided mug and don’t overmix the batter.
How to make a mug cake that has a perfect texture?
For a perfect mug cake texture, measure ingredients precisely, don’t overmix the batter (mix just until combined), and avoid overcooking. Microwave in 30-second increments, stopping when the center looks slightly underdone as it will continue cooking from residual heat. Using oil rather than butter creates moisture, while the right flour-to-liquid ratio prevents dryness. Let the cake rest for 1 minute after microwaving for the ideal fudgy consistency.
Can I make a mug cake with only 3 ingredients?
Yes, you can make a simplified chocolate mug cake with just 3 ingredients: 1/4 cup chocolate spread (like Nutella), 2 tablespoons self-rising flour, and 1 tablespoon milk. Mix thoroughly and microwave for 45-60 seconds. While this version works in a pinch, it won’t have the depth of flavor or perfect texture that comes with a few additional ingredients like cocoa powder and vanilla.
How long should I microwave a chocolate mug cake?
Most chocolate mug cakes need 70-90 seconds in a 1000-watt microwave. Start checking at 70 seconds; the cake should look set around the edges but slightly underdone in the center. Microwaving time varies based on wattage: for 700-800 watt microwaves, add 15-20 seconds; for 1200+ watt microwaves, reduce by 10-15 seconds. Remember that the cake continues cooking from residual heat after you remove it.
What are common reasons a mug cake might fail?
Common mug cake failures include: rubbery texture from overcooking or overmixing; dryness from too much flour or not enough oil/liquid; overflowing from too much baking powder or too small a mug; uncooked centers from insufficient cooking time or improper microwaving technique; and tough texture from developing too much gluten during mixing. Using old baking powder or incorrect measurements can also lead to dense, flat cakes that don’t rise properly.
How can I make my chocolate mug cake fudgier?
For a fudgier chocolate mug cake, slightly undercook it by reducing microwave time by 5-10 seconds. Add 1-2 teaspoons more oil and use brown sugar instead of white for extra moisture. Incorporate 1-2 tablespoons of chocolate chips into the batter before cooking. Replace 1 tablespoon of flour with cocoa powder for more chocolate intensity. Finally, allow the cake to rest for 1-2 minutes after cooking to achieve that perfect molten, fudgy center.
What substitutions can I use for a healthier chocolate mug cake?
For a healthier chocolate mug cake, replace oil with unsweetened applesauce or mashed banana for moisture without the fat. Use almond flour or oat flour instead of all-purpose flour for more nutrients and fiber. Substitute maple syrup, honey, or monk fruit sweetener for refined sugar. Greek yogurt can replace some or all of the milk for added protein. For extra nutrition, add a tablespoon of ground flaxseed or chia seeds, which blend seamlessly into the chocolate flavor.