No Egg Recipes – Delicious Cooking Without Eggs
Blueberry Crumb Bars: A Tried-and-True Home Recipe from Elsie Marlow
Bake Elsie Marlow's family-trusted Blueberry Crumb Bars. This fail-proof recipe ensures tender crumbs & juicy filling, perfect for any baker. Get Elsie's
I promise a reliably tender base, a juicy bright filling, and a sandy, buttery topping when I make Blueberry Crumb Bars in my busy Castleton kitchen. Over years of practice I learned how to coax the right texture from simple pantry staples so these bars come out with a tender crumb, no soggy center, and the scent of baking blueberries filling your kitchen.
- Texture target: sandy, slightly tender crust with a jammy filling
- Reliable swap/tool: best egg-free swap for binding when needed
- Make-ahead: freeze single layer, thaw and reheat gently
TOC
Table of Contents
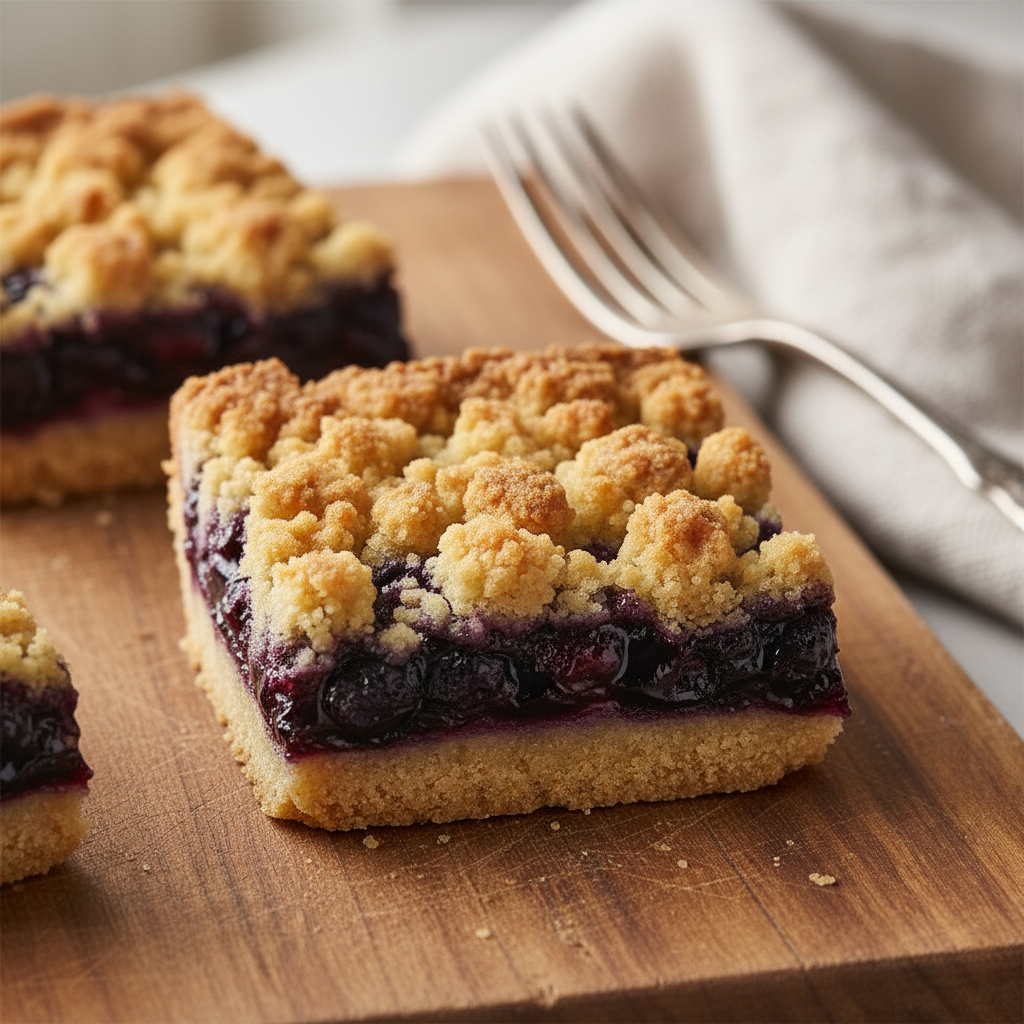
Homemade Blueberry Crumb Bars
Easy-to-make blueberry crumb bars featuring a buttery-sweet crust and topping, encasing a juicy blueberry filling. Perfect for home bakers looking for a reliable, fruit-based dessert.
PREP TIME
15 mins
15 mins
COOK TIME
45 mins
45 mins
TOTAL TIME
60 mins
60 mins
Servings: 15 bars
Course: Snack
Cuisine: American
Calories: 318
🥄 Ingredients
- 3 cups (380 g) all-purpose flour
- 1 cup (200 g) white sugar
- 1 teaspoon baking powder
- 0.25 teaspoon salt
- 1 pinch ground cinnamon
- 1 cup (226 g) butter-flavored vegetable shortening, softened
- 1 large egg
- 4 cups (600 g) fresh blueberries
- 0.5 cup (100 g) white sugar
- 3 teaspoons (9 g) cornstarch
👩🍳 Method
- Preheat your oven to 375 degrees F (190 degrees C). Lightly grease a 9×13-inch baking pan.
- In a medium bowl, combine the 3 cups all-purpose flour, 1 cup white sugar, and 1 teaspoon baking powder. Stir in the 0.25 teaspoon salt and 1 pinch ground cinnamon, if desired. Using a fork or pastry cutter, cut in the 1 cup butter-flavored vegetable shortening and 1 large egg until the mixture resembles coarse crumbs.
- Press half of the crumb mixture evenly into the bottom of the prepared 9×13-inch baking pan.
- In a separate bowl, whisk together the 0.5 cup white sugar and 3 teaspoons cornstarch. Gently mix in the 4 cups fresh blueberries until they are evenly coated. Spread the blueberry mixture evenly over the pressed crust in the baking pan.
- Crumble the remaining half of the dough mixture evenly over the blueberry layer.
- Bake in the preheated oven for approximately 45 minutes, or until the topping is golden brown and the blueberry filling is bubbly. Cool completely on a wire rack before attempting to cut into squares. Chilling for at least 2 hours, or overnight, makes for cleaner slices.
Notes: Allow the bars to cool completely before cutting to ensure clean slices and a set filling. For best results, chill them in the refrigerator for a few hours before slicing. Store cooled bars in an airtight container at room temperature for up to 2 days, or in the refrigerator for up to 1 week. They can also be frozen for longer storage.
Why These Blueberry Crumb Bars Are a Must-Try
I developed this version after dozens of experiments in my small Peak District home, learning to balance a crumbly topping with a stable, tender base and a juicy fruit layer that does not weep. These bars are an every-day treat, easy enough for a weekday bake and special enough for a picnic or summer dessert. They hit a sweet spot between snap and melt: the topping should break with a pleasant crumble while the base gives a little under the fork, and the filling should be glossy and fruit-forward rather than cloying.
My daughter Molly’s egg allergy shaped much of this journey. Early tests that relied on eggs left me chasing a texture that never quite matched what I wanted. Switching techniques taught me to use cold fats, the right sugar balance, and gentle handling so any baker can produce consistent results without complex techniques. That hands-on learning is baked into every tip in this post, so whether you want quick blueberry squares or a more refined lemon blueberry twist, you have a dependable path to follow.
Ingredient Notes & Essential Substitutions
Rather than listing amounts here, I will describe the role each component plays and practical swaps that preserve texture and flavor. Flour creates structure, but too much handling makes the topping tough, so mix just until it resembles wet sand, then stop. Butter-cold and cubed-gives the best flavor and the flakes that become the crumbly texture; vegetable shortening can help produce a sturdier crust for picnic desserts when temperatures are warm. Sugar sweetens and helps with browning; a portion of brown or muscovado-style sugar adds a toffee note that contrasts nicely with tart berries.
For egg-free baking, which I often do for Molly and for guests with allergies, a few swaps work well. If a recipe element needs binding, use a flaxseed egg or a small amount of aquafaba whisked until foamy. These are not always necessary in a crumb bar; often the right balance of fat and dry ingredients is enough to hold the base. For a gluten-free version, use a blend designed for baking that contains xanthan or guar gum for stability, and reduce handling to avoid crumbling into powdery pieces.
Essential substitution tips from the real kitchen: use fresh lemon zest or a splash of lemon juice in the filling to brighten the fruit, and if you must use frozen berries, do not thaw completely before folding them into your filling to reduce excess liquid. If you replace butter with a plant-based spread, chill thoroughly before using so the crumbs form properly.
Method Overview: Combine dry and cold fat until crumbly, press some crumb into the pan to form a base, add the fruit filling, then scatter remaining crumbs on top and bake until the filling is set and the top is golden.
Equipment for Perfect Bars
You do not need fancy tools to make great bars, but a few items make the process foolproof. A sturdy baking pan with straight sides helps produce neat bars. Use a bench scraper or the back of a spoon to press the base evenly into the pan without overworking the dough. A food processor speeds up the crumb-making stage, but you can achieve the same result by rubbing cold butter into the flour with your fingertips until it resembles wet sand. A spatula or offset palette knife helps spread the fruit layer without disturbing the base.
I rely on a shallow pan for the best ratio of crust to filling. A kitchen scale is my secret for consistent results across batches, particularly when I am swapping flours or fats. Finally, cooling racks are essential; letting bars cool briefly in the pan and then finish on a rack prevents condensation from softening the crust.
Pro Tips for Crumb Bar Success
These are the hands-on lessons I learned the hard way, condensed so you do not have to repeat my early mistakes. First, the tactile cues matter: the dough for crumbs should feel like wet sand, slightly clumpy but giving when squeezed. If it feels greasy, chill it briefly and work faster. When pressing the base, do so firmly and evenly but do not compact it to the point it turns dense. The top crumbs should be large enough to give a satisfying crunch, so avoid pulverizing everything.
Watch the filling for signs of readiness rather than relying on a timer. I learned that a filling that looks glossy and slightly set around the edges, not liquid and bubbling violently, keeps bars from becoming soggy. If your berries are particularly juicy, toss them with a spoonful of cornstarch or a little extra sugar to stabilize the juices. For perfectionists: chill the assembled pan briefly before baking to help the topping keep its texture while the filling heats through.
Other practical tips: rotate your pan halfway through bake if your oven has hot spots, use a light dusting of flour or cornstarch on frozen fruit to absorb excess liquid, and always test a small piece for doneness rather than relying solely on color. In my Castleton kitchen, I often test the center with a fingertip-if it gives slightly and is not sloshy, it will set as it cools.
Note: I recommend documenting your successes after many failures. A short kitchen notebook helps you track small changes that made the biggest difference, and sharing those wins builds confidence for less experienced bakers.
Flavor Variations & Dietary Adaptations
The basic form is a perfect canvas for variations. Add lemon zest to the filling for a bright lift, or fold in a small amount of vanilla for warmth. For a more complex bar, sprinkle a few oats or chopped almonds into the topping for extra chew and texture. If you want a citrus contrast, make a thin lemon curd layer under the berries, but keep that thin so it does not introduce too much moisture.
Dietary adaptations are straightforward. For dairy-free baking, use a cold, firm plant-based butter alternative and chill thoroughly. For egg-free baking, the crust and topping rarely need a binder, but if a recipe calls for an egg in the filling, replace it with aquafaba or a flaxseed mixture. For lower-sugar versions, reduce the sweetener in the filling slightly and add a bright acid like lemon to keep the flavor interesting. If you need gluten-free bars, use a tested gluten-free flour blend and be gentle when combining to avoid a mealy texture.
Serving Suggestions & Storage Tips
These bars are lovely warm or at room temperature. Serve them with a dollop of unsweetened yogurt or a scoop of vanilla ice cream for dessert, or slice them into squares for portable snacks and picnic desserts. For a teatime treat, dust lightly with powdered sugar just before serving.
Storage: once fully cooled, keep them in a single layer if possible, or separate layers with parchment to avoid smearing. They keep well at room temperature for a couple of days in a cool place, and longer if refrigerated. For longer storage, freeze in a single layer until firm, then stack with parchment between layers in an airtight container. Reheat gently from frozen in a low oven or allow to thaw at room temperature before serving. These bars travel well for family gatherings because the crumb topping maintains structure if not exposed to steam.
Common Crumb Bar Mistakes to Avoid
From my many tests I identified a set of repeatable errors and how to prevent them. Overworking the dough is the classic culprit, producing a tough base and topping. The remedy is simple: mix until the dry and fat components resemble wet sand, then stop. Too much liquid in the filling makes a soggy center; use a light thickener or slightly less fruit juice to stabilize the layer. Baking at too high a temperature can brown the crumbs before the center sets; moderate heat and watching visual cues are better than strict adherence to a time.
Another mistake is using fully thawed frozen berries without draining or tossing in absorbent starch. I learned this after a batch that looked perfect but collapsed into a syrupy mess. Now I fold those berries in while still partially frozen and toss them in a little starch. Lastly, do not skip the cooling step. Cut bars while warm and they will crumble; allow them to firm and the edges to set so you get clean slices.
Make-Ahead & Freezing Instructions
I often bake a double batch and freeze half for later. For best texture, freeze the bars in a single layer until solid, then wrap or transfer to an airtight container with parchment between layers. When you want to serve, thaw at room temperature or warm gently in a low oven for a few minutes to restore that just-baked aroma. If you plan to transport bars for a picnic, freezing briefly before packing helps prevent the crumbs from shedding and keeps a compact block that slices neatly on arrival.
Make-ahead tips from the real kitchen: assemble the base and crumbs, refrigerate, and add the fruit and top crumbs just before baking for fresher texture. Alternatively, bake fully and freeze finished bars if time is tight. Both approaches preserve the flavor; the first gives a slightly fresher crumb on the day of baking, the second is faster on busy mornings.
The Science of Crumb Bar Perfection
Understanding why these steps work helps you troubleshoot in the moment. Cold fat in the flour creates pockets that, when baked, produce a tender, flaky crumb. Overmixing warms the fat and allows gluten to form, which yields toughness. The balance of sugar and acid in the fruit filling controls gelation and flavor; sugar draws juice out of the berries, and a bit of acid helps the fruit retain brightness and prevents cloying sweetness. A small amount of starch binds extra juice so the filling sets without needing eggs.
Temperature control is about timing the top and center. If the top browns too quickly, the center may still be underdone; chilling the pan briefly before baking slows the topping from melting into the fruit, helping both elements finish at the same time. Cooling after baking completes the gelation of the filling, so patience is a functional part of the final texture. These are the practical pieces of food science I use every time I bake in Castleton, egg-free crumb guide.
Conclusion
I wrote this guide as Elsie Marlow, a home cook from Castleton in the Peak District, where quiet village life is the backdrop for my busy kitchen. My daughter Molly’s egg allergy sparked our journey into egg-free cooking, and what began as a challenge has become a joyful adventure of experiments and improvements. I share these tips so you can make dependable, delicious bars whether you are a beginner or a perfectionist.
To summarize, aim for a crumb that feels like wet sand, stabilize juicy berries as needed, and give your bars time to cool so the filling sets. Keep a short notebook of what works for you, celebrate small successes after many failures, and do not be afraid to adapt the recipe for seasonal fruit or dietary needs. These fruit bars are simple, versatile, and forgiving, and they reward a little patience with a really special result.
Thank you for baking with me. When you try this at home, notice the scent of baking berries and that little crackle when you cut into the topping. Those are the small signals that tell you a batch turned out well, and they are what I chase every time I turn on my oven in the village of Castleton. For more on aquafaba resources.
Love this recipe? Follow us on Facebook and Pinterest and explore more creative ideas on our food blog!
Frequently Asked Questions
Can blueberry crumb bars be made ahead of time?
Yes, you can assemble and bake the bars ahead, store them cooled in an airtight container for a few days, or freeze for longer. For best texture, freeze in a single layer then wrap with parchment between layers.
How do you store blueberry crumb bars?
Store fully cooled bars at room temperature in a single layer for a couple of days, or refrigerate for longer storage. Use parchment between layers to prevent sticking.
Are blueberry crumb bars healthy?
They are a treat that includes fruit, but like most baked goods they contain butter and sugar. You can reduce sugar slightly and use whole-grain or alternative flours for a more nutrient-dense version, while keeping hand-on adjustments in mind.
Can you use frozen blueberries for crumb bars?
Yes, frozen berries work well if you fold them in while still partially frozen and toss them in a little starch to absorb excess liquid, which helps prevent a soggy center.
What makes crumb bars taste crumbly?
The crumbly texture comes from cold fat cut into the flour and minimal handling. The mixture should resemble wet sand; overworking warms the fat and develops gluten which reduces crumble.
Can I substitute other fruits in crumb bars?
Absolutely. Raspberries, peaches, or mixed berries all work. Adjust thickener slightly for very juicy fruits and consider adding a citrus note to balance sweetness.
How do you keep crumb bars from getting soggy?
Use a light starch in the filling when fruit is very juicy, do not overfill, chill the assembled pan briefly before baking if your topping is soft, and allow the bars to cool completely before slicing to let the filling set.