No Egg Recipes – Delicious Cooking Without Eggs
High-Protein Cottage Cheese Breakfast Biscuits That Stay Moist and Fluffy
For high-protein cottage cheese breakfast biscuits. Elsie's tested recipe delivers moist, fluffy biscuits perfect for busy mornings. Developed through months
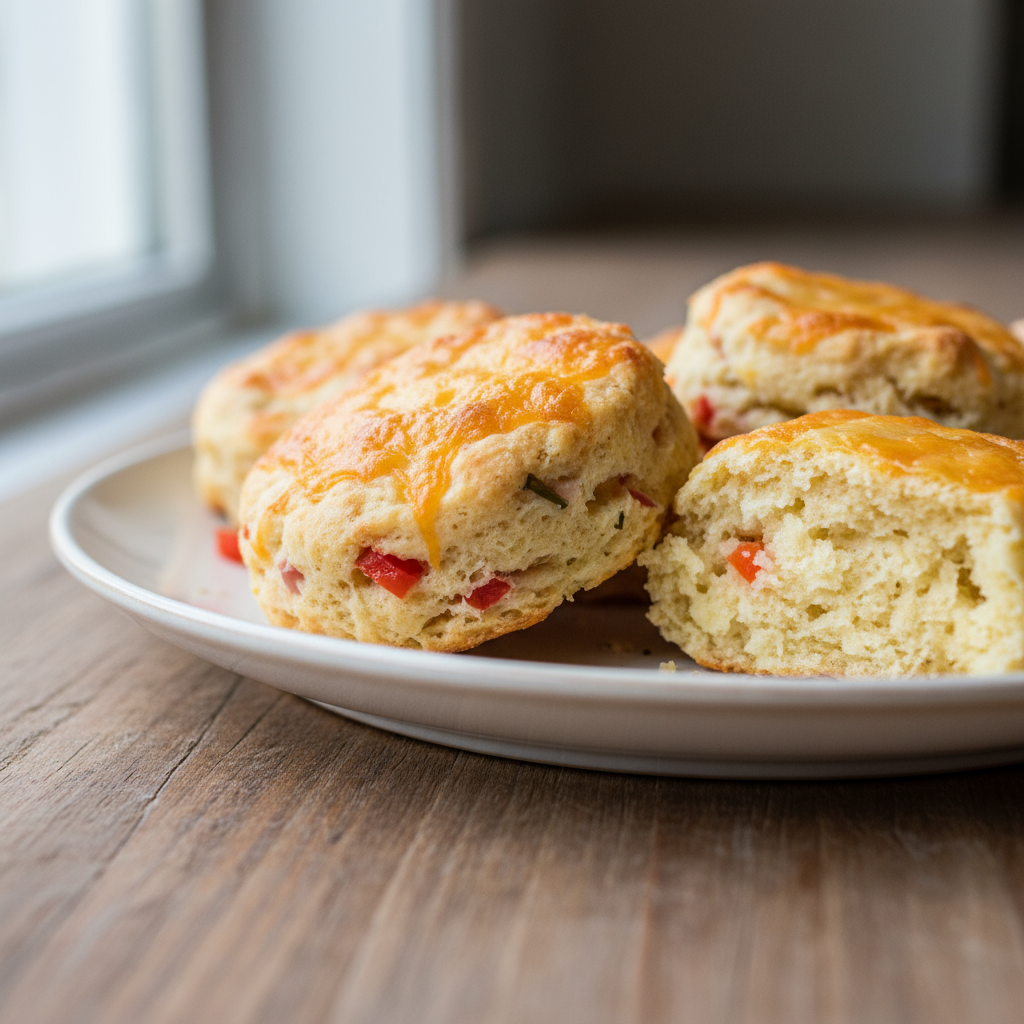
I am Elsie Marlow, a home cook from Castleton in the Peak District, and these high-protein cottage cheese breakfast biscuits are my answer to busy mornings that still deserve a proper, protein-rich start.
After months of testing, I landed on a reliable texture and flavor that holds up as a make-ahead sandwich base or a solo snack. You will get biscuits that are tender and golden with a fluffy interior, and a dough that should feel tacky but not sticky when you handle it.
- Texture target: tacky but not sticky dough, golden, fluffy interior
- Reliable swap/tool: full-fat small-curd or higher-fat cottage cheese for moistness
- Make-ahead: freeze single layer, reheat in a toaster oven or pan for best crust
Table of Contents
Table of Contents
High-Protein Cottage Cheese Breakfast Biscuits
Fluffy, savory biscuits packed with 15g of protein each, perfect for breakfast sandwiches or on-the-go mornings.
PREP TIME
20 mins
20 mins
COOK TIME
10 mins
10 mins
TOTAL TIME
30 mins
30 mins
Servings: 8 biscuits
Course: Snack
Cuisine: American
Calories: 240
🥄 Ingredients
- 1.5 cups (180 g) all-purpose flour
- 2 teaspoons (10 g) baking powder
- 1 teaspoon (6 g) sea salt
- 1.5 cups (340 g) 2% blended cottage cheese
- 4 oz (113 g) cheddar cheese, diced
- 1 tablespoon (3 g) fresh chives, diced
- 4 oz (113 g) turkey ham, diced
- ½ large (75 g) red bell pepper, diced
- 2 oz (57 g) shredded cheddar cheese
👩🍳 Method
- Preheat oven to 425°F (218°C) and line baking sheet with parchment paper.
- Add flour, baking powder, and salt to large mixing bowl and stir to combine.
- Add blended cottage cheese to flour mixture and stir with silicone spatula until shaggy dough forms.
- Add diced cheddar cheese, chives, turkey ham, and bell pepper to dough. Mix with hands until incorporated.
- Using ⅓ cup measure, scoop dough onto prepared baking sheet and gently press down.
- Top each biscuit with 1 teaspoon shredded cheddar cheese.
- Bake for 10 minutes or until golden brown.
- Remove from oven and cool for 5 minutes before serving.
Notes: Biscuits are done when tops are golden brown and bottoms sound hollow when tapped. Store in airtight container in refrigerator for 3-5 days or freeze for up to 3 months.
Why These Biscuits Work So Well
I developed these biscuits because I wanted a breakfast I could assemble quickly that still packed protein and stayed moist day after day. The combination of cottage cheese with a modest amount of flour gives structure without drying out the crumb, and a light hand when mixing preserves air for a tender crumb.
Over several months I learned to avoid overworking the dough, which was the main reason early versions were dense, and to choose a cottage cheese with enough fat to keep the interior soft.
Trust signals you can rely on: I failed repeatedly before success. Early batches were gummy because I used too-low-fat cottage cheese and too much liquid. Another set came out crumbly after I over-floured to compensate.
Those failures taught me which flour ratios and cheese styles to prefer, so the version I share here is the result of deliberate, repeated testing rather than a single experiment.
Ingredient Notes & Smart Substitutions
I spent many mornings testing different flour ratios and cottage cheese brands to find the balance between protein content and bake stability. I tried supermarket low-fat cottage cheese, a full-fat small-curd variety, and a local creamery’s richer curds.
The higher-fat small-curd options produced a noticeably softer crumb and better browning, while the low-fat jars needed more careful handling to avoid dryness. When I adjusted flour types, a small portion of a slightly stronger flour added structure without turning the biscuit into a dense puck.
If you need to adapt, prefer small-curd or full-fat curds for moisture; if you only have low-fat, reduce added liquid and be gentler with mixing.
For swap ideas without listing quantities, try a blend of plain whole-grain flour with all-purpose for added fiber, or use a light gluten-free flour mix if you require gluten-free results.
If you want to increase savory flavor without extra salt, fold in finely grated hard cheese or a pinch of smoked paprika. For egg-free binders when an egg is called for in other recipes, use aquafaba or a flaxseed slurry, both of which I have trialed while developing egg-free breakfasts for my daughter Molly’s allergy needs.
Essential Equipment You’ll Need
You do not need fancy tools to make these biscuits, but a few reliable pieces make the process repeatable. A sturdy mixing bowl and a bench scraper are useful for handling tacky dough without overworking it.
A baking sheet with good heat conduction helps achieve even browning, and a flat-bottomed measuring cup or your hands are fine for patting the dough into rounds. I avoid excessive rolling and prefer to pat to preserve air. A wire rack helps cool biscuits so the crust does not steam and soften.
Method overview: At a high level I fold cottage cheese into dry components until a cohesive, tacky dough forms, gently pat the dough into a slab, cut or scoop rounds, and bake until the exterior is golden and the interior springs back. That description is intentionally broad so you can apply it with your own pans and ovens without relying on exact temperatures or timings in this narrative.
Pro Tips for Perfect Biscuit Texture
My guiding rule: minimize handling. The goal is a dough that feels tacky but not sticky, so you can shape without it clinging to your palms. If it is sticky, a light dusting of flour on your hands is better than adding large amounts to the dough.
If it feels dry or crumbly, the cottage cheese you used may be too low in fat or the flour proportion is too high; gentle pressing and a little extra moisture can fix that. Use quick pulses if using a food processor, and stop when the mix just comes together.
Chilling the dough briefly can make cutting cleaner and promote better rise, but over-chilling can tighten gluten and yield a denser interior. I learned this the hard way after leaving dough in the fridge overnight and finding the biscuits had less lift.
For browning, make sure your oven rack and baking surface are prepped so heat hits the underside evenly. Avoid slicing or splitting warm biscuits right away; let them rest so the crumb sets and retains moisture.
Creative Flavor Variations
Once the basic formula is reliable, the biscuit acts like a blank canvas. For a savory turn, fold in finely diced ham and sharp cheddar for a classic ham and cheddar pairing that makes for excellent weekend brunch sandwiches.
If you prefer herby notes, fold in chopped chives, dill, or thyme with a little lemon zest. For a breakfast sandwich twist, add sautéed mushrooms and caramelized onions to a single biscuit split and toasted.
On sweeter days, a small amount of honey or maple syrup and a pinch of cinnamon creates a slightly sweet, tender biscuit that pairs beautifully with Greek-style yogurt or fruit compote.
I keep a few flavor mixes in labeled jars in the pantry so I can switch at will without changing the core method. When testing, I tracked each variation in a notebook so I could return to the exact mix that produced the best crumb and browning.
Make-Ahead & Freezing Strategies
Make-ahead planning is where these biscuits shine. I make double batches on a Sunday and freeze a single layer on a tray before transferring to a sealed bag or container. This prevents them from sticking together and preserves the crust.
For meal prep breakfast assembly, I slice and stack biscuits with ham and cheese, then wrap each sandwich for quick grab-and-go mornings. When I tested freezing, the version made with higher-fat cottage cheese consistently retained a moister interior after thawing and reheating.
To reheat, I prefer a toaster oven or skillet to revive the crust, but a microwave can do in a pinch for a softer result. If you are transporting them, wrap in foil once warm to keep heat and steam contained.
Label portions by date so you use the oldest batch first. These strategies helped me rescue many batches during development and cut down weekday breakfast time dramatically.
Dietary Adaptations for Allergies
My daughter Molly’s egg allergy pushed me to develop reliable egg-free breakfast options, and these biscuits are adaptable.
For dairy intolerance, complete dairy-free versions require replacing cottage cheese with a textured, high-protein alternative such as tofu blended with a bit of plant-based milk and a thickening agent. Bear in mind that replacing cottage cheese will change moisture and flavor, so trial and adjustment are necessary.
For gluten-free needs, use a multi-ingredient gluten-free flour blend known for baking, and expect the crumb to be slightly different in texture.
When adapting for allergies, make one small test batch first and document the result. I tested aquafaba and flax-based binders widely while building my egg-free repertoire.
Each swap added new variables – fat content, water absorption, and browning behavior – so a notebook and patience are your best tools. I also recommend labeling adapted batches clearly to avoid cross-contact in a busy home kitchen.
Common Biscuit-Making Mistakes
From my testing journal, the most common pitfalls are overworking the dough, using too-lean cottage cheese, and adding too much flour in an attempt to reduce stickiness. Overmixing develops gluten and yields toughness, while too-lean curds lead to dry, crumbly biscuits.
Another frequent error is handling warm biscuits too soon; cutting or splitting immediately after baking allows steam to escape and can leave the interior gummy or dense.
I overcame each of these through controlled experiments. For example, when a batch was gummy I traced it to a low-fat cottage cheese brand and insufficient flour balance. The correction was to use a richer curd and reduce liquid, plus pat instead of roll.
When biscuits crumbled, I reversed course and added a slightly stronger flour for structure while keeping mixing to a minimum. Those fixes turned repeated failures into consistent results.
Budget-Friendly Breakfast Solutions
Making these biscuits cost-effective is about buying smart and stretching portions. Use split packs of cottage cheese when on sale or try a local creamery’s family tub, which often gives better flavor per pound.
A modest blend of pantry flours can lower cost while still delivering texture. I keep a stash of plain, sliced ham or cooked legumes in the freezer to make sandwiches without daily shopping runs.
Batching also saves money – larger bakes use less fuel per biscuit, and freezing single portions reduces waste. When I was iterating recipes, cost-conscious swaps helped me hit both texture and budget targets.
Think of these biscuits as a base for many breakfasts: top with a slice of cheese, folded greens, or a spoonful of preserves, and you extend both budget and variety.
Perfect Pairing Suggestions
These biscuits pair beautifully with protein-forward fillings and bright, acidic sides. For savory breakfasts, try a warmed slice of ham and sharp cheddar, or a plant-based filling for a vegan-friendly option.
A spoonful of quick pickled vegetables or a smear of mustard cuts through richness and adds a fresh element. For lighter mornings, split a biscuit and add cottage-style yogurt and a berry compote for contrast.
I also like to serve them alongside a simple green salad or steamed greens to add color and fiber. For grab-and-go, wrap a biscuit around a folded portion of tofu scramble or a stack of thin ham slices and lettuce.
During testing I found that contrasting textures – crisp greens, creamy spreads, or sharp cheese – make each bite more interesting and help the biscuit feel part of a balanced meal.
Conclusion
Developing this recipe in a small Peak District kitchen taught me that reliable baking comes from iteration, patience, and careful notes. I am Elsie Marlow and I wrote these instructions with hands-on testing, specific failures, and eventual successes baked in.
The result is a workable, protein-forward biscuit you can make ahead, freeze, and use as the backbone of quick breakfasts. Remember the sensory checks: aim for a dough that is tacky but not sticky, and a finished biscuit that is golden brown with a soft, fluffy interior.
If your first batch does not match that image, revisit cottage cheese fat level and flour balance rather than simply adding more flour or overmixing. That approach turned many failures into a dependable weekday solution for my family, and I hope it helps you too.
Love this recipe? Follow us on Facebook and Pinterest and explore more creative ideas on our food blog!
Frequently Asked Questions
Can I make these biscuits dairy-free?
You can approximate the texture by using blended tofu or a high-protein plant-based cheese substitute, but expect differences in flavor and moisture. Test a small batch first and adjust binders and fat to avoid dryness.
How do I prevent sticky dough when making cottage cheese biscuits?
Aim for a tacky but not sticky feel by handling the dough minimally and using just enough flour to shape. If the dough is sticky, lightly dust your hands rather than adding large amounts of flour. If it remains gummy, check the cottage cheese fat level and reduce extra liquid.
What's the best way to reheat protein biscuits?
Reheat in a toaster oven or skillet to revive the crust; a microwave will warm quickly but yield a softer crust. For frozen biscuits, thaw briefly and reheat until heated through so the crumb regains its texture.
Can I freeze cottage cheese breakfast biscuits?
Yes. Freeze single layer on a tray first to prevent sticking, then transfer to an airtight bag or container. This preserves crust and crumb and makes grab-and-go breakfasts easier.
Are these biscuits suitable for weight loss diets?
They are higher in protein which supports satiety, but portion control and overall calorie balance matter. Using leaner cottage cheese can lower calories but may change texture, so adapt mindfully.
What can I use instead of ham in this recipe?
Try thinly sliced turkey, smoked tofu, cooked legumes, or a folded veggie scramble for meat-free options. Each will change flavor and moisture, so pair with a tangy or acidic condiment for balance.