No Egg Recipes – Delicious Cooking Without Eggs
Baked Pears with Goat Cheese, Honey, and Cranberries: A Simple Elegant Treat
Elsie's Fail-Proof Baked Pears with Goat Cheese, Honey, and Cranberries. Get 7 expert tips for tender, flavorful results, tested in a home kitchen. Discover
The first time I made baked pears with goat cheese, honey, and cranberries was for a small dinner party in our Peak District cottage. I needed something special yet simple after a hearty main course. The moment my guests took their first bites, conversation stopped, replaced by appreciative murmurs and requests for the recipe. That’s the magic of these baked pears: minimal effort with maximum impact. I’ve perfected this recipe through countless iterations in my kitchen, balancing the tender fruit with creamy cheese and sweet-tart flavors.
- Texture target: Pears tender but still holding their shape, with melty cheese and sticky-sweet honey
- Reliable tool: A melon baller for perfect, even cores that hold plenty of filling
- Make-ahead: Prepare up to 24 hours in advance and bake just before serving
TOC
Table of Contents
Baked Pears with Goat Cheese, Honey, and Cranberries
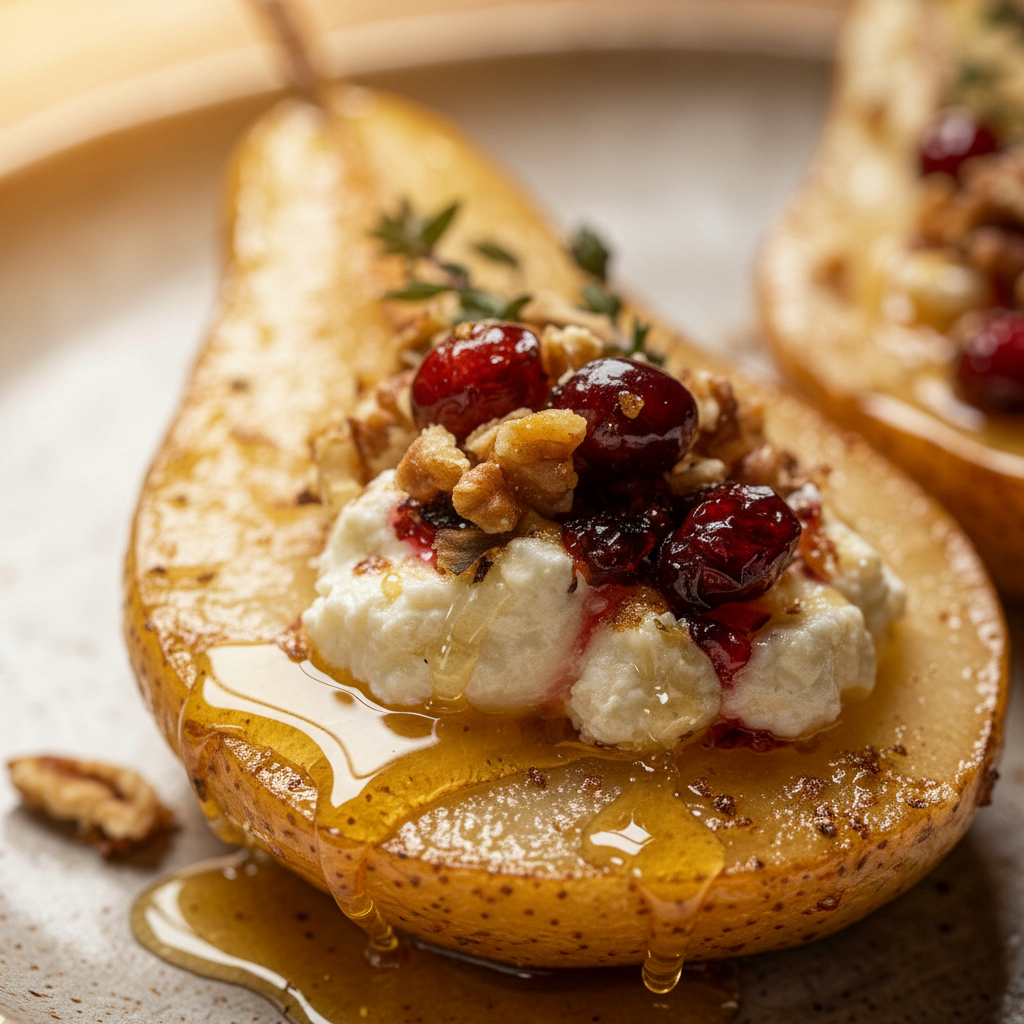
This elegant and easy-to-make dish features tender baked pear halves, topped with creamy goat cheese, tart dried cranberries, and a luxurious drizzle of golden honey. A delightful balance of sweet, savory, and tangy, perfect as a sophisticated dessert or a refined appetizer.
PREP TIME
15 mins
15 mins
COOK TIME
25 mins
25 mins
TOTAL TIME
40 mins
40 mins
Servings: 4 servings
Course: Snack
Cuisine: American
Calories: 210
🥄 Ingredients
- 2 ripe but firm Bosc or Anjou pears, 400 grams
- 2 tablespoons extra virgin olive oil, 30 ml
- 1/2 teaspoon ground cinnamon, 2.5 grams
- Pinch of ground nutmeg, 0.5 grams
- 1/4 cup goat cheese, crumbled, 60 grams
- 2 tablespoons dried cranberries, 20 grams
- 2 tablespoons honey, or maple syrup, 30 ml
- 1 tablespoon chopped walnuts or pecans (optional), 8 grams
👩🍳 Method
- 1. Preheat your oven to 375°F (190°C). Line a baking sheet with parchment paper for easy cleanup.
- 2. Wash the pears thoroughly. Carefully cut each pear in half lengthwise. Using a small spoon or melon baller, scoop out the core and any seeds from the center of each pear half.
- 3. Place the pear halves, cut side up, on the prepared baking sheet. Drizzle the pears with 2 tablespoons of olive oil, ensuring they are lightly coated. Sprinkle evenly with 1/2 teaspoon of ground cinnamon and a pinch of ground nutmeg.
- 4. Bake for 20-25 minutes, or until the pears are tender when pierced with a fork but still hold their shape. The cooking time will vary depending on the ripeness and size of your pears.
- 5. Remove the baking sheet from the oven. Evenly distribute 1/4 cup of crumbled goat cheese into the hollowed-out centers of the baked pears.
- 6. Return the pears to the oven and bake for an additional 3-5 minutes, or until the goat cheese is softened and slightly warm. Watch carefully to prevent the cheese from browning too much.
- 7. Once removed from the oven, immediately sprinkle 2 tablespoons of dried cranberries over the warm pears and goat cheese. The heat will slightly soften the cranberries.
- 8. Drizzle each pear half generously with 2 tablespoons of honey (or maple syrup). If using, sprinkle 1 tablespoon of chopped walnuts or pecans for added texture and flavor.
- 9. Serve warm as a delightful dessert or a sophisticated appetizer.
Notes: Pears should be ripe but still firm to hold their shape during baking. A fork should easily pierce the flesh when done, but the pears should not be mushy. Store any leftovers in an airtight container in the refrigerator for up to 3 days. Reheat gently in the oven or microwave.
Why These Baked Pears Are a Must-Try
In my village of Castleton, autumn brings a bounty of pears, and this recipe has become my signature seasonal offering. These sweet vessels filled with tangy goat cheese create a perfect balance that satisfies both dessert lovers and those who prefer a savory finish to their meal. What makes them truly special is their versatility. I’ve served them at casual Sunday lunches and elegant Christmas dinners alike, always to rave reviews.
The contrast of temperatures and textures is what elevates this simple dish. The warm, yielding pear against the melting cheese center, brightened by tart cranberries and drizzled with honey creates a multi-sensory experience that feels far more sophisticated than the effort required. And for someone like me who’s always cooking with dietary restrictions in mind (thanks to Molly’s egg allergy), it’s refreshingly simple to make something so elegant that naturally fits multiple dietary needs.
Ingredient Notes & Substitutions
The quality of each component truly matters in this simple recipe. For pears, I reach for Bosc or Anjou varieties, which hold their shape beautifully when baked. They should be ripe but still firm when gently pressed near the stem. If they’re too soft, they’ll collapse during baking; too hard, and they’ll remain tough even after time in the oven.
Fresh goat cheese (chèvre) provides that wonderful tangy creaminess, but if you’re not a fan, mascarpone offers a milder alternative with similar texture. Blue cheese creates an entirely different but equally delicious experience if you enjoy stronger flavors. For a dairy-free version that still delivers creaminess, I’ve successfully used cashew cream cheese for Molly’s portions.
Honey adds natural sweetness and creates that gorgeous glaze, but maple syrup works wonderfully for a vegan option or different flavor profile. I’ve found that a darker honey like heather honey (abundant here in the Peaks) adds more complexity than lighter varieties.
Dried cranberries provide those jewel-like bursts of tartness, but dried cherries, chopped dried apricots, or even pomegranate seeds can stand in beautifully. Each brings its own character to the dish. The freshness of thyme elevates everything with its subtle earthy notes, though rosemary or sage can create interesting variations.
Equipment Notes for Perfect Pears
After many attempts with various utensils, I’ve found that a melon baller is absolutely essential for creating perfectly even cavities in the pears. Before discovering this trick, I struggled with uneven cores and filling that would spill out during baking. The melon baller creates a neat hollow that holds just the right amount of cheese and cranberries.
A baking dish with sides is important to contain any juices that release during baking. I use a ceramic dish that’s just large enough to hold the pears without crowding them. This allows for even heat distribution and caramelization. If the pears are too close together, they steam rather than bake, losing that wonderful roasted quality.
Parchment paper isn’t strictly necessary but makes cleanup much easier, especially when the honey caramelizes. I learned this the hard way after spending far too long scrubbing my favorite dish after one particularly sticky batch. A small pastry brush works best for applying honey evenly both before and after baking, ensuring every bit of pear gets that sweet glaze.
Pro Tips & Troubleshooting for Baking Pears
The most common issue I’ve encountered is pears that turn mushy. This usually happens when they’re overripe to begin with. Test ripeness by gently pressing near the stem; you want a slight give, not softness. If your pears are slightly underripe, let them sit at room temperature for 1-2 days before baking.
If your cheese isn’t melting properly, it might be too cold when going into the oven. I let the goat cheese come to room temperature while preparing the pears, which helps it melt evenly during baking. Another option is to briefly warm the cheese mixture before filling the pears.
For perfectly caramelized pears, brush the cut surfaces with honey before baking. This creates that beautiful golden color and deepens the flavor. I learned this through trial and error after noticing that my earlier attempts lacked that gorgeous caramelization that makes them so visually appealing.
Keep a close eye on timing. The exact baking time varies depending on the ripeness and size of your pears. They should be tender when pierced with a knife but still hold their shape. I start checking at 25 minutes and sometimes need up to 35 minutes. If the tops are browning too quickly but the pears aren’t tender yet, loosely cover with foil for the remaining time.
Variations & Flavor Twists
While the classic combination of goat cheese, honey, and cranberries is hard to beat, I love experimenting with seasonal twists. During summer, I’ll swap cranberries for fresh berries and add a sprinkle of lemon zest for brightness. In deep winter, a splash of spiced rum or bourbon in the honey creates a warming dessert that’s perfect after a chilly walk in the Peaks.
For a more indulgent version, try adding chopped dark chocolate to the goat cheese mixture. The chocolate melts slightly during baking, creating pockets of richness that contrast beautifully with the tangy cheese. My daughter Molly particularly loves this variation for special occasions.
A savory direction works wonderfully too. Replace the honey with a drizzle of balsamic glaze, add chopped walnuts or pecans for crunch, and finish with cracked black pepper. I’ve served this version as a starter at dinner parties, paired with a small side of arugula dressed simply with olive oil and lemon.
For a spiced variation that’s perfect for holiday gatherings, mix a pinch of cinnamon, nutmeg, and cloves into the honey before drizzling. The warm spices infuse the pears as they bake, filling your kitchen with the most incredible aroma. This has become our traditional Christmas Eve dessert, served with a small glass of dessert wine.
Serving & Storage Tips
Temperature matters significantly with this dish. I serve these pears warm rather than piping hot to allow the flavors to fully develop. Let them rest for about 5 minutes after removing from the oven. This also prevents burned mouths, which I learned the hard way when eagerly diving into a just-baked pear!
If serving as a dessert, a small scoop of vanilla ice cream or a dollop of crème fraîche alongside creates a lovely temperature contrast with the warm pears. For a breakfast or brunch option, a spoonful of Greek yogurt works beautifully.
These baked pears can be prepared ahead and stored in several ways. The pears can be cored and filled up to 24 hours in advance, kept covered in the refrigerator, and baked just before serving. If you have leftover baked pears, store them covered in the refrigerator for up to 3 days.
Surprisingly, these pears reheat quite well. Place them in a 300°F oven for about 10 minutes or until warmed through. The microwave works in a pinch (about 30 seconds per pear), though you lose some of the textural contrast. I’ve even enjoyed them cold from the refrigerator the next day, when the flavors have had time to meld together even more.
Elevating Your Plating: Presentation Ideas
A beautiful presentation transforms these pears from delicious to memorable. I like to serve them on warmed plates (just a minute in a low oven does the trick) to keep them at the perfect temperature longer. A light dusting of powdered sugar adds a touch of elegance and hints at the sweetness to come.
For color and contrast, scatter a few fresh cranberries around the plate in winter, or fresh berries in summer. A small sprig of thyme or mint adds a pop of green that makes the whole dish more vibrant. When I’m serving these for a special occasion, I’ll add a thin tuile cookie or shortbread alongside for textural contrast.
The honey drizzle is your final artistic touch. I use a spoon to drizzle it in a circular pattern around the plate, then across the top of the pear. For extra visual impact, try using a flavored or colored honey like lavender or buckwheat. The darker color creates beautiful contrast against the pale pear flesh.
If you’re serving these as part of a dessert board or buffet, consider halving the pears vertically instead of horizontally. Stand them cut-side up on a large platter, fill with the cheese mixture, and drizzle with honey. This creates an impressive display that guests can easily serve themselves from, which I’ve found works wonderfully for larger gatherings at our cottage.
Pairing Suggestions for Baked Pears
The versatility of these baked pears extends to their pairing possibilities. When served as a dessert, they partner beautifully with dessert wines. A Sauternes or late-harvest Riesling complements the honey sweetness, while a glass of tawny port plays wonderfully against the tangy goat cheese. For non-alcoholic options, a spiced tea like chai or a pear nectar works harmoniously.
As a starter, consider serving alongside a crisp white wine like Sauvignon Blanc or a light Pinot Noir if you prefer red. The acidity cuts through the richness of the cheese while complementing the fruit. I’ve found that a dry sparkling cider from our local Derbyshire producer makes an excellent pairing that honors the fruit.
For a complete meal, these pears follow beautifully after a simple roast chicken or pork tenderloin. The lightness and sweetness provide a perfect counterpoint to savory main courses. If serving as an appetizer, follow with something robust like a beef stew or mushroom risotto.
They also work wonderfully as part of a cheese board for a more casual gathering. I arrange them alongside a selection of other cheeses, some good bread, and charcuterie for a relaxed weekend lunch with friends. The pears become the star attraction that everyone gravitates toward, even with other options available.
Conclusion
These baked pears with goat cheese, honey, and cranberries have become much more than just a recipe in my kitchen. They represent the joy of transforming simple ingredients into something extraordinary, the pleasure of adapting to dietary needs without compromise, and the satisfaction of creating memorable food experiences for those I love.
From the first tentative attempts that ended with overcooked pears to the confident preparation that now takes me less than 10 minutes of active time, this dish has been a journey. The combination of sweet pears, tangy cheese, tart cranberries, and floral honey creates a harmonious balance that feels both sophisticated and comforting.
I encourage you to make this recipe your own. Experiment with different cheeses, try various sweeteners, play with the presentation. The basic technique remains the same, but the possibilities for personalization are endless. Whether you’re cooking for a quiet night in or hosting a special celebration, these baked pears offer a delicious reminder that sometimes the simplest preparations yield the most remarkable results.
And when you pull your perfectly tender, cheese-filled pears from the oven, filling your kitchen with their sweet aroma, I hope you’ll feel the same satisfaction I do every time I make them. Because ultimately, that’s what cooking is about: creating moments of delight that bring us together around the table.
Love this recipe? Follow us on Facebook and Pinterest and explore more creative ideas on our food blog!
Frequently Asked Questions
What kind of pears are best for baking?
Bosc and Anjou pears are ideal for baking because they hold their shape well during cooking. They should be ripe but still firm when gently pressed near the stem. Bartlett pears can work but tend to soften more quickly, so reduce the baking time slightly. Avoid very soft pears as they’ll collapse during baking.
How do you know when baked pears are done?
Baked pears are done when they’re tender enough to be easily pierced with a knife but still hold their shape. The cut surface should be caramelized to a golden brown, and any honey drizzled on top should be bubbling slightly. Depending on the size and ripeness of your pears, this typically takes 25-35 minutes in a 350°F oven.
Can you prepare baked pears ahead of time?
Yes, you can prepare the pears up to 24 hours ahead. Core and fill the pears, cover tightly with plastic wrap, and refrigerate. Bring them to room temperature for about 30 minutes before baking. Alternatively, you can fully bake the pears, refrigerate for up to 3 days, and reheat in a 300°F oven for about 10 minutes before serving.
What can I substitute for goat cheese in baked pears?
If you don’t enjoy goat cheese, there are several excellent substitutes: mascarpone for a milder, creamier option; cream cheese for tanginess without the distinct goat flavor; blue cheese for a stronger flavor profile; or dairy-free alternatives like cashew cream cheese for those avoiding dairy. Each will create a different but equally delicious flavor profile.
What to serve with baked pears and goat cheese?
Serve baked pears with a scoop of vanilla ice cream or dollop of crème fraîche for dessert. For a breakfast or brunch option, pair with Greek yogurt. As an appetizer, serve alongside a simple arugula salad. They also work beautifully as part of a cheese board with crusty bread and charcuterie, or as a sophisticated finish to a meal of roast chicken or pork.
Can I make this recipe without cranberries?
Absolutely! Dried cherries, chopped dried apricots, raisins, or fresh berries all work wonderfully in place of cranberries. For a different texture, try chopped toasted nuts like walnuts or pecans. Pomegranate seeds add beautiful color and a juicy burst. You can even omit the fruit entirely and focus on the cheese filling with herbs for a more savory approach.
How to store leftover baked pears?
Store leftover baked pears in an airtight container in the refrigerator for up to 3 days. To reheat, place in a 300°F oven for about 10 minutes or microwave for approximately 30 seconds per pear until warmed through. They can also be enjoyed cold straight from the refrigerator, where the flavors will have melded together even more.