No Egg Recipes – Delicious Cooking Without Eggs
No Bake Grinch Pie: A Festive Holiday Treat That’s Deliciously Simple
Make Elsie's easy no bake Grinch pie in 15 mins! This simple, vibrant dessert is a fail-proof holiday hit even for egg allergies. Get the trusted recipe!
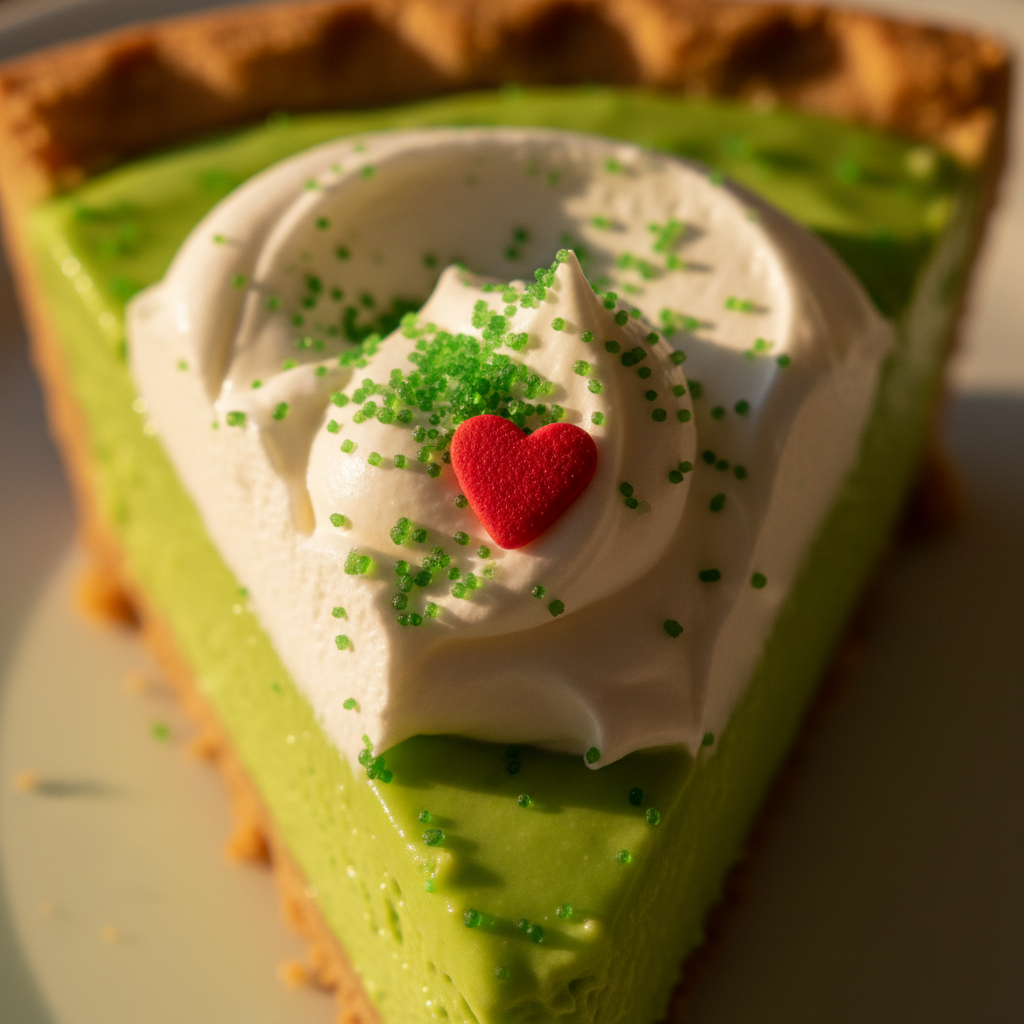
Creating a show-stopping holiday dessert doesn’t require hours in the kitchen or professional baking skills. My no bake Grinch pie has become our family’s most requested Christmas treat! With its vibrant green filling and adorable red heart on top, this whimsical dessert captures the spirit of Dr. Seuss’s beloved character while delivering a creamy, delicious experience that’s incredibly simple to make. Even with my daughter Molly’s egg allergy, this pie is a perfect solution that everyone can enjoy.
- Visual impact: Striking green color with perfect red heart garnish
- Prep advantage: Complete assembly in under 15 minutes with zero baking
- Make-ahead win: Prepare 2 days in advance for stress-free holiday hosting
Table of Contents
No Bake Grinch Pie
This no bake Grinch Pie recipe combines white chocolate pudding, dairy-free whipped topping, and sprinkles on top of an Oreo pie crust for a perfect Christmas dessert. It'll have your heart growing three sizes with every bite!
PREP TIME
5 mins
5 mins
COOK TIME
0 mins
0 mins
TOTAL TIME
N/A
N/A
Servings: 1 pie (8 servings)
Course: Snack
Cuisine: American
Calories: 350
🥄 Ingredients
- 1 Oreo pie crust (9 inches)
- 1 box white chocolate pudding (3.9 oz / 110 g)
- 2 cups (473 ml) 2% milk, very cold
- 0.5 container (approx. 4 oz / 113 g) dairy-free whipped topping, thawed
- 2-3 drops neon green gel food coloring
- 1-2 drops green food coloring
- 0.5 cup (100 g) green sanding sugar
- 0.5 cup (120 g) mini red heart sprinkles
- 0.5 cup (120 g) large red heart sprinkles
👩🍳 Method
- Prepare your pudding according to the directions on the package, using the cold milk. In a medium bowl, beat the pudding packet with the cold milk and both green food colorings until the mixture thickens and forms soft peaks, about 2-3 minutes.
- Scoop the green pudding mixture into the Oreo pie crust and spread it evenly with a spatula.
- Refrigerate for a minimum of 3 hours to allow the pudding to fully set. For firmer results, chill overnight.
- Remove the pie from the fridge and evenly spread the dairy-free whipped topping over the set pudding layer.
- Generously add the green sanding sugar and mini red heart sprinkles over the whipped topping.
- Cut the pie into individual slices. Prior to serving each slice, carefully top it with a single large red heart sprinkle for that signature Grinch look.
- Serve immediately and enjoy your festive No Bake Grinch Pie!
Notes: You can refrigerate any leftovers for a few days. For best results, ensure milk is very cold before mixing with pudding.
Why This Grinch Pie Will Make Your Heart Grow Three Sizes
There’s something magical about bringing beloved characters to life through food, especially during the holidays. This green dessert isn’t just visually charming – it’s a science-backed mood booster! The simple chemistry of instant pudding combined with whipped topping creates a perfectly set, cloud-like texture that melts in your mouth. No complicated techniques or finicky ingredients required. This no-bake cheesecake might inspire you further.
I’ve found that serving this festive creation sparks joy and conversation at any gathering. Children’s eyes light up at the recognizable character reference, while adults appreciate the nostalgic nod to a classic holiday story. The best part? While it looks like you spent hours creating this masterpiece, it requires minimal effort – giving you more time to enjoy the holiday season with your loved ones instead of being stuck in the kitchen.
When I first made this for my daughter Molly’s holiday school party, even the pickiest eaters couldn’t resist its creamy texture and playful appearance. The delight on their faces made all the difference, proving that sometimes the simplest recipes bring the most joy.
Ingredient Notes & Smart Substitutions
The beauty of this Grinchy dessert lies in its simple ingredients, but knowing which products work best and how to substitute them can elevate your creation from good to extraordinary. The vibrant green color comes from instant pistachio pudding mix – I’ve found Jell-O brand provides the most consistent color and flavor. For the filling’s structure, Cool Whip creates that perfect fluffy texture, but you can substitute with homemade whipped cream stabilized with a tablespoon of unflavored gelatin for a less processed option.
The pre-made graham cracker crust is a time-saver I swear by (Keebler Ready Crust works wonderfully), though you can easily make your own by combining graham cracker crumbs with melted butter. For dairy sensitivities, coconut milk (the full-fat canned version) can replace regular milk in the pudding mixture – I discovered this when adapting recipes for Molly’s friend with lactose intolerance.
The iconic red heart that makes this dessert unmistakably Grinch-themed can be created with red candy melts, strawberry fruit leather, or even a carefully cut strawberry. Green sprinkles add festive flair, but holiday-themed sprinkles or crushed green candy works beautifully too. Just ensure whatever garnish you choose won’t bleed color into your pristine white whipped topping border.
Essential Equipment for a Perfect Pie
While this no-bake wonder doesn’t require fancy kitchen gadgets, a few key tools will ensure your Grinch pie turns out perfectly every time. First, a good quality electric mixer (stand or handheld) makes blending the pudding mixture smooth and lump-free. I learned this the hard way during a power outage when whisking by hand left my filling with tiny pudding lumps!
A silicone spatula is indispensable for folding the whipped topping into the pudding without deflating all that wonderful air that creates the light texture. For precise assembly, keep a small offset spatula handy – it’s perfect for creating clean edges and that distinct border of white whipped topping around the edge of the pie.
If you’re making the heart decoration from scratch, small heart-shaped cookie cutters in various sizes allow you to select the perfect proportion for your pie. I keep a set of graduated cutters specifically for decorating desserts like this. A piping bag with a star tip isn’t strictly necessary but elevates the presentation if you want to pipe decorative stars of whipped topping around the edge instead of spreading it.
Lastly, don’t underestimate the importance of proper storage containers. A pie keeper with a locking lid prevents the dreaded plastic wrap stick-to-the-top scenario that can ruin your beautiful creation before it makes its debut at the holiday table. Explore more storage tips to keep your baked goods fresh.
Pro Tips for a Flawless No-Bake Grinch Pie
After making this festive green pie countless times (and having a few early attempts that weren’t quite photo-worthy), I’ve gathered some foolproof tips to guarantee success. First, when preparing the pudding mixture, use very cold milk and whisk immediately after adding it to the pudding mix. This prevents lumps and helps the pudding set more quickly and firmly.
For the most vibrant green color that truly captures the Grinch aesthetic, add the pudding mix to your mixing bowl first, then pour in the milk. This prevents the powder from floating on top of the liquid and ensures every granule gets properly dissolved. If your pistachio pudding isn’t quite green enough (batch variations happen), a tiny drop of green food coloring can intensify the hue without affecting flavor.
When folding in the whipped topping, use a gentle hand with a figure-eight motion. Overmixing will deflate the mixture and result in a dense rather than fluffy texture. I aim for just enough mixing until the color is uniform, with no white streaks remaining.
Chilling is absolutely crucial – a minimum of four hours, but overnight produces the best results. If you’re in a time crunch, placing the pie in the freezer for 30 minutes before transferring it to the refrigerator can speed up the setting process. Just don’t forget it’s in there, or you’ll end up with a frozen dessert!
For that picture-perfect heart on top, make your decoration before assembling the pie and keep it refrigerated until the final moment. This ensures it’s firm enough to place without sinking or bleeding color into your filling.
Creative Variations & Flavor Twists
While the classic green pudding version captures the Grinch’s signature color perfectly, there are several delicious ways to put your own spin on this holiday favorite. For chocolate lovers, try creating a chocolate crust using crushed Oreo cookies and butter instead of the graham cracker base. The contrast between the chocolate and green filling creates a striking visual effect.
Flavor enthusiasts might enjoy adding a layer of complementary taste beneath the green filling. A thin layer of white chocolate ganache spread over the crust before adding the pudding mixture adds a luxurious element. Alternatively, a layer of cream cheese whipped with a little powdered sugar creates a cheesecake-inspired version that’s utterly divine. For a guide on egg-free dessert options, check out this Nutella cake recipe.
For a more sophisticated adult version, consider infusing the milk with mint leaves before using it in the pudding (strain and chill it first), then add a splash of crème de menthe to the mixture. This creates a more complex mint flavor profile that elevates the dessert beyond its playful appearance.
The decorative elements can be personalized too. Instead of a single heart, create a string of Christmas lights using different colored candies, or write “Merry Grinchmas” with red decorator gel. One year when we hosted a Grinch movie night, I created individual mini versions in clear cups with layers of red and green for an interactive dessert that the children could help assemble.
For texture variation, try adding a layer of crushed candy canes between the crust and filling, or sprinkle some on top for a peppermint crunch that complements the smooth, creamy filling beautifully.
How to Serve and Store Your Holiday Masterpiece
Presentation elevates this holiday dessert from simple to spectacular. Serve your Grinch pie on a festive platter surrounded by fresh mint leaves for a pop of natural green that echoes the filling. For an extra touch, place small candy canes around the plate’s edge to reinforce the Christmas theme.
When it comes to slicing, the key is using a sharp knife dipped in hot water and wiped clean between cuts. This creates those picture-perfect slices that show off the layers beautifully. I like to accompany each serving with a small dollop of additional whipped topping and a sprinkle of crushed candy cane for a professional touch.
Storage is straightforward but important for maintaining quality. The pie keeps beautifully in the refrigerator for up to 3 days when properly covered. However, I’ve found that the first 24-48 hours offer the optimal texture and flavor profile. After assembling, allow the pie to set uncovered in the refrigerator for about 30 minutes before covering it with plastic wrap or placing it in a pie keeper. This prevents condensation from forming on the surface and potentially dripping onto your perfect creation.
If you need to make this further in advance, the pie can be frozen for up to 2 weeks. Thaw it overnight in the refrigerator before serving, though be aware that freezing may slightly alter the texture of the whipped topping. Add any final decorative elements after thawing for the freshest appearance.
For transport to holiday gatherings, I recommend chilling the pie in the freezer for about 30 minutes before leaving – this firms it up just enough to survive the journey without affecting the final texture once it returns to refrigerator temperature.
Common Grinch Pie Mistakes to Avoid
Even with a simple no-bake recipe, there are pitfalls that can turn your festive creation from merry to scary. The most common issue I’ve encountered is pudding that doesn’t set properly. This usually happens when the milk is too warm or the pudding mixture isn’t whisked thoroughly enough. Always use cold milk straight from the refrigerator and whisk energetically for a full two minutes to activate the thickening agents properly.
Another frequent misstep is rushing the chilling process. I once tried to serve this pie after just two hours in the refrigerator for an impromptu gathering, and while it looked firm, it collapsed into a pudding pool when sliced. Patience truly is a virtue here – give it the full recommended chilling time.
Color bleeding can ruin the visual impact of your Grinch-themed masterpiece. When placing red decorations on the green filling, ensure they’re completely dry and free from excess color that might transfer. This is especially important with red gel food coloring or decorator icing, which can be notorious for bleeding into surrounding areas.
Overloading on toppings is tempting but can overwhelm both the visual appeal and flavor balance. The charm of this dessert lies in its simplicity and the clear reference to the Grinch character. A single, well-placed heart makes a stronger impact than a jumble of excessive decorations.
Finally, improper storage can lead to a crust that becomes soggy or a filling that absorbs refrigerator odors. Always use airtight storage, and if your refrigerator contains strong-smelling foods, consider double-wrapping the pie to preserve its delicate flavor profile.
The Story Behind Grinch-Themed Holiday Treats
The emergence of Grinch-inspired desserts represents the perfect intersection of literature, pop culture, and seasonal celebration. Dr. Seuss’s 1957 classic “How the Grinch Stole Christmas” has become firmly embedded in our holiday traditions, with the character’s journey from Christmas-hating grouch to holiday enthusiast resonating across generations. The distinctive green character with his small heart that eventually grows three sizes has inspired countless interpretations in food form.
The green color that makes Grinch recipes instantly recognizable became even more entrenched in popular culture after the 1966 animated television special that brought the character to vibrant life. The contrast of the Grinch’s green coloring with the red heart symbol creates a visually striking and immediately identifiable holiday motif that translates perfectly to desserts.
What makes Grinch-themed treats particularly appealing for family celebrations is their inherent message of transformation and holiday spirit. Creating and sharing these desserts becomes a tangible way to celebrate the story’s themes of community and holiday joy. I’ve found that making this green pie has become as much a part of our family’s holiday traditions as watching the movie together.
The popularity of these treats spiked again with the release of the 2000 live-action film starring Jim Carrey, and once more with the 2018 animated version. Each new generation discovers the joy of the character, ensuring that Grinch-themed food remains relevant and delightful year after year. In our home, making this pie has become a signal that the holiday season has truly begun, much like decorating the tree or hanging stockings.
Conclusion
Creating a no bake Grinch pie isn’t just about making a dessert; it’s about crafting a memory and continuing a beloved holiday tradition. This playful green creation strikes the perfect balance between impressive appearance and achievable technique, making it ideal for bakers of all skill levels. Whether you’re preparing it for a festive gathering, a family movie night, or simply to bring a smile to a loved one’s face, this dessert embodies the transformation at the heart of the Grinch story – taking something simple and turning it into something heart-warming and special.
I’ve watched faces light up year after year when this vibrant pie makes its appearance at our holiday table. There’s something undeniably magical about a dessert that captures the essence of a cherished character while delivering on flavor and fun. The best recipes are those that become part of your family’s traditions, and I hope this one finds a permanent place in your holiday repertoire.
As you create your own version, remember that the joy is in both the making and the sharing. Don’t worry if your heart decoration isn’t perfectly centered or if your green isn’t exactly the same shade as the Grinch himself. What matters is the love that goes into creating something special for those you care about. After all, isn’t that what made the Grinch’s heart grow three sizes in the first place?
From my kitchen to yours, I wish you a holiday season filled with delicious treats, beloved stories, and hearts that grow three sizes with the joy of sharing.
Love this recipe? Follow us on Facebook and Pinterest and explore more creative ideas on our food blog!
Frequently Asked Questions
Why is my no-bake Grinch pie not setting properly?
If your Grinch pie isn’t setting properly, there are a few likely culprits. First, ensure you’re using cold milk when mixing the pudding – warm milk prevents proper setting. Second, whisk vigorously for a full 2 minutes to activate the thickening agents in the instant pudding. Finally, allow adequate chilling time (at least 4 hours, preferably overnight) in the refrigerator. If you’ve added too much liquid or modified the recipe significantly, this can also prevent proper setting. For a quick fix, try adding an additional half package of pudding mix to help firm things up.
Can I make Grinch pie ahead of time for a party?
Absolutely! This no-bake Grinch pie is actually perfect for make-ahead preparation. For optimal results, make it 1-2 days before your event and store it covered in the refrigerator. The flavors meld beautifully overnight, and the texture sets to perfection. If you need to make it more than 2 days ahead, you can freeze it (without any fresh fruit decorations) for up to 2 weeks. Thaw overnight in the refrigerator before serving. Just add any final decorative touches right before presenting to ensure they look fresh and vibrant.
What can I use instead of Cool Whip for a no-bake pie?
If you prefer not to use Cool Whip, you have several options. Homemade whipped cream works wonderfully – simply whip 2 cups of heavy cream with 1/4 cup powdered sugar and 1 teaspoon vanilla until stiff peaks form. For stability (especially important in no-bake recipes), add 1 tablespoon of unflavored gelatin bloomed in 3 tablespoons cold water and melted before folding into your whipped cream. Plant-based alternatives include coconut cream whipped with powdered sugar, or commercial dairy-free whipped toppings like So Delicious Cocowhip. Each alternative will slightly alter the flavor profile but will maintain the light, creamy texture needed for this dessert.
How do I get the vibrant green color for my Grinch dessert?
For that perfect Grinch-green color, start with instant pistachio pudding mix as your base – Jell-O brand typically provides the most consistent color. If you find the green isn’t vibrant enough, add a few drops of green food coloring (gel food coloring works best for intense color without adding excess liquid). Add the coloring gradually, as you can always add more but can’t take it away. For a natural alternative, you can use matcha powder or spirulina powder, though these will alter the flavor slightly. The key is adding any coloring agents to the pudding mixture before folding in the whipped topping to ensure even distribution while minimizing mixing that could deflate your filling.
How long does no-bake Grinch pie last in the refrigerator?
When properly stored in the refrigerator, a no-bake Grinch pie maintains optimal quality for 3-4 days. To store it correctly, let the pie set uncovered for about 30 minutes after assembly, then cover it with plastic wrap or place it in an airtight container to prevent it from absorbing refrigerator odors. The graham cracker crust may begin to soften slightly after the second day, but the flavor remains delicious. For the freshest presentation, add any decorative elements like whipped cream piping or sprinkles just before serving if you’re planning to store the pie for multiple days.
Can I use a different type of pudding for my Grinch pie?
While pistachio pudding provides that iconic Grinch-green color naturally, you can absolutely customize with different pudding flavors. Vanilla pudding with green food coloring works well and offers a more neutral flavor profile. Alternatively, white chocolate or cheesecake pudding with green coloring creates a richer taste experience. For mint lovers, vanilla pudding with green coloring and 1/4 teaspoon of mint extract creates a refreshing variation. Just remember that whichever pudding base you choose, you’ll likely need to add green food coloring to achieve that characteristic Grinch look unless you’re using pistachio pudding.
What are some fun variations for my Grinch pie?
Get creative with your Grinch pie! Try an Oreo cookie crust instead of graham cracker for a chocolate contrast. For extra decadence, add a layer of white chocolate ganache between the crust and filling. Make individual mini pies in clear cups for a party, layering red and green elements. Flavor variations include adding mint extract or crème de menthe for adults, or incorporating crushed candy canes for a peppermint crunch. For decoration, try using red velvet cake crumbs to form the heart, or create a border of alternating red and green sprinkles. You could even add a thin layer of cranberry compote beneath the whipped topping for a festive twist that adds a tangy contrast to the sweet filling.