No Egg Recipes – Delicious Cooking Without Eggs
Peri peri chicken: A hands-on home cook’s guide to fiery African-Portuguese flavor
Discover Elsie Marlow's trusted peri peri chicken recipe perfected through dozens of home kitchen tests. Learn to balance heat, smoke, and acidity with
I promise juicy, tangy results you can repeat at home, and I show you how I learned to balance heat, smoke, and acidity with a straightforward approach to Peri peri chicken that fits a busy kitchen. I tested dozens of batches, learned to read the marinade by smell and texture, and now I can reliably coax bright, layered flavor from simple tools and pantry staples.
- Texture target: crisp-edged skin, moist interior
- Reliable swap/tool: blender for smooth sauce or mortar for rustic crush
- Make-ahead: sauce keeps chilled for days; marinated chicken freezes single layer
Table of Contents
Table of Contents
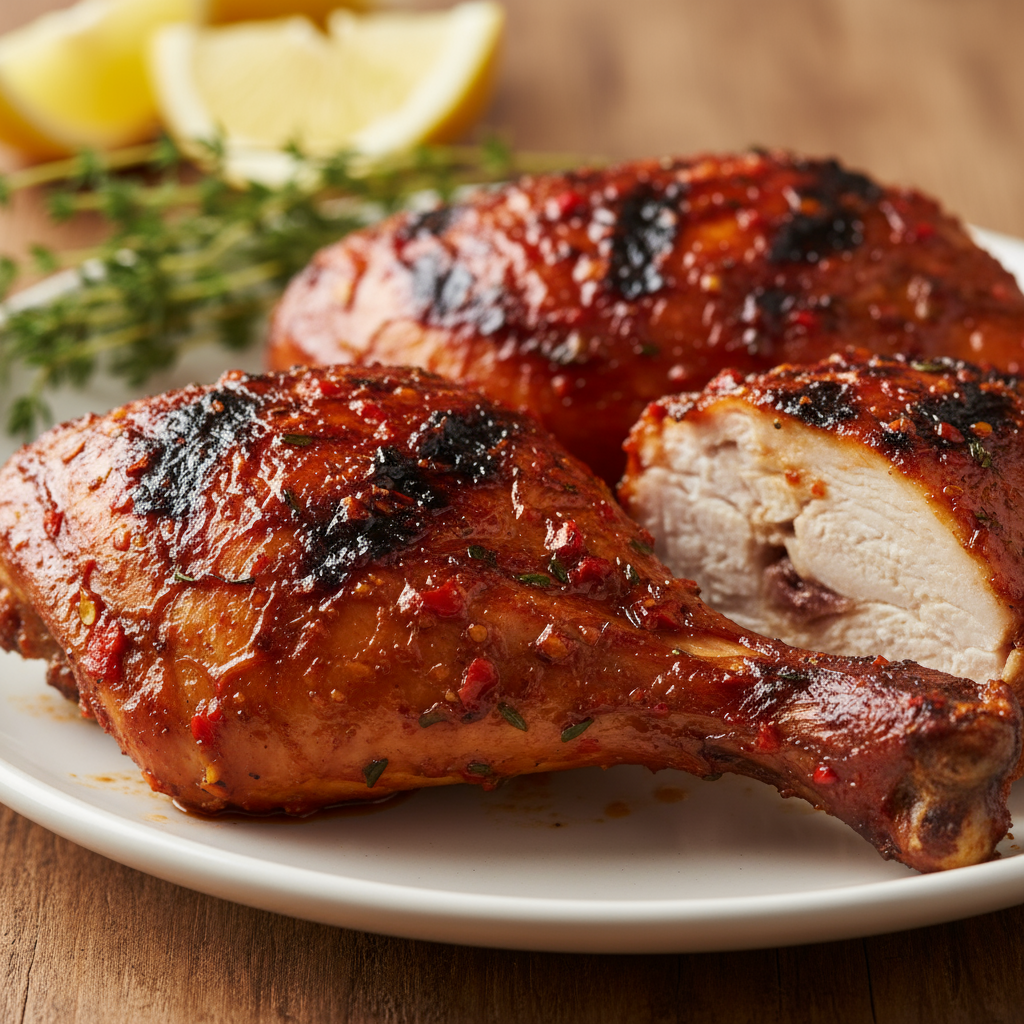
Authentic Peri Peri Chicken
A flavorful, spicy chicken dish marinated in a blend of African bird's eye chilies, garlic, and citrus, grilled to perfection.
PREP TIME
30 mins
30 mins
COOK TIME
45 mins
45 mins
TOTAL TIME
N/A
N/A
Servings: 4 servings
Course: Snack
Cuisine: African-Portuguese
Calories: 504
🥄 Ingredients
- 6 cloves garlic, minced
- 4 red Fresno chili peppers, seeded and chopped (approx. 120g)
- 1 habanero pepper, seeded and chopped (approx. 15g)
- 1/2 cup diced red bell pepper (approx. 75g)
- 1 tablespoon smoked paprika (15g)
- 1 tablespoon fresh thyme leaves (3g)
- 1 1/2 teaspoons kosher salt (9g)
- 1 teaspoon freshly ground black pepper (2g)
- 1 teaspoon ground cayenne pepper (2g)
- 1 teaspoon white sugar (4g)
- 1/2 teaspoon onion powder (1g)
- 1/2 cup mild olive oil (120ml)
- 1/3 cup sherry vinegar (80ml)
- 2 lemons, juiced (approx. 60ml)
- 4 chicken leg/thigh quarters (approx. 1.5kg)
- kosher salt to taste for seasoning chicken
👩🍳 Method
- Combine garlic, Fresno chilies, habanero, bell pepper, smoked paprika, thyme, kosher salt, black pepper, cayenne, sugar, and onion powder in a blender.
- Add olive oil, sherry vinegar, and lemon juice to the blender; blend on high until smooth.
- Pour 3/4 of the marinade into a resealable bag; reserve the rest for serving.
- Make shallow cuts in the skin side of chicken quarters; season with salt and place in the bag with marinade.
- Seal the bag and massage to coat chicken evenly; marinate in refrigerator for 8-24 hours.
- Preheat grill to medium heat; oil the grate. Grill chicken skin-side down for 5 minutes, then turn and grill for 10-12 minutes, brushing with reserved marinade, until internal temperature reaches 165°F (74°C).
- Serve with reserved sauce.
Notes: Chicken is done when internal temperature reaches 165°F (74°C). Store leftovers in an airtight container in the refrigerator for up to 3 days or freeze for up to 3 months.
The Cultural Roots of Peri Peri
Peri peri sings of two worlds meeting. The spice-forward peppers and cooking styles have roots across southern Africa, while the Portuguese colonial and trading routes brought ingredients and techniques that shaped the dish into what many of us recognize today. I like to tell this story in the kitchen as I work, because each stir or crush echoes centuries of exchange – of chiles moved across oceans, of citrus and vinegar applied as preservation and flavor, of open-fire cooking techniques adapted from village hearths to coastal grills.
When I teach friends about the sauce I make, I emphasize cultural fusion, not appropriation. I respect the African bird pepper varieties and the family traditions that shaped the original marinades. At the same time, home cooks benefit from the Portuguese influence: acids like lemon or vinegar, oils for gloss, and simple aromatics to lift the pepper heat. That tension between raw chili heat and bright acidity is what gives the dish its character, and learning to honor both sides has been central to my experiments.
Personal note, from Castleton in the Peak District: I first fell for this flavor while traveling and then tried to recreate it in my small village kitchen. Early efforts were either too one-note or overcooked. Over time I learned to tame the heat and celebrate the brightness, which makes this more than a recipe. It is a portable tradition you can adapt to your pantry and your table.
Ingredient Notes & Substitutions
I avoid a strict ingredient list in this narrative section, but I will describe the role of the main components so you can swap confidently. Chiles are the backbone, supplying heat and floral pepper notes. If you cannot source African bird’s eye chilies, choose a fresh alternative with similar heat and fruity tone, or use smoked dried chilies rehydrated for smokiness. The acid component brightens and balances; lemon or a mild white vinegar will do similar work, and I sometimes blend both for complexity. Oil binds and carries flavor, and a neutral oil is easiest, though a mild olive oil gives body and sheen if you prefer.
Garlic and shallot or onion give savory depth. If you have only one, use it; if you need to soften raw garlic, briefly macerate it with salt before blending to mellow sharp edges. Salt and a little sugar or honey balance bitterness and help the sauce cling to meat. If you are egg-free for allergy reasons like my daughter Molly, rest assured the sauce and marinade are naturally egg-free; I developed these combinations in part to keep our table inclusive for guests with allergies.
For substitutions I rely on equivalence by function. Replace fresh chiles with a mix of dried and fresh to control heat and introduce smokiness. If you need to lower heat dramatically, remove membranes and seeds or swap in a milder pepper and add a pinch of smoked paprika for character. For a vegan or vegetarian adaptation, the same flavor matrix works on tofu, seitan, or roasted cauliflower; treat them as you would the chicken when marinating so the acid and oil can penetrate surfaces.
Dual measurements and practical guidance: when a recipe card lists a spoonful or cup for an acidic or oily component, keep in mind that a tablespoon is 15 ml and a cup is 240 ml, which helps when you scale the sauce up or down. Use that conversion mentally when tasting and adjusting so you do not overshoot brightness or fat.
Equipment Essentials
You do not need professional gear to get excellent results, but a few reliable items make the process far easier. A good blender or food processor creates a smooth, emulsified sauce; a mortar and pestle lets you keep more texture and control. A sturdy bowl for marinating, a tray or sheet for resting the chicken before cooking, tongs for turning, and a thermometer are helpful if you like precision. For cooking, you can use a grill, a heavy skillet, or an oven depending on the texture you want – smoky char from a grill, deep crust from a hot skillet, or even roast-style caramelization from an oven.
Method overview: Working only with the ingredients and tools listed in the recipe card, the basic flow is to blend or crush the sauce components to your desired texture, coat the chicken thoroughly and allow time for the flavors to penetrate, then cook by your chosen method while occasionally spooning or brushing extra sauce during the cook for layered flavor. Rest briefly after cooking to let juices redistribute, then serve.
My kitchen is small, so I keep my toolset compact and multi-purpose. A handheld blender doubles for sauces and quick dressings; a cast iron pan moves from stovetop to oven and gives reliable sear and caramelization. If you opt for a charcoal or gas grill, plan for two zones – direct and indirect heat – which helps you sear and then finish without burning the sugars in the marinade.
Pro Tips for Perfect Marination
Marination is where this dish is won or lost, and I learned that through trial and error. Early failures included an underflavored center after a quick 30-minute soak, and an overpowered, almost metallic tang when I used too much straight vinegar. Those mistakes taught me two lessons: give the acid time to cut but not dominate, and let oil and sugar round the edges so the pepper notes sit happily on the tongue. Over many iterations I developed cues I now use to judge readiness without a clock: the smell, the texture of the marinade, and how the meat surface feels.
Sensory cues to watch for: the marinade should smell bright with citrus or vinegar up front, then rounded by garlic and the fragrant oil. If the aroma is one-dimensional, adjust by adding a touch more acid for lift or a pinch of sugar to soften. Texture-wise, a well-blended sauce should be pourable but clingy; it should coat the back of a spoon and drizzle slowly, not run off like water. If you press the marinated surface and the coating beads rather than soaks in, the oil may be too high – increase the acid slightly or blend more garlic and aromatics to help the sauce adhere.
Time and temperature tips without precise numbers: I vary marination time based on cut size. Thinner pieces need far less time than bone-in pieces. If you are short on time, you can accelerate penetration by scoring skin and flesh gently, or by massaging the sauce into the meat for a few minutes before resting. For maximum convenience, I often make the sauce a day ahead; it improves in the fridge as flavors meld, and I keep extra to baste while cooking. Remember Molly’s allergies taught me to always label and separate jars to avoid cross-contamination when I’m juggling egg-free baking and savory projects.
Adjusting spice levels: taste the sauce before you add it to the meat. To bring heat down, remove seeds and membranes from fresh chiles, or dilute a portion of the sauce with oil and acid. To increase heat gradually, add a tiny bit of concentrated chili or hot sauce, tasting as you go. If you overshoot, temper with a touch of sugar or more oil to soften the edge.
Trust signals: I do not claim this was perfect from the start. I had many flat, overly vinegary, or undercooked batches. I share those failures because the eventual successes are built from them, and that iterative process is what made my approach reliable for home cooks like you and me.
Cooking Method Variations
Different cooking methods highlight different parts of the flavor profile. Grilling over charcoal or wood adds smokiness and a pleasing char that plays well with pepper heat. A hot skillet gives concentrated crust and rendered fat for extra succulence. Roasting in an oven produces even cooking and is forgiving when you have thick bone-in pieces. For pan-to-oven or grill-to-oven hybrid methods, you can sear first to lock in flavor, then finish gently to avoid burning sugars in the sauce.
Method Overview: Using only the ingredients and tools listed in the recipe card, choose the technique that suits your rhythm – sear first then finish for depth, slow and steady roast for tenderness, or quick grill for charred brightness. Baste sparingly for layered flavor, and rest after cooking so juices settle.
Practical swaps for cook-at-home constraints: if you have only an oven, use a hot pan to sear and then transfer to the oven in the same pan for finishing. If you have only a grill with limited space, manage temperatures by moving pieces between hot and cooler zones so the sugars do not burn. For indoor cooking without strong ventilation, use a cast iron pan and moderate heat to develop color while minimizing smoke, or choose the oven route for a cleaner finish.
I once tried an experimental high-heat sear with a sugar-forward glaze and the sugars burned before the center reached a safe doneness. From that failure I learned to separate any sweet components for late baste, or to reduce sugar during high-heat searing and reserve a glaze for the last few minutes of cooking, which gives shine without burning. These are the little adjustments that move a home-cooked dish closer to restaurant-quality without demanding professional equipment.
Serving & Pairing Suggestions
Peri peri flavor loves contrast. Serve with something cool and creamy to temper heat, something starchy to soak up juices, and a simple green to add freshness. Traditional pairings are grilled vegetables, potato wedges, plain rice, or a crisp salad dressed in a light vinaigrette. In my house we frequently pair the chicken with a lemony slaw and charred corn; the slaw gives crunch and acidity that keeps each bite lively.
For sauces, keep reserved sauce at the table for dipping, but if you like a milder option, provide a yogurt-based dip or a cooling cucumber salad. For a heartier meal, slice the cooked meat and serve over flatbreads or rice bowls with pickled onions, fresh herbs, and a drizzle of extra sauce. If you want to offer a branded homage, aim for the balance many folks expect from Nando style plates: bright acid, clean heat, and textural contrast between crisp skin and tender meat.
When entertaining, plan for variable spice tolerance. Present the salad and starch prominently, let guests spoon extra sauce as they wish, and label the spice level if you have a range from mild to very hot. This helps everyone enjoy the sharing spirit of the meal without surprises.
Storage & Reheating Guidelines
Short-term storage: keep cooked chicken refrigerated in an airtight container and use within a few days. If you have leftover sauce, store it separately to preserve texture and acidity. When freezing, lay pieces single layer in a shallow tray until firm, then transfer to a freezer-safe bag to prevent clumping; this method helps you reheat individual portions and keeps the exterior from steaming into mush.
Reheating: gently reheat in an oven or a skillet to restore crispness rather than microwaving, which tends to soften skin and redistribute juices unevenly. If you must use a microwave, do short bursts and finish in a hot pan for a minute to recrisp. For frozen portions, thaw overnight in the refrigerator before reheating for best texture. Reheat to a safe, even temperature throughout before serving.
Leftover sauce keeps well chilled for several days, and its flavors often become more integrated after sitting. If it separates slightly in the fridge, whisk or blend briefly before using. If you notice the sauce has developed any off smells or visible mold, discard it. Always label and date your jars and containers so you can keep track, especially when I have multiple projects in the fridge for Molly and the rest of the family.
Dietary Adaptations
My kitchen journey began with egg-free baking to keep Molly safe, and that mindset led me to create savory recipes that are inclusive by design. The peri peri flavor profile translates well across diets. For vegetarian or vegan versions, firm tofu, tetured seitan, cauliflower steaks, and portobello mushrooms accept the marinade and develop great char. Press tofu first to help it soak the sauce, or briefly parboil cauliflower to open its structure before marinating if you want deeper penetration.
For low-sodium or low-acid needs, reduce added salt and increase aromatic herbs and spices to compensate, and choose a gentler acid like lemon over strong vinegars. Gluten-free is straightforward since the core components are naturally gluten-free; just watch for any packaged sauces or spice mixes that include gluten-containing stabilizers and choose certified products if needed.
For those avoiding nightshades, you can mimic the smoky, tangy profile with a combination of smoked paprika, mild chiles if tolerated, and a touch of fermented chili-free condiments to add umami. The result will be different from the classic but can still deliver bright, savory satisfaction for restricted diets.
Common Mistakes to Avoid
From my many test batches the most frequent missteps are over-relying on vinegar, under-marinating, burning sugary bastes, and ignoring resting time. A sharp vinegary bite can dominate the other flavors; if your first bowl of sauce tastes too sour, add a neutral oil or a touch of sugar to balance it. Marinating too briefly with thick cuts leaves the center bland; when in doubt, extend the marinating window or score the surface to help penetration. Sugar in glazes will scorch quickly on high heat, so reserve sweet components for the final moments of cooking or use indirect heat to finish.
Another error is crowding the pan or grill. Overcrowding causes steam and prevents browning. Cook in batches if necessary and keep finished pieces warm in a low oven or covered pan. Lastly, neglecting to rest the meat after cooking is a common habit that costs you juices. Give it a short rest so the proteins relax and the juices redistribute, producing a juicier bite.
Trust the process and your senses. In one funny failure I basted too early and repeatedly, creating an unevenly caramelized surface and a slightly bitter back note. After that I started reserving some sauce for a late baste and keeping a small amount as a finishing drizzle to preserve brightness and avoid burning.
Why This Recipe Works
The approach I teach balances three pillars: heat, acid, and fat. Heat gives the thrill, acid gives clarity and lift, and fat carries and softens the edges. Aromatics and a touch of sweet round things out so the heat feels purposeful rather than punitive. I learned to trust those pillars after dozens of tests that failed for predictable reasons, and each failure taught me a micro-adjustment that improved the next batch.
There is also a technique element. Emulsifying the sauce into a clingy, pourable texture helps it coat skin and meat, which is why a blender or mortar is a valuable tool. Allowing adequate marinating time lets the acid and oil do their work without collapsing proteins too far, and finishing with care prevents burnt sugars and preserves depth. Those technique notes are why the recipe is forgiving for home cooks yet capable of producing results that impress on a dinner party plate.
Practical evidence of reliability: after repeating key steps and adjusting for my own small-kitchen constraints, I reached a point where I could produce consistent results for family dinners and guests. That repeatability, born from many messy experiments, is what I share so you skip the worst pitfalls and get to the tasty part faster.
Conclusion
I write this as Elsie Marlow, a home cook from Castleton in the Peak District, so my kitchen anecdotes are rooted in a small village life with a busy stove and a daughter, Molly, whose egg allergy pushed me toward inclusive cooking. NoEggRecipes.com started as a necessity and grew into a joy, and this peri peri approach is one of those adaptable recipes that lets me feed anyone at my table without compromise.
My final piece of advice is simple: use your nose and your hands as much as your watch. Smell for brightness, feel the marinade cling, and taste to adjust before the chicken ever sees heat. Keep a small jar of reserved sauce for finishing, and learn one reliable method for your equipment so you can return to it with confidence. You will have imperfect batches, but those are how you land on the technique and balance that make this dish sing in your home.
Happy cooking, and may your kitchen be a place where everyone gets a seat at the table.
Love this recipe? Follow us on Facebook and Pinterest and explore more creative ideas on our food blog!
Frequently Asked Questions
Where did peri peri sauce originate and how did it develop?
The sauce emerged through a cultural exchange between southern Africa and Portuguese traders, combining local hot peppers with European acids and preservation methods. Over time regional variations developed based on available chiles, local aromatics, and cooking techniques, creating a spectrum of preparations rather than a single origin point.
How can I adjust the spiciness of the sauce without losing flavor?
Taste the blended sauce first and dilute heat by removing seeds and membranes from fresh peppers or blending a portion with more oil and acid. To rescue an overly hot batch, add a touch of sugar or honey and more neutral oil to soften the edge while preserving the core flavors.
What side dishes pair best with this spicy grilled chicken style?
Contrast is key: cooling sides like a simple yogurt or cucumber salad, starchy sides such as roasted potatoes or rice, and crisp greens or slaws all work well. Pickles or quick-pickled onions add acidity and crunch to balance the heat.
What is the best way to store and reheat leftovers?
Store cooked chicken in an airtight container in the refrigerator for a few days, and freeze single-layer pieces for longer storage. Reheat gently in an oven or skillet to restore crispness instead of microwaving, which softens skin and can make texture mushy.
Can I use the same peri peri marinade on vegetarian options?
Yes. Firm tofu, seitan, cauliflower, or portobello mushrooms take the same flavor matrix well. Press or par-cook them as needed to open their texture, then marinate so the acid and oil penetrate before cooking.
How is this different from other spicy chicken dishes?
This style emphasizes the balance between vibrant acid, floral pepper heat, and carrying fat, often with garlic and aromatic herbs. The African-Portuguese fusion gives it a bright, punchy character distinct from sweeter barbecue sauces or curry-based heat profiles.
Any tips to make restaurant-quality peri peri cooking at home?
Focus on contrast: get a good sear for texture, reserve some sauce for a late baste to avoid burning sugars, and rest the meat before slicing. Use a hot pan or grill for caramelization, and adjust acid and oil so the sauce clings and shines.