No Egg Recipes – Delicious Cooking Without Eggs
Perfect Eggless Christmas Cookies: Soft, No-Spread Sugar Cookies for Holiday Baking
Elsie's ultimate guide to soft, no-spread eggless Christmas cookies, perfected over years for delicious, allergy-friendly holiday baking. Get her trusted
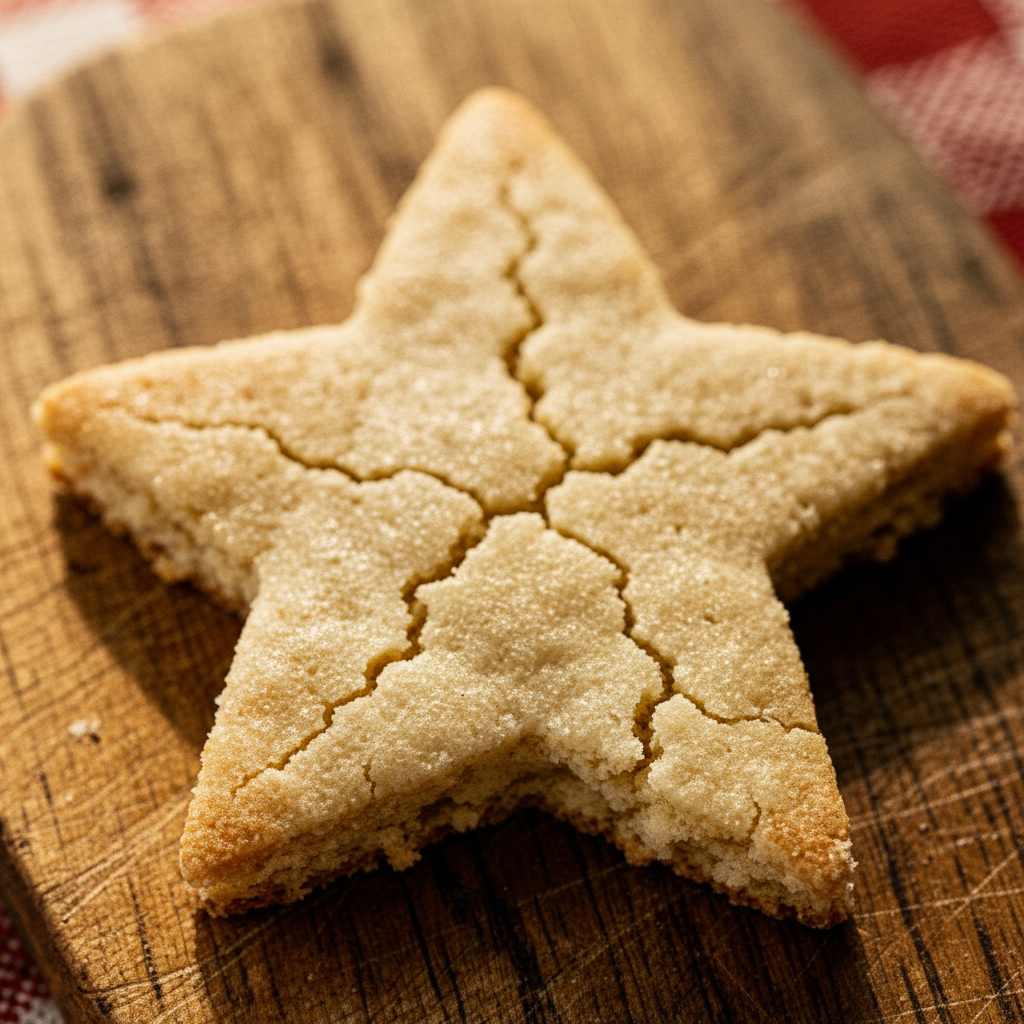
After years of trial and error, I’ve perfected these eggless Christmas cookies that have become our family tradition. When my daughter Molly was diagnosed with an egg allergy, I was determined to create cut-out sugar cookies that wouldn’t leave her out of our holiday baking fun. These cookies hold their shape beautifully during baking, have a soft, melt-in-your-mouth texture, and provide the perfect canvas for festive decorations. They’ve become so popular at our village gatherings that friends specifically request my ‘special’ cookies without ever realizing they’re egg-free!
- Texture target: Soft and tender with clean-cut edges that don’t spread
- Reliable substitution: A precise combination of milk and cornstarch replaces egg perfectly
- Make-ahead friendly: Dough refrigerates for 3 days or freezes for up to 3 months
TOC
Table of Contents
BEST Eggless Christmas Sugar Cookies (Soft Cut-Out)
Delight in these soft, cut-out eggless sugar cookies, perfect for festive decorating! This reliable recipe ensures no-spread cookies every time, catering to egg allergies and making holiday baking fun and accessible. With clear instructions and expert tips, you'll create beautiful and delicious Christmas treats.
PREP TIME
15 mins
15 mins
COOK TIME
12 mins
12 mins
TOTAL TIME
N/A
N/A
Servings: 40 cookies (depending on the shapes you cut)
Course: Snack
Cuisine: American
Calories: 104
🥄 Ingredients
- 3 cups (420 g) all-purpose flour
- 0.5 teaspoon (2 g) baking powder
- 0.5 teaspoon (2 g) salt
- 0.75 cup (175 g) unsalted butter, softened
- 1 cup (200 g) granulated sugar
- 6 ounces (170 g) cream cheese, softened
- 2 teaspoons (10 ml) pure vanilla extract
👩🍳 Method
- Sift the all-purpose flour and baking powder into a bowl. Add the salt and set aside.
- Using an electric hand mixer or a stand mixer with the paddle attachment, beat the unsalted butter and granulated sugar on medium speed until smooth and creamy, about 3 to 4 minutes. Scrape down the sides and bottom of the bowl as needed. Add the cream cheese and pure vanilla extract; mix until just incorporated.
- Reduce the mixer speed to low and gradually beat in the sifted flour mixture; beat just until the dough comes together and no dry streaks of flour remain. Be careful not to overmix.
- Divide the dough into two equal pieces.
- Place one piece of dough on a large piece of parchment paper or a silicone mat. Place another piece of parchment paper on top to prevent sticking. With a rolling pin, roll the dough out to about 0.25 inch (6 mm) thick. Repeat with the second piece of dough.
- Carefully transfer both rolled-out doughs (still between parchment) onto a baking tray. Cover the tray with plastic wrap and refrigerate for at least 2 hours and up to 2 days. This chilling step is crucial to prevent spreading.
- Preheat the oven to 350º F (180º C). Line two baking sheets with parchment paper or silicone baking mats.
- Working with one sheet of chilled dough at a time, remove the top parchment paper. Use your favorite cookie cutters to cut the dough into desired shapes. Transfer the shapes to the prepared baking sheets, spacing them about 0.5 inch apart.
- Gather up any dough scraps and gently form them into a disk. Roll out the scraps between parchment paper again and refrigerate for 15 to 20 minutes before cutting additional shapes.
- Bake for 10 to 13 minutes, or until the edges of the cookies are just beginning to turn a light golden brown. The centers may still look soft. Do not overbake for soft cookies.
- Remove the baking sheets from the oven and let the cookies sit on the hot sheets for 5 minutes. This allows them to firm up.
- Using a wide metal spatula, gently transfer the cookies to a wire rack and let them cool completely before decorating. Repeat the process to cut and bake the remaining dough.
- Decorate the cooled sugar cookies as desired. If using eggless royal icing, allow the icing to dry completely (about 1.5 hours) before serving. Once fully dried, store cookies in an airtight container with waxed paper between layers, or in a single layer in an airtight bag, at room temperature for up to 5 days.
Notes: Bake for 10-13 minutes until edges are lightly golden. Cookies will be soft when removed from the oven but will set as they cool. Store cooled, decorated cookies in an airtight container at room temperature for up to 5 days, or refrigerate for up to 10 days. Dough can be frozen for up to 3 months; thaw in the fridge before use.
Why This Eggless Sugar Cookie Recipe Works
The secret to these exceptional eggless holiday cookies lies in understanding the science of cookie structure. Without eggs, which typically provide moisture, fat, and binding properties, I needed to create a perfect balance of ingredients that would mimic these functions. Through countless test batches in my Peak District kitchen, I discovered that the right proportion of milk adds moisture, while cornstarch works as a binder and creates that coveted tender crumb.
Another key to success is the proper ratio of butter to flour. Too much butter causes spreading, while too much flour makes cookies dry and crumbly. After many batches that either puddled into formless blobs or cracked at the edges, I found the golden ratio that produces cookies that hold their shape while remaining deliciously soft.
The controlled chilling time is non-negotiable for these cookies. I’ve learned that at least 2 hours in the refrigerator allows the gluten to relax and the fats to solidify, which prevents spreading during baking. When Molly and I made the mistake of rushing this step one Christmas Eve, our snowmen looked more like melting snowmen by the time they came out of the oven!
Finally, vanilla extract and a touch of almond extract provide a rich, classic sugar cookie flavor that makes people forget they’re eating an eggless version. The combination results in cookies that taste just like traditional recipes, with no unusual aftertaste that some egg alternatives can leave behind.
Ingredient Notes & Essential Substitutions
After years of experimentation, I’ve found that quality ingredients make all the difference in eggless baking. For the butter, I always use unsalted so I can control the salt level. The butter should be softened just until it gives slightly when pressed, not melty or oily. When I’m in a rush, I cut it into small cubes and let it sit for just 30 minutes rather than using the microwave, which can create hot spots.
Granulated sugar provides structure and sweetness, but I’ve discovered that using a touch of powdered sugar as well creates a more tender crumb. For flour, all-purpose works perfectly, though I always weigh rather than measure by volume for consistent results. My kitchen scale was the best investment I made for reliable egg-free baking.
The cornstarch is crucial for binding without eggs. I’ve tried many alternatives like arrowroot powder, but cornstarch consistently produces the best texture. The milk adds necessary moisture, and whole milk works best, though I’ve successfully used 2% in a pinch. Plant-based milks can work too, especially oat milk, which has a neutral flavor and creamy consistency.
For flavorings, pure vanilla extract is essential, and a tiny bit of almond extract enhances the flavor beautifully without being overpowering. If you’re not a fan of almond, a touch of lemon zest makes a lovely alternative that brightens the cookies.
A small amount of baking powder provides just enough lift without causing spreading. I’ve found that many eggless cookie recipes overcompensate with too much leavening, leading to cookies that puff up and then collapse. Our perfectly balanced amount maintains the cookie’s shape while ensuring a tender bite.
Equipment for Perfect Cut-Out Cookies
Having the right tools makes creating these eggless Christmas cookies so much easier. My stand mixer with a paddle attachment is invaluable for achieving the perfect dough consistency without overworking it. If you don’t have one, a hand mixer works well too, though you’ll need to be extra vigilant not to overbeat the dough.
I swear by my heavy aluminum baking sheets, which conduct heat evenly and prevent hot spots that can cause uneven baking. After years of cookies with burnt edges and underdone centers, I invested in quality sheets that have made all the difference.
Parchment paper is non-negotiable in my kitchen. It prevents sticking without adding extra grease and makes cleanup a breeze. I’ve tried silicone mats, but find that parchment gives cookies a slightly crisper bottom while maintaining that soft center we love.
For rolling the dough, adjustable rolling pins with thickness rings ensure uniform cookies that bake evenly. Before I discovered these, Molly and I would struggle with cookies of varying thicknesses that would bake unevenly. Now, we achieve a perfect 1/4-inch thickness every time.
Cookie cutters with clean edges produce the best shapes. I’ve collected dozens over the years, but metal cutters with a sharp edge and a comfortable grip are my favorites. For intricate designs, I chill the cut cookies before carefully transferring them to the baking sheet using a thin metal spatula, which prevents stretching or distortion.
A cooling rack is essential for perfect texture. Allowing air to circulate around the cookies prevents condensation on the bottom and maintains that ideal soft-but-not-soggy consistency we’re after.
Expert Tips for No-Spread Eggless Cookies
The key to perfect no-spread eggless Christmas cookies lies in the details I’ve perfected over years of baking with Molly. First, temperature control is critical. Your butter should be softened but still cool to the touch. If it’s too warm, the cookies will spread regardless of other precautions. I press my finger into it, and it should leave an indentation while still feeling cool.
When mixing your dough, stop as soon as the ingredients are combined. Overmixing develops gluten, which can make cookies tough and more prone to spreading. The dough should feel like soft play-dough, not sticky or crumbly. If it’s sticky, add a tablespoon of flour at a time until it reaches the right consistency. If it’s crumbly, a teaspoon of milk will bring it together.
Chilling the dough is non-negotiable. After one disastrous Christmas where I tried to rush this step, I learned my lesson. The dough needs at least 2 hours in the refrigerator, though overnight is even better. This allows the gluten to relax and the fats to solidify completely. When we’re making other cookie varieties without eggs, proper chilling is just as vital.
Working in small batches keeps the dough cool. I take out only what I need, keeping the rest refrigerated. In my warm kitchen, the dough can soften quickly, so if it becomes too soft to work with, I pop it back in the fridge for 15 minutes.
Before baking, I place the cut-out cookies back in the refrigerator for 10-15 minutes. This extra step ensures they’re thoroughly chilled and will maintain their shape in the oven. I’ve found this particularly important for intricate designs that might otherwise lose their definition.
Finally, your oven temperature matters enormously. I always use an oven thermometer because I discovered my oven runs 25 degrees cooler than the setting indicates. A properly preheated oven at the correct temperature means cookies start to set quickly before they have a chance to spread.
Creative Flavor Variations & Festive Twists
While the classic vanilla-almond flavor of these eggless Christmas cookies is delicious on its own, I love experimenting with variations that make each batch special. One of our favorites is adding the zest of one orange and 1/2 teaspoon of cinnamon to the dough, creating a subtle spiced orange cookie that’s perfect for the holidays. The bright citrus notes complement the warm spice beautifully.
For chocolate lovers, I replace 1/4 cup of the flour with unsweetened cocoa powder. The result is a rich chocolate cookie that provides a striking contrast when decorated with white royal icing. Molly particularly loves these with a hint of peppermint extract added to the dough.
Lemon lovers will appreciate adding the zest of one lemon and 1/4 teaspoon of lemon extract to the base recipe. These bright, citrusy cookies are refreshing and pair wonderfully with a simple glaze made from powdered sugar and lemon juice.
For a cozy holiday flavor, I sometimes incorporate 1 teaspoon of gingerbread spice mix into the dough. While not as intense as traditional gingerbread, these cookies offer a hint of those beloved warming spices without overwhelming the delicate sugar cookie base.
Texture variations can be exciting too. Folding in 1/3 cup of finely chopped cranberries and a tablespoon of orange zest creates a festive cookie with bursts of tartness. For a bit of crunch, I occasionally add 1/4 cup of finely chopped pistachios to the dough, which adds both texture and a subtle nutty flavor that complements the sweetness.
When making multiple variations for holiday cookie exchanges, I prepare a large batch of the base dough, divide it into portions, and flavor each differently. This approach is efficient and allows me to create an impressive assortment of cookies from one basic recipe. Each variation gets its own distinct decoration, making for a stunning cookie platter that delights our village gatherings every year.
Storing Your Eggless Christmas Cookies
Proper storage is crucial for maintaining the perfect texture of these eggless Christmas cookies. After cooling completely on a wire rack, unfrosted cookies should be stored in an airtight container at room temperature. I separate layers with parchment paper to prevent sticking and potential damage to decorated surfaces. In my experience, these cookies stay fresh for up to 5 days when stored this way.
For cookies with royal icing, I allow the icing to dry completely for at least 24 hours before stacking or storing them. This patience prevents smudging and ensures your beautiful designs remain intact. Decorated cookies may soften slightly faster due to moisture in the icing, so they’re best enjoyed within 3-4 days.
In our humid Peak District kitchen, I sometimes add a slice of bread to the storage container. The bread absorbs excess moisture, keeping the cookies from becoming too soft. Just remember to replace the bread slice daily to prevent mold.
If you need to store cookies for longer periods, freezing works wonderfully. Place them in a single layer on a baking sheet until frozen solid, then transfer to freezer bags or containers with parchment between layers. They’ll keep for up to 3 months frozen. When ready to enjoy, thaw them in their container at room temperature for about 2 hours. The gradual thawing prevents condensation that could make them soggy.
For gifting, I’ve found that tin containers lined with parchment paper provide the best protection while looking festive. If shipping cookies to family, I pack them with slight pressure against each other to prevent movement during transit, using crumpled parchment paper to fill any gaps. This method has successfully delivered intact cookies to Molly’s grandmother in Scotland multiple times.
Remember that the flavor of these cookies actually improves after a day or two as the vanilla and other extracts mellow and blend. This makes them perfect for preparing ahead of holiday gatherings or cookie exchanges.
Ensuring Success: Common Mistakes to Avoid
Throughout my egg-free baking journey, I’ve encountered plenty of pitfalls that can turn perfect cookies into disappointments. The most common mistake I see is improperly measured flour. Too much flour creates dry, crumbly cookies that crack when rolled. I always weigh my flour on a kitchen scale for accuracy, but if measuring with cups, gently spoon the flour into the measuring cup and level it with a knife rather than scooping directly from the bag.
Another frequent error is rushing the chilling process. I understand the temptation, especially when Molly is eagerly waiting to cut shapes, but insufficiently chilled dough will spread in the oven every time. When we’re in a hurry, I divide the dough into smaller portions and spread them flat between parchment paper to chill faster, rather than skipping this critical step.
Rolling the dough to inconsistent thicknesses leads to cookies that bake unevenly. Thinner parts will brown or burn while thicker sections remain underdone. I’ve learned that investing in rolling pin rings or guides ensures uniform thickness every time.
Overbaking is particularly problematic for tender eggless cookie recipes, which can dry out quickly. The cookies should look set but not browned at the edges. Remember that they continue cooking slightly on the hot baking sheet after removal from the oven. I start checking about 2 minutes before the suggested baking time, knowing my oven runs hot in certain spots.
When it comes to decorating, applying icing to cookies that aren’t completely cool is a recipe for disaster. The heat causes the icing to run, ruining intricate designs. After one particularly disappointing batch where our snowflake designs melted into unrecognizable blobs, I now ensure cookies cool for at least an hour before decorating.
Finally, don’t underestimate the importance of quality ingredients. Using margarine instead of butter drastically changes the texture and flavor. Similarly, artificial vanilla extract can’t match the depth of flavor that pure vanilla provides. These eggless Christmas cookies have few ingredients, so each one needs to shine.
Make-Ahead & Freezing Instructions
One of the greatest advantages of these eggless Christmas cookies is their make-ahead potential, which has saved our holiday baking sessions many times. The dough can be prepared up to 3 days in advance and stored in the refrigerator, wrapped tightly in plastic wrap. If the dough feels too firm when you’re ready to use it, let it sit at room temperature for 10-15 minutes until pliable but still cool.
For longer storage, freezing the dough works beautifully. I divide it into manageable portions, flatten into discs about 1-inch thick, wrap in plastic wrap, and place in freezer bags. Label with the date, as the dough maintains its quality for up to 3 months frozen. When ready to use, thaw overnight in the refrigerator, never at room temperature, which can cause condensation and alter the texture.
Cut-out unbaked cookies can also be frozen. I arrange them on baking sheets lined with parchment, freeze until solid (about 1-2 hours), then transfer to freezer containers with parchment between layers. These can be baked directly from frozen, adding just 1-2 minutes to the baking time. This method has been a lifesaver when preparing for large village gatherings or school events.
Baked undecorated cookies freeze exceptionally well. After cooling completely, place them in single layers separated by parchment in airtight containers. They’ll keep for up to 3 months. Thaw at room temperature for about an hour before decorating or serving.
Fully decorated cookies can be frozen too, though with some precautions. Royal icing freezes well once completely dry (allow 24 hours of drying before freezing). Place cookies in single layers separated by parchment paper in rigid containers to protect the designs. Thaw them in their containers at room temperature for about 2 hours to prevent condensation from forming on the icing.
For holiday planning, I often prepare and freeze several batches of dough in October, then thaw and bake them throughout November and December as needed. This approach spreads out the work and ensures we always have fresh cookies for unexpected guests or last-minute cookie exchanges.
Beyond the Recipe: Decorating Ideas & Techniques
The joy of these eggless Christmas cookies extends to the creative possibilities for decoration. For beginners, I recommend starting with a simple glaze made from powdered sugar and milk. Add food coloring as desired, then dip the cookie face-down into the glaze or spread it with the back of a spoon. While still wet, sprinkle with colored sugar, nonpareils, or other decorations. Molly started with this method at age four and still enjoys its simplicity and reliable results.
For more defined designs, royal icing made without eggs is our go-to option. I use a combination of powdered sugar, meringue powder (which contains no egg), and water to create the perfect consistency. Outline cookies with thicker icing, then fill (or “flood”) with a thinner consistency. Allow the base layer to dry completely before adding details. A toothpick helps pop any air bubbles and create marbled effects by dragging through wet icing.
One technique that always impresses is the “wet-on-wet” method. Apply a base color, then immediately add dots or lines of contrasting colors. Draw a toothpick through to create hearts, feathers, or spider web designs. Work quickly as this only works while the icing remains wet.
For dimensional decorations, thicker royal icing can be piped to create texture and details that stand up from the cookie. I use this for snowflake ridges, Santa beards, or holly berries. The key is allowing each layer to dry completely before adding the next.
Alternative decorations work beautifully too. Melted chocolate, either drizzled or piped, adds richness. Painting designs with food coloring mixed with a drop of vodka (which evaporates quickly) creates watercolor effects. For a rustic look, brush cookies with a simple egg-free wash made from maple syrup and plant milk before baking, then sprinkle with coarse sugar for a sparkling finish.
Don’t underestimate the impact of thoughtfully chosen cookie cutters. We collect interesting shapes and often use them in unexpected ways. A tulip cutter turns upside down to become an ice cream cone, a heart becomes a strawberry with a few decorative touches, and a simple round cutter becomes a wreath, ornament, or snowman face depending on the decoration.
Finally, packaging decorated cookies becomes part of the presentation. Clear cellophane bags tied with ribbon, small bakery boxes lined with parchment, or cookies carefully arranged on a festive plate wrapped in colored plastic wrap all make beautiful gifts that highlight your creative efforts.
Conclusion
Creating these eggless Christmas cookies has transformed our holiday baking from a challenge into a cherished tradition. What began as a necessity due to Molly’s egg allergy has become a gift, pushing me to perfect a recipe that everyone can enjoy, regardless of dietary restrictions. The journey hasn’t been without its trials, like the Christmas Eve when we discovered that patience with chilling the dough truly is non-negotiable, but each mishap taught us something valuable.
These cookies have become more than just treats in our home. They represent the joy of inclusive baking, where no one feels left out of holiday traditions. I’ve watched Molly’s face light up as she shares her creations with friends, proudly explaining that they’re egg-free but no one can tell the difference. Those moments make every bit of experimentation worthwhile.
Whether you’re baking for someone with an egg allergy, following a vegan lifestyle, or simply ran out of eggs, these cookies deliver on their promise of soft texture, beautiful shape retention, and delicious flavor. They’ve earned their place as stars of cookie exchanges and holiday gatherings throughout our village.
I encourage you to make this recipe your own. Experiment with the flavor variations, try different decorating techniques, and create new traditions with those you love. The true magic of holiday baking isn’t in perfection but in the memories created around the kitchen table, cutting shapes, mixing colors, and sharing stories.
From my Peak District kitchen to yours, I wish you joyful baking and cookies that bring people together, one egg-free batch at a time.
Love this recipe? Follow us on Facebook and Pinterest and explore more creative ideas on our food blog!
Frequently Asked Questions
Why do my eggless cookies spread too much?
Spreading usually happens when the butter is too warm or the dough hasn’t chilled enough. Make sure your butter is softened but still cool to the touch, not melty. Always chill the dough for at least 2 hours before cutting shapes, and place cut cookies back in the refrigerator for 10-15 minutes before baking. Also check that your oven temperature is accurate with an oven thermometer, as too low a temperature can cause spreading.
How can I make eggless cookies softer?
For softer eggless cookies, be careful not to overbake them. They should look set but not browned at the edges. Adding a tablespoon of cornstarch to your flour helps create tenderness. Using some powdered sugar along with granulated sugar also contributes to a softer texture. Finally, proper storage in an airtight container with a slice of bread helps maintain moisture and softness for days.
What are good substitutes for eggs in Christmas cookies?
For cut-out cookies, I find the best egg substitute is a combination of milk and cornstarch which provides moisture and binding. Yogurt or sour cream (2-3 tablespoons per egg) works well too. For chewier cookies, try 1/4 cup of unsweetened applesauce or mashed banana per egg. Flaxseed meal mixed with water (1 tablespoon ground flax + 3 tablespoons water, left to gel for 10 minutes) is excellent for cookies where texture flecks won’t matter.
Can I make eggless cookie dough ahead of time?
Absolutely! Eggless cookie dough can be refrigerated for up to 3 days, wrapped tightly in plastic wrap. For longer storage, freeze the dough for up to 3 months. Divide it into discs, wrap well, and place in freezer bags. Thaw overnight in the refrigerator before using. You can even cut out shapes and freeze them unbaked on a baking sheet, then transfer to containers once solid. Bake directly from frozen, adding 1-2 minutes to the baking time.
What is the best way to decorate eggless Christmas cookies?
For eggless decorating, I recommend egg-free royal icing made with meringue powder (which despite its name doesn’t contain eggs), powdered sugar, and water. Create different consistencies by adjusting the water amount: thicker for outlines and details, thinner for flooding. Simple powdered sugar glazes also work beautifully. Let cookies cool completely before decorating, and allow royal icing to dry for 24 hours before stacking or storing. Sprinkles, colored sugars, and edible metallic paints are all excellent egg-free decorating options.
How long do eggless Christmas cookies last?
Properly stored in airtight containers at room temperature, undecorated eggless cookies stay fresh for 5-7 days. Cookies decorated with royal icing are best within 3-4 days as the icing can add moisture to the cookies over time. For longer storage, freeze undecorated cookies for up to 3 months or decorated cookies (with fully dried royal icing) for up to 2 months. Always separate layers with parchment paper to protect designs and prevent sticking.
Can this eggless cookie recipe be made gluten-free or dairy-free?
Yes! For gluten-free eggless cookies, substitute the all-purpose flour with a 1:1 gluten-free baking blend that contains xanthan gum. The dough may be slightly more delicate, so handle with care. For dairy-free versions, replace butter with solid coconut oil or a plant-based butter stick (not spread). Substitute the milk with oat milk or almond milk. The cookies will have a slightly different texture but still maintain their shape and delicious flavor. For both modifications, you may need to adjust chilling time and be extra gentle when transferring cut shapes to baking sheets.