No Egg Recipes – Delicious Cooking Without Eggs
Perfect Vanilla Mug Cake: Your 90-Second Microwave Dessert Solution
Craving dessert fast? Get Elsie's trusted Vanilla Mug Cake recipe for a moist, fluffy treat in 90 seconds. Perfectly portioned & easy to make. Discover the
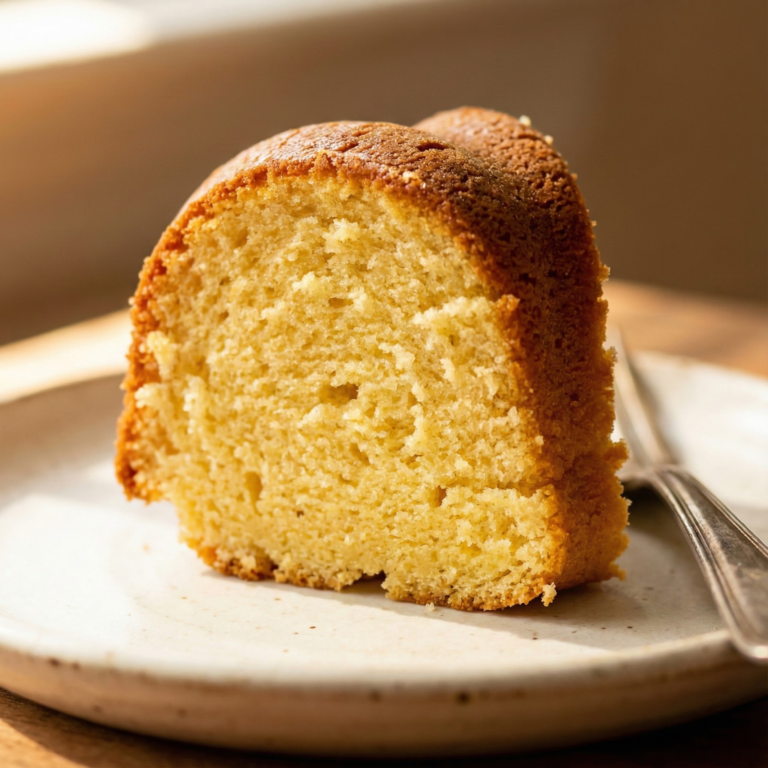
When the dessert craving strikes and I need something sweet in minutes, not hours, my vanilla mug cake recipe is my reliable savior. After dozens of late-night experiments in my Peak District kitchen (much to my daughter Molly’s delight), I’ve perfected this vanilla mug cake that delivers bakery-quality results with minimal effort. The beauty lies in its simplicity: just a few pantry staples, a mug, and 90 seconds in the microwave for a warm, comforting treat that satisfies like a slice of cake without the commitment of baking a whole one.
- Texture target: Moist, fluffy center with slightly firm edges
- Reliable swap: Oil instead of butter for guaranteed tenderness
- Make-ahead: Premix dry ingredients for 30-second prep when cravings hit
Table of Contents
Vanilla Mug Cake
A quick, easy, and adaptable single-serving vanilla mug cake, perfect for satisfying sweet cravings without extensive baking or leftovers.
PREP TIME
3 mins
3 mins
COOK TIME
2 mins
2 mins
TOTAL TIME
5 mins
5 mins
Servings: 1 mug cake
Course: Snack
Cuisine: American
Calories: 458
🥄 Ingredients
- 1/4 cup plus 1.5 teaspoons all-purpose flour (35 g)
- 2 tablespoons granulated sugar (25 g)
- 1/4 teaspoon baking powder (1 g)
- dash salt
- 2 tablespoons vegan butter, melted (28 g)
- 3 tablespoons plant-based milk (45 ml)
- 1/2 teaspoon vanilla extract (2.5 ml)
- 1 teaspoon sprinkles (4 g)
👩🍳 Method
- Add the all-purpose flour, granulated sugar, baking powder, and salt to your ceramic mug and stir them together with a small spoon or fork until well combined.
- Pour in the melted vegan butter, plant-based milk, and vanilla extract. Stir the mixture until it is smooth, making sure to scrape the bottom of the mug to incorporate all dry ingredients. Fold in the sprinkles gently.
- Place the mug in the microwave and cook for 70-90 seconds. The cake should be just set but still barely shiny on top. Allow the cake to rest in the microwave for 1 minute after cooking before carefully removing and enjoying.
Notes: Microwave wattages vary, so cooking times may differ. Start with 70 seconds and check for doneness. The cake should be just set but still slightly shiny on top. Allow it to rest for 1 minute in the microwave after cooking, as it will continue to cook as it cools, ensuring a soft and moist interior. To store, cover and refrigerate for up to 2 days, though mug cakes are best enjoyed fresh.
Ingredient Notes & Smart Substitutions
The heart of a great vanilla mug cake is quality vanilla extract. I’ve found that pure vanilla extract creates a much more authentic flavor than imitation varieties. For those special occasions, I sometimes splurge on vanilla bean paste, which adds those beautiful specks throughout the cake.
For the milk component, I regularly use almond milk since we often have it on hand for Molly, but any milk works wonderfully. Oat milk creates an extra creamy result, while coconut milk adds a subtle tropical note that pairs beautifully with the vanilla. You can also explore milk alternatives for even more options.
While many mug cake recipes call for an egg, I’ve intentionally developed this recipe without one. Instead, a touch more oil ensures moisture while baking powder provides the lift. This makes the recipe not only simpler but also more accessible for those with egg allergies like my daughter.
Sugar alternatives work well in this recipe too. Brown sugar creates a deeper, more caramel-like flavor, while coconut sugar adds a subtle earthiness. I’ve even used honey with success, though you’ll want to reduce the amount by about 25% due to its intense sweetness.
As for flour, all-purpose is my go-to, but I’ve made this with gluten-free flour blends (with xanthan gum included) for friends with dietary restrictions. The texture is slightly different but still delightful. For a protein boost, substitute 1 tablespoon of the flour with protein powder. Just be aware this might make the cake slightly denser.
Essential Equipment for Mug Cake Success
The beauty of mug cakes lies in their simplicity, but a few equipment considerations can elevate your results from good to exceptional. First, let’s talk about the star of the show: the mug itself. After many trial runs, I’ve found that wide, straight-sided mugs with a capacity of 350-400ml (12-14oz) work best. This shape allows the cake to rise evenly without overflowing. Ceramic mugs distribute heat more evenly than thin porcelain ones, reducing the chances of hotspots that can lead to uneven cooking.
For mixing, I keep it simple with a small fork rather than a whisk. This prevents overbeating the batter, which can lead to a tougher texture. I’ve learned through experience that scraping down the sides of the mug with a small silicone spatula ensures no pockets of dry ingredients remain hidden.
Your microwave is the most critical piece of equipment. I’ve made this recipe in several different models ranging from 700 to 1200 watts, and the cooking time varies significantly. In my 900-watt microwave at home, 70 seconds is perfect, but you might need anywhere from 60 to 90 seconds depending on your appliance’s power. Start with less time; you can always add more, but you can’t un-cook an overcooked mug cake!
If you’re feeling fancy, a microwave-safe plate underneath the mug catches any potential overflow and makes it easier to remove the hot mug afterward. Not essential, but a trick I’ve adopted after one too many burned fingertips.
Pro Tips & Troubleshooting for Perfect Texture
After making hundreds of mug cakes (not an exaggeration; they were my pandemic comfort food!), I’ve encountered and solved just about every possible texture issue. The most common problem is overcooking, which results in a rubbery texture. Remember that your cake continues to cook from residual heat even after the microwave stops. I pull mine when the top looks just set but still appears slightly moist in the very center. For my 900-watt microwave, this sweet spot is exactly 70 seconds.
If your cake turns out dry despite careful timing, try adding an extra teaspoon of oil next time. The fat content is crucial for moisture retention. On the flip side, if your cake is gummy or underdone in the middle, it likely needs a few more seconds of cooking time, or you may have added too much liquid.
Mixing technique matters more than you might think. I’ve found that mixing in stages produces the best texture: first combine all dry ingredients thoroughly, then add wet ingredients and mix until just combined. Overmixing activates the gluten in flour, resulting in a tougher cake. About 20-25 gentle stirs should do it.
For perfect rise, make sure your baking powder is fresh. I learned this the hard way after a series of flat cakes that left me puzzled until I checked the expiration date on my baking powder! Also, letting the batter rest for 30 seconds before microwaving allows the leavening agent to activate slightly, giving you a fluffier result.
If you find your cake has a slightly metallic taste, you might be using too much baking powder. For a single mug cake, ¼ teaspoon is typically sufficient. Any more can leave that distinctive aftertaste that detracts from the vanilla flavor.
Creative Flavor Twists & Variations
While vanilla mug cake is perfect in its simplicity, it also serves as an excellent canvas for creative variations. In my kitchen experiments, I’ve developed several delicious twists that still honor the quick and easy spirit of a mug cake.
For chocolate lovers in my family, I add a tablespoon of cocoa powder and a few chocolate chips to transform it into a double chocolate treat. The chips melt partially during cooking, creating pockets of molten chocolate that make each bite an adventure.
When berries are in season, I fold in a handful of fresh raspberries or blueberries just before cooking. The fruit bursts during microwaving, creating natural pockets of fruity sauce throughout the cake. This variation works beautifully with a touch of lemon zest added to the batter.
For a sophisticated twist, I sometimes add a teaspoon of instant coffee granules to the dry ingredients for a vanilla-coffee flavor that pairs wonderfully with a scoop of vanilla ice cream. When autumn arrives, I embrace the season by adding ¼ teaspoon of cinnamon and a pinch of nutmeg for a vanilla chai variation.
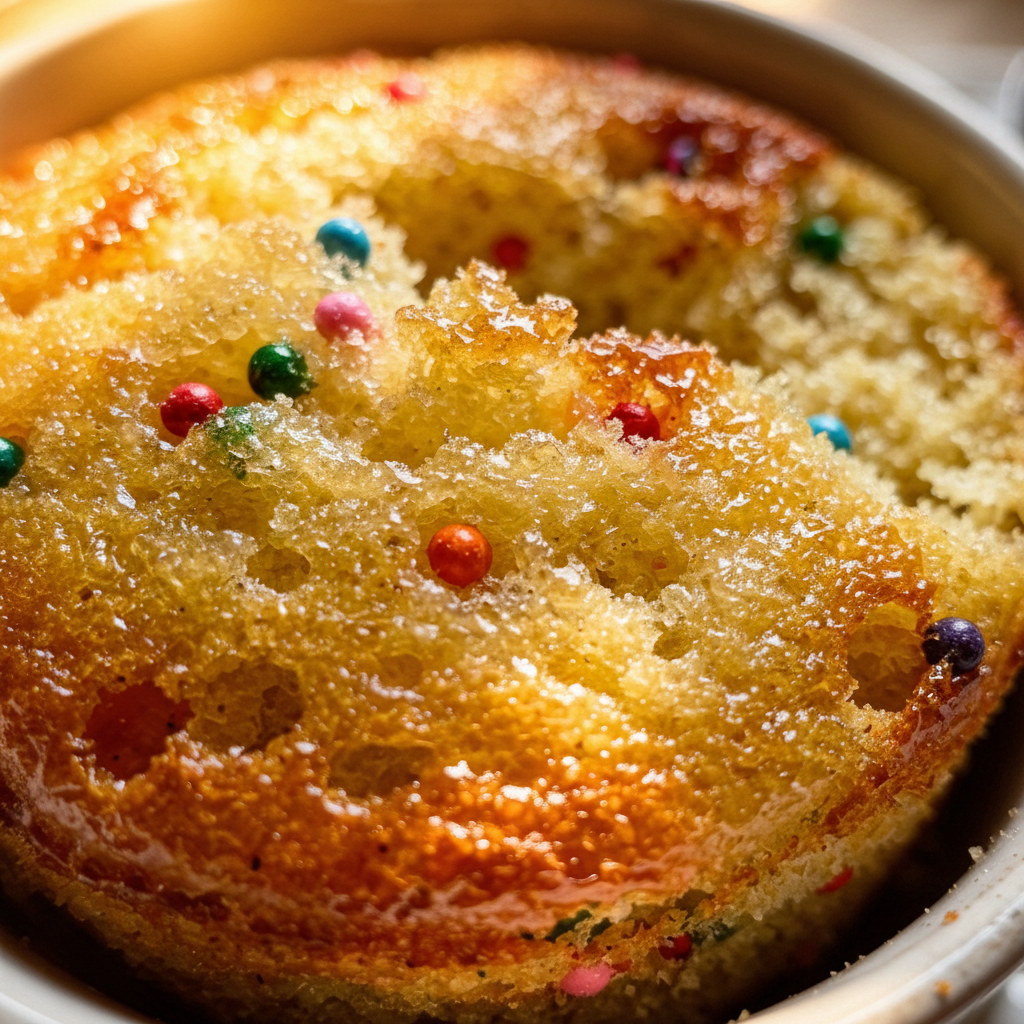
One of my daughter’s favorites is what we call the “birthday cake” version, where I fold in a teaspoon of colorful sprinkles just before cooking. They maintain their shape and color, creating a festive confetti effect throughout the cake.
For textural contrast, consider adding chopped nuts, such as pecans or walnuts, or even a tablespoon of shredded coconut. When I’m feeling particularly indulgent, I place a small piece of chocolate or a half teaspoon of nut butter in the center of the batter before cooking, creating a molten center that never fails to delight.
Serving Suggestions & Storage Tips
The beauty of a vanilla mug cake lies in its versatility when it comes to serving. While delicious straight from the microwave, I find that allowing it to cool for just 2 minutes creates the perfect eating temperature and allows the texture to set properly. For a simple but effective presentation, dust the top with a little powdered sugar, which melts slightly into the warm surface.
For a more decadent dessert, top with a scoop of vanilla ice cream that melts into the warm cake, creating a sauce-like coating that’s simply divine. During summer months, fresh berries add both color and a refreshing tartness that balances the cake’s sweetness. In autumn and winter, a drizzle of salted caramel or maple syrup transforms this simple dessert into something special.
When serving to guests (yes, mug cakes can be guest-worthy!), I sometimes transfer the cake onto a small plate and add a mint leaf and a quenelle of whipped cream for an elegant touch. My family particularly enjoys a simple vanilla glaze made by mixing powdered sugar with a splash of milk and a drop of vanilla.
While mug cakes are best enjoyed fresh, I occasionally make an extra one for later. If you need to store your cake, cover the mug with plastic wrap once completely cooled and refrigerate for up to 24 hours. To reheat, remove the plastic wrap, cover with a damp paper towel, and microwave for about 15 seconds. The damp paper towel helps reintroduce moisture that might have been lost during refrigeration.
I don’t recommend freezing mug cakes as they tend to become too dry upon thawing. Instead, if you want to plan ahead, mix the dry ingredients in a small container or zip-top bag and label it “Mug Cake Mix.” When the craving strikes, you just need to add the wet ingredients for an even quicker treat.
Why a Mug Cake Beats Traditional Baking Sometimes
As someone who loves spending hours crafting elaborate layer cakes for special occasions, I still find myself returning to the humble mug cake several times a month. The obvious advantage is speed; when I’m craving something sweet at 9 PM, waiting two hours for a traditional cake isn’t practical. With a vanilla mug cake, I satisfy that craving in under two minutes, from gathering ingredients to taking the first bite.
There’s also something wonderfully portion-controlled about a mug cake. In our small household, a full-sized cake often means eating the same dessert for days or watching it dry out before we can finish it. A mug cake is the perfect single serving that leaves no leftovers to tempt me the next morning.
The simplicity of cleanup cannot be overstated. One mug and one measuring spoon versus multiple bowls, a mixer, baking pans, and spatulas. On busy weeknights when I’m already tired from cooking dinner, this minimal cleanup is a significant advantage.
I’ve also found mug cakes to be ideal for experimentation. When I want to test a new flavor combination, I can try it in a small, quick format before committing to a full-sized cake. Some of my most successful cake recipes started as mug cake experiments.
For teaching baking skills, mug cakes are unbeatable. When Molly was younger, she could make these independently much earlier than she could manage a conventional cake. The quick results provided immediate gratification and built her confidence in the kitchen without requiring extended focus.
Perhaps most importantly, there’s something deeply satisfying about the immediate connection between making something and enjoying it. Traditional baking creates a significant time gap between effort and reward. A mug cake collapses this timeline, creating an almost meditative experience where you’re fully present for the entire process, from measuring ingredients to enjoying the warm, fresh cake minutes later.
Achieving the Ideal Mug Cake Consistency: A Deep Dive
The perfect vanilla mug cake has a specific texture profile: moist and tender with a light crumb that’s fluffy yet substantial enough to feel like real cake, not just a steamed pudding. Achieving this consistently took me dozens of attempts, with many lessons learned about the science of microwave baking.
Unlike conventional oven baking, microwaves cook from the inside out by exciting water molecules. This fundamental difference explains why traditional cake recipes often fail when adapted for the microwave. The rapid cooking can create steam pockets that collapse once cooking stops, leading to dense, rubbery patches in your cake.
The ratio of liquid to dry ingredients is absolutely crucial. Through extensive testing, I’ve found that slightly less liquid than you might use in a conventional cake creates the best microwave results. Too much moisture leads to a gummy center; too little creates a dry, crumbly texture. My ideal ratio is approximately 2:1 dry to wet ingredients by volume.
The type of fat used significantly impacts the final texture. Oil, rather than melted butter, produces a consistently moister result because it remains liquid at room temperature. Butter contains water that can create steam pockets and uneven cooking. However, if you prefer butter’s flavor, using 75% butter and 25% oil gives you the best of both worlds.
Another key factor is the power and cooking time relationship. Lower power for longer time creates a more even cook than high power for a shorter time. If your microwave allows power adjustment, try cooking at 80% power for 80-90 seconds instead of full power for 60-70 seconds. The more gentle cooking environment allows the cake to rise more evenly.
The resting period after cooking is not just about cooling the cake to an edible temperature; it’s an essential part of the cooking process. The cake continues to set during this time through carryover cooking. I’ve found that a 1-2 minute rest improves texture dramatically, allowing moisture to redistribute throughout the cake and the structure to stabilize.
For those seeking a more cake-like structure, one teaspoon of cornstarch added to the dry ingredients helps create a finer crumb by diluting some of the gluten-forming proteins in the flour. This small addition makes a noticeable difference in achieving that perfect balance between fluffy and substantial.
Conclusion
My journey with the vanilla mug cake began as a simple solution to late-night dessert cravings but evolved into an exploration of microwave baking science and flavor possibilities. What makes this humble dessert truly special is its accessibility; whether you’re a beginner in the kitchen or an experienced baker looking for a quick treat, this recipe delivers consistent satisfaction with minimal effort and ingredients.
The versatility of a vanilla mug cake continues to surprise me, even after making hundreds of them. It can be as simple or as elaborate as you desire, adapting to whatever ingredients you have on hand or special dietary needs you might have. The basic recipe I’ve shared has become something of a template in our household, with each family member having their preferred variation.
Beyond the practical benefits of speed and simplicity, there’s something emotionally satisfying about creating a personal dessert from scratch in minutes. It connects us to the joy of baking without the commitment or intimidation factor that sometimes comes with more complex recipes. In our busy modern lives, this small act of creating something warm and comforting for ourselves has value beyond the calories or ingredients.
I encourage you to start with the basic vanilla mug cake recipe and then make it your own. Experiment with different add-ins, toppings, and serving styles. Don’t be discouraged if your first attempt isn’t perfect; microwave baking has its quirks, and finding the exact timing for your specific microwave might take a try or two. The beauty of mug cakes is that even the imperfect ones are usually delicious, and each attempt takes just minutes.
Whether you’re making this as a quick dessert for yourself, a fun cooking activity with children, or a last-minute treat for unexpected guests, the vanilla mug cake proves that sometimes the simplest recipes bring the most joy. Happy microwave baking!
Love this recipe? Follow us on Facebook and Pinterest and explore more creative ideas on our food blog!
Frequently Asked Questions
Why is my mug cake rubbery or dry?
Rubbery or dry mug cakes typically result from overcooking or overmixing. Microwaves vary significantly in power, so start with less time (60-70 seconds for a 1000-watt microwave) and add more if needed. Remember that the cake continues cooking after you remove it from the microwave. For mixing, stir just until ingredients are combined; overmixing develops gluten, creating a tough texture. Adding an extra teaspoon of oil can help with moisture if dryness persists.
Can I make a mug cake without baking powder?
Yes, though your cake won’t rise as much. You can substitute ⅛ teaspoon of baking soda plus ¼ teaspoon of vinegar or lemon juice for ¼ teaspoon of baking powder. Another option is to whip the egg (if your recipe uses one) very well to incorporate air before adding other ingredients. Self-rising flour can also work as it already contains leavening agents. Without any leavening, you’ll get more of a pudding-like dessert than a cake.
What size mug is best for mug cakes?
A 12-14 oz (350-400ml) mug with straight sides works best for mug cakes. This size provides enough room for the cake to rise without overflowing. The batter should fill only about half of the mug before cooking. Wider mugs are generally better than tall, narrow ones as they allow for more even cooking. Ceramic mugs are ideal as they distribute heat more evenly than thin porcelain or glass.
How long should I cook a mug cake in the microwave?
Cooking time varies based on your microwave’s wattage. As a general guide: 60-70 seconds for a 1000-1200 watt microwave, 70-80 seconds for an 800-900 watt microwave, and 80-90 seconds for a 700 watt microwave. Start with the lower end of the range and check for doneness. The cake should look set on top but still be slightly moist in the center. It will continue cooking from residual heat after removal.
Can I prepare mug cake batter ahead of time?
You can prepare the dry ingredients ahead of time and store them in a sealed container or zip-top bag for quick assembly. However, once wet ingredients are added, the baking powder activates, and the batter should be cooked immediately for best results. If you must prepare full batter ahead, refrigerate it for no more than 1-2 hours, but expect a denser result as the leavening power diminishes over time. The texture will not be as fluffy as a freshly mixed cake.
What are some popular variations for vanilla mug cake?
Popular variations include adding 1 tablespoon of cocoa powder for chocolate cake, folding in fresh berries for fruity flavor, adding sprinkles for a funfetti effect, or incorporating a spoonful of nut butter in the center for a molten middle. Spice lovers can add cinnamon and nutmeg for a chai-spiced version. For texture, try adding chocolate chips, chopped nuts, or shredded coconut. Extracts like almond or lemon can replace some of the vanilla for different flavor profiles.
How do I make a mug cake rise properly?
For proper rising: 1) Ensure your baking powder is fresh, 2) Don’t overmix the batter, which deflates air bubbles, 3) Fill your mug only halfway to allow room for expansion, 4) Let the batter rest 30 seconds before microwaving to activate the leavening agent, 5) Consider cooking at 80% power for slightly longer time for more even rising, and 6) Use room temperature ingredients, which incorporate more easily than cold ones. The cake will rise during cooking and slightly deflate after removal, which is normal.