No Egg Recipes – Delicious Cooking Without Eggs
Mastering Bundt Cake Recipes: A Baker’s Comprehensive Guide
Master Bundt Cake Recipes with Elsie's trusted, kitchen-tested methods. Overcome common baking disasters & achieve perfect texture every time. Get Elsie's

After years of trial and error in my Peak District kitchen, I’ve perfected the art of bundt cake recipes that never fail to impress. The secret lies in understanding not just what to do, but why it matters for that signature tender crumb and perfect release. My journey through countless bundt cake disasters taught me exactly what makes these showstoppers work consistently, even when baking egg-free versions for my daughter Molly. Let me show you how to achieve that perfect dome, moist interior, and golden crust every single time.
- Texture target: Velvety, moist crumb that holds together when sliced without crumbling
- Reliable tool: A proper non-stick bundt pan with detailed grooves, thoroughly greased and floured
- Make-ahead: Unfrosted bundt cakes freeze beautifully for up to 3 months with no loss of texture
Table of Contents
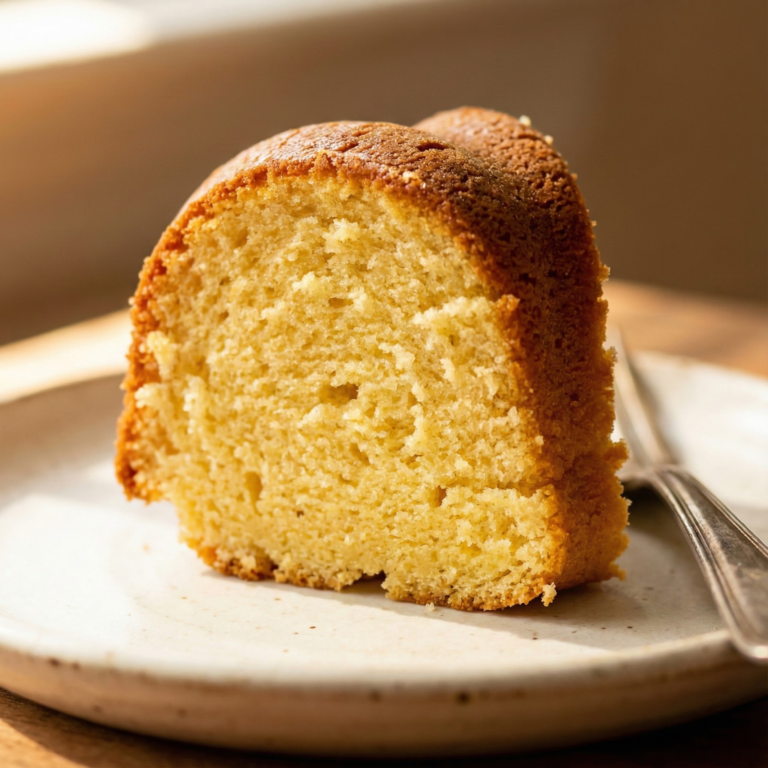
Classic Bundt Cake (Super Moist!)
A truly classic and incredibly moist vanilla bundt cake recipe, featuring a tender crumb and a delicate vanilla glaze. This recipe uses a blend of butter, oil, and cream cheese to ensure a rich, velvety texture that keeps everyone coming back for more.
PREP TIME
15 mins
15 mins
COOK TIME
50 mins
50 mins
TOTAL TIME
N/A
N/A
Servings: 12 slices
Course: Snack
Cuisine: American
Calories: 617
🥄 Ingredients
- 2½ cups (300 g) all-purpose flour
- ½ cup (60 g) cornstarch
- ½ teaspoon salt
- 1 teaspoon baking powder
- ¼ teaspoon baking soda
- 1 cup (227 g) unsalted plant-based butter, room temperature
- ¼ cup (52 g) unflavored vegetable oil
- 2¼ cups (450 g) white granulated sugar
- 1 cup (226 g) plant-based cream cheese, room temperature
- 6 large plant-based eggs, room temperature
- 1 tablespoon vanilla extract
- ½ cup (120 ml) whole plant-based milk, room temperature
- 2 cups (240 g) powdered sugar
- 2 teaspoons unsalted plant-based butter, melted
- ½ teaspoon vanilla extract
- 3 tablespoons whole plant-based milk
👩🍳 Method
- Preheat your oven to 350°F (175°C) and set your oven rack in the lower third. Very generously grease and flour a 12-cup bundt pan (or use a baking spray with flour). Set aside.
- In a medium bowl, sift together the all-purpose flour, cornstarch, salt, baking powder, and baking soda. Using a whisk, mix until well combined. Set aside.
- In a large mixing bowl, cream together the unsalted plant-based butter, vegetable oil, and white granulated sugar on medium-high speed for 3 minutes until light and creamy. Do not overcream.
- Next, add the plant-based cream cheese and mix on a low-medium speed until well combined.
- Add the plant-based eggs two at a time, mixing on low speed until each addition is well incorporated before adding the next two. Continue until all 6 plant-based eggs are used.
- Add the 1 tablespoon vanilla extract and mix on low speed until well combined. Remove any batter from the attachment(s) as the rest of the mixing will be done by hand.
- Add half of the presifted dry ingredients to the wet ingredients, and fold with a spatula until just combined. Pour in the whole plant-based milk and fold again until just incorporated. Finally, add the remaining dry ingredients and fold until the batter is uniform, with no streaks of flour remaining. Be careful not to overmix.
- Pour the batter into the prepared bundt pan, smoothing the top as best you can. Give the pan a little shake to help the batter settle into all the corners, then tap it lightly on the counter twice to release any large air bubbles. Bake for 50–55 minutes, or until a skewer inserted into the thickest part of the cake comes out clean or with a few moist crumbs. If the top is browning too much after 45 minutes, cover loosely with aluminum foil for the remaining bake time.
- Once ready, allow the cake to cool in the bundt pan for 45 minutes before turning it out onto a wire rack to finish cooling completely.
- To prepare the Vanilla Glaze: Once the cake has completely cooled, transfer it to your serving plate. In a small bowl, combine the powdered sugar, 2 teaspoons melted unsalted plant-based butter, ½ teaspoon vanilla extract, and 3 tablespoons whole plant-based milk. Stir until smooth and a very thick glaze forms (it should still be somewhat runny). If too runny, add more powdered sugar. If too thick, add more plant-based milk.
- Pour the glaze evenly over the top of the cooled bundt cake. Allow to set for 30 minutes to an hour before slicing and serving. Enjoy!
Notes: For best results, ensure all ingredients are at room temperature. The cake is done when a skewer inserted into the thickest part comes out clean or with a few moist crumbs. Store the cooled cake covered at room temperature for up to 3 days, or refrigerate for longer freshness.
Why Elsie’s Bundt Cake Tips Work
My bundt cake approach is built on countless Saturday mornings spent testing and refining techniques in my Castleton kitchen. What sets these methods apart is that they’re based on understanding the science behind successful bundts, not just following steps blindly. When I first started baking for Molly’s egg-free diet, I experienced the heartbreak of stuck cakes, dry textures, and uneven bakes.
The breakthrough came when I started treating bundt cakes as their own unique category of baking, not just a fancy shape for regular cake batter. The deep, curved pan creates specific challenges: longer baking times that risk dryness, intricate shapes that can trap batter, and larger surface area that affects how the cake rises and sets.
My methods work because they address these specific challenges. The precise balance of fats and liquids ensures moisture throughout the longer bake time. The careful pan preparation technique I developed after five consecutive stuck cakes guarantees a perfect release every time. And my temperature management approach prevents the dreaded tunneling that often ruins the texture of dense bundt cakes.
These aren’t just random tips but a cohesive system developed through actual kitchen failures and successes. Last Christmas, when my perfectly released cranberry orange bundt became the centerpiece at our village gathering, I knew these methods were ready to share with fellow home bakers.
Ingredient Notes & Substitutions for Optimal Moistness
The secret to exceptionally moist bundt cakes lies in understanding how your ingredients interact. After years of experimentation, I’ve discovered that room temperature ingredients incorporate much more effectively than cold ones. I always set out my butter, eggs (or egg substitutes), and liquids at least an hour before baking to ensure they blend seamlessly into a silky batter.
For fats, I’ve found that combining butter and oil creates the perfect balance of flavor and moisture. Butter delivers that irreplaceable rich taste, while a neutral vegetable oil helps prevent the cake from drying out during the lengthy baking time that bundts require. When baking egg-free for Molly, I’ve discovered that 1/4 cup of yogurt per egg creates a wonderfully moist texture without affecting the flavor. For more tips on egg replacements, check out my flax egg recipe.
Sugar isn’t just for sweetness in bundt cakes; it’s crucial for moisture retention. I prefer using a combination of granulated and brown sugars. The molasses in brown sugar adds depth of flavor and helps keep the cake moist for days. For particularly dense, moist cakes like my chocolate bundt, I sometimes swap in some dark brown sugar for even more richness.
The type of flour matters tremendously. After multiple tests, I’ve found that cake flour produces too delicate a structure for the substantial weight of a bundt. All-purpose flour provides just the right protein content to support the cake’s structure while remaining tender. For extra insurance against dryness, I often incorporate a tablespoon of cornstarch per cup of flour, which mimics the tenderness of cake flour without sacrificing stability.
Liquid ingredients offer excellent opportunities for both moisture and flavor enhancement. Instead of plain milk, try buttermilk, sour cream, or Greek yogurt, which add tanginess and create a more tender crumb through their acidity. For fruit-flavored bundts, I often substitute some of the liquid with fruit puree or juice, being careful to balance the added moisture with dry ingredients.
Essential Equipment for Bundt Success
The journey to perfect bundt cakes begins with having the right tools. Through years of baking in my small Peak District kitchen, I’ve identified the truly essential equipment that makes the difference between success and frustration.
First and foremost is your bundt pan itself. Not all bundt pans are created equal. I learned this lesson the hard way when a bargain pan left half my cake stuck in the grooves despite careful greasing. A high-quality non-stick bundt pan with a durable coating is worth every penny. I prefer heavy-cast aluminum pans with dark, non-stick finishes that conduct heat evenly and release cleanly. The classic 10-12 cup capacity works for most recipes, though I keep a 6-cup mini for smaller gatherings.
For preparing the pan, a pastry brush with natural bristles has proven indispensable. It reaches all the nooks and crannies when applying melted butter or shortening. Silicone brushes can leave gaps in coverage, as I discovered during an embarrassing moment when my holiday bundt refused to release for a gathering of village friends.
A stand mixer isn’t just a luxury for bundt cakes; it’s practically a necessity. The thick batters require thorough creaming of butter and sugar, which develops the structure needed for these substantial cakes. When making Molly’s egg-free versions, proper aeration becomes even more crucial. After burning through two hand mixers in a year, I invested in a sturdy stand mixer that’s still going strong five years later.
For testing doneness, nothing beats a long wooden skewer. Toothpicks are too short to reach the center of a tall bundt cake, and many metal cake testers are too thin to show crumbs clearly. A wooden skewer gives you accurate feedback about moisture throughout the cake’s depth.
Finally, a proper cooling rack is essential. Bundt cakes need to cool in the pan for exactly the right amount of time (usually 10-15 minutes), and then cool completely out of the pan. A sturdy wire rack with grid pattern supports the cake’s weight without leaving marks and allows air to circulate underneath for even cooling.
Pro Tips & Troubleshooting Common Bundt Cake Issues
Over years of baking both traditional and egg-free bundt cakes, I’ve encountered virtually every possible pitfall. Let me share the solutions that have saved countless bakes in my kitchen.
The most common bundt catastrophe is sticking. If your cake refuses to release despite greasing, try this rescue method: place a hot, damp kitchen towel over the inverted pan for 5-10 minutes. The steam often loosens the cake enough to release it. For prevention, I’ve developed a bulletproof pan preparation method: apply melted shortening with a pastry brush, making sure to reach every crevice, then dust with flour and tap out the excess. For chocolate cakes, I use cocoa powder instead of flour to avoid the white residue.
For more baking advice, I recommend checking my eggless Nutella cake tips, which cover various common baking scenarios.
Dense, gummy layers near the bottom of your bundt signal undermixing or overmixing. The batter should be smooth and flowing but not runny. I count my mixing time after adding flour: no more than 30 seconds on low speed just until incorporated, then a few gentle folds with a spatula to catch any pockets of dry ingredients.
Domed bottoms (which become the top when inverted) indicate too much leavening or too high an oven temperature. I reduced my leavening agents by 25% compared to regular cake recipes after repeated issues with my bundts cracking and doming excessively.
Tunnels running through your cake point to overmixing or too much baking powder. When making Molly’s egg-free versions, I’m particularly careful with leavening since we don’t have eggs to stabilize the structure.
Dry, crumbly texture is often caused by overbaking. Bundt cakes continue cooking after removal from the oven due to residual heat. I always check 8-10 minutes before the recipe suggests, as my early bundts frequently dried out from following times exactly. Your skewer should show moist crumbs, not wet batter or complete dryness.
If your glaze disappears into the cake rather than forming a beautiful drizzle, the cake is likely still too warm. I wait until the cake is completely room temperature, then apply a slightly thickened glaze that holds its shape. The perfect glaze consistency drips from a spoon slowly enough to count to 3 before the stream breaks.
For sinking fruit or add-ins, try tossing them in flour before folding into the batter, which helps suspend them evenly throughout the cake during baking rather than sinking to the bottom (which becomes the top when inverted).
Creative Variations & Flavor Twists
The beauty of mastering a basic bundt lies in the endless creative variations you can explore. My kitchen adventures have yielded some fabulous flavor combinations that have become village favorites at Castleton gatherings.
Citrus infusions transform a simple vanilla bundt into something special. Beyond just adding juice and zest, try rubbing the zest directly into your sugar before creaming with butter. This releases the essential oils for maximum flavor impact. My lemon bundt with thyme-infused glaze began as an experiment but became requested so often I had to plant extra thyme in my garden just to keep up with demand.
Seasonal fruits create memorable bundts that showcase the best of what’s available. In autumn, I fold diced apples tossed in cinnamon sugar into the batter, creating pockets of spiced fruit throughout. Summer berries work beautifully when macerated slightly with sugar before folding in, which prevents them from releasing too much moisture during baking.
Chocolate bundts offer particularly rich territory for experimentation. Try layering two batters, one vanilla and one chocolate, for a marbled effect. Or fold in different chocolate varieties: my triple-chocolate bundt combines cocoa in the batter, dark chocolate chunks, and a white chocolate drizzle that looks spectacular when sliced.
Spice blends can completely transform your basic recipe. My chai-spiced bundt combines cardamom, ginger, cinnamon, cloves, and black pepper for a warming cake that perfumes the whole house. For Molly’s egg-free version, the robust spices beautifully mask any slight texture differences from the substitutions.
Nuts and streusel create wonderful textural contrasts. I sometimes layer a cinnamon-pecan streusel in the middle of the batter and another portion on the bottom of the pan (which becomes the top when inverted). As it bakes, the streusel forms a caramelized, crunchy coating that contrasts beautifully with the tender cake.
Alcohol-infused bundts are perfect for adult gatherings. A bourbon-soaked bundt with vanilla bean glaze has become my signature contribution to our village’s annual harvest festival. The trick is adding alcohol in multiple ways: in the batter, in a soaking syrup applied to the warm cake, and in the glaze for layered flavor.
Don’t forget about glaze and topping variations. A simple powdered sugar glaze can be transformed with citrus juice, coffee, maple syrup, or liqueurs. For special occasions, I sometimes press edible flowers into a white chocolate ganache coating while it’s still tacky, creating a stunning decorative effect with minimal effort.
Serving & Storage Suggestions
Bundt cakes shine in their presentation, but serving and storing them properly ensures they maintain their moisture and flavor. After years of baking for both family meals and village gatherings, I’ve developed reliable methods for keeping these beautiful cakes at their best.
For serving, bundt cakes need no elaborate decoration, their architectural form is ornament enough. A light dusting of powdered sugar often suffices for simple elegance. When I serve at our Castleton community events, I’ve found that a cake stand that elevates the bundt creates a more dramatic presentation. For informal family dinners, I often warm individual slices for 10-15 seconds in the microwave and serve with a complementary sauce, like my quick raspberry coulis or vanilla bean custard.
Bundt cakes actually improve with a day’s rest, as the flavors deepen and meld. I typically bake my bundts the day before serving, store them well-wrapped at room temperature, and glaze them shortly before presentation. This not only improves flavor but reduces day-of stress when preparing for gatherings.
For storage, a well-made bundt will remain moist at room temperature for 3-4 days when properly covered. I use a cake dome if available, or invert a large bowl over the cake on a plate. Plastic wrap can stick to glazes, so I avoid direct contact with the cake’s surface.
Refrigeration is generally unnecessary and can actually dry out your bundt cake. The exception is for cakes with perishable fillings or toppings, such as cream cheese glaze or fresh fruit decorations. If refrigeration is required, bring the cake to room temperature before serving for best flavor and texture.
Freezing works remarkably well for bundt cakes, making them perfect make-ahead desserts for busy periods. I freeze unglazed bundts by cooling completely, wrapping tightly in plastic wrap, then in aluminum foil, and placing in a freezer bag with the air pressed out. They maintain quality for up to 3 months. When Molly’s friends with various dietary needs visit, I often have an egg-free chocolate bundt ready in the freezer that can be thawed and glazed on short notice.
To thaw, unwrap and place on a wire rack at room temperature for several hours. The key is unwrapping while still frozen to prevent condensation from making the cake soggy. Once thawed, apply a fresh glaze or topping before serving.
For transporting bundt cakes to events, I invest in cake carriers with tall, domed lids that won’t touch the surface. If a carrier isn’t available, I place toothpicks strategically around the top of the cake and loosely tent with foil to protect the surface without making contact.
Mastering the Art of Bundt Cake Release
Perhaps no aspect of bundt baking creates more anxiety than the moment of release. After countless tears over cakes left in pieces in the pan, I’ve developed a foolproof method that hasn’t failed me in years, even with the most intricate pan designs.
Timing is everything when it comes to releasing your bundt. Too soon, and the warm cake lacks structural integrity to hold its shape; too late, and it can stick permanently to the pan. The sweet spot is precisely 10 minutes of cooling time, which I time with a kitchen timer to be exact. This allows the cake to set enough to hold its shape while still being warm enough to release from the pan.
Preparation begins long before baking. I never use cooking spray alone, despite its convenience. After a devastating failure when bringing a cake to my daughter’s school event, I developed my triple-protection method: solid shortening applied with a pastry brush, focusing on every nook and cranny, followed by a thin dusting of flour (or cocoa for chocolate cakes), and finally, a quick refrigeration of the prepared pan for 10 minutes before filling with batter. This creates a reliable release barrier between cake and pan.
The physical technique of release matters too. I place a cooling rack over the exposed bottom of the pan, then holding both rack and pan firmly together, I flip them in one confident motion. The key is confidence; hesitation leads to partially released cakes that tear. Once inverted, I wait a full minute without touching or tapping the pan, allowing gravity to work. Then, and only then, do I gently lift the pan straight up. If there’s any resistance, I stop immediately rather than force it.
For stubborn releases, I place a kitchen towel soaked in hot water over the inverted pan for 5 minutes. The steam and heat often loosen the cake enough to release it fully. I discovered this rescue technique after nearly throwing away a stuck spice cake that went on to become the most complimented dessert at our village autumn festival.
Pan maintenance is crucial for consistent releases. I never put my bundt pans in the dishwasher, which can degrade non-stick surfaces over time. Instead, I soak them briefly in warm soapy water, then clean gently with a soft sponge. Before storing, I always ensure they’re completely dry to prevent any moisture damage to the surface. With proper care, a quality bundt pan will provide years of perfect releases.
Choosing the Perfect Bundt Pan
The right bundt pan makes all the difference between a showstopping success and a frustrating failure. After collecting quite an array in my Peak District kitchen, I’ve learned what features truly matter for consistent results.
Material is your first consideration. Heavy-cast aluminum pans conduct heat evenly and thoroughly, preventing hot spots that cause uneven baking. I learned this lesson after a lightweight pan created a cake with overdone edges and an underbaked center, embarrassingly discovered only when slicing at a family gathering. Cast aluminum also tends to release cakes more reliably than thinner metals.
The non-stick coating quality varies dramatically between pans. Premium non-stick finishes may cost more but pay for themselves in saved cakes and reduced frustration. I look for pans with dark, matte finishes rather than shiny ones, as they conduct heat better and create a better crust. After my third replacement of budget pans with deteriorating coatings, I invested in a high-quality pan that’s still performing perfectly years later.
Size matters significantly in bundt baking. Standard bundt pans hold 10-12 cups, which works for most recipes. I recommend measuring your pan’s capacity by filling it with water to the rim and then measuring that water, rather than relying on package descriptions. For my small household, I sometimes use a 6-cup pan and adjust recipes accordingly (typically halving a standard recipe). Having both sizes has proven invaluable for both family dinners and larger gatherings.
Design intricacy affects both visual impact and release challenge. Deeply grooved, elaborate designs create stunning cakes but require meticulous greasing. For beginners, I suggest starting with a classic fluted design that has rounded rather than sharp angles. My most intricate pan, with a cathedral-inspired design, produces breathtaking cakes but demands perfect technique for successful release.
The center tube’s design is often overlooked but critically important. Look for a pan with a center tube that extends above the pan’s outer rim. This design helps the cake rise more evenly around the tube. My favorite pan features a tube that extends almost an inch above the rim, resulting in cakes with perfect height and even texture throughout.
Consider the weight when full. Cast aluminum pans filled with batter can be surprisingly heavy. This matters both for handling the pan safely when full and for storage. My most elaborate bundt pan weighs nearly three pounds empty, which makes it awkward to maneuver when filled with batter, especially important to consider for those with strength or mobility limitations.
For storage convenience, look for pans that stack effectively without scratching their surfaces. Some premium pans come with protective storage covers or bags that prevent damage to the non-stick finish during storage, a feature I’ve found well worth the extra cost after scratching several pans when stacked together.
The Difference Between Bundt Cakes and Regular Cakes
Understanding the fundamental differences between bundt cakes and regular layer cakes was a breakthrough moment in my baking journey. These distinctions explain why standard cake recipes often fail when baked in a bundt pan and why special techniques are necessary for bundt success.
Structurally, bundt cakes are denser than layer cakes by design. This density is necessary because bundt cakes must maintain their intricate shapes and stand alone without frosting support. When I first attempted to bake my fluffy vanilla layer cake recipe in a bundt pan, the result collapsed when inverted because it lacked the structural integrity needed. Bundt batters typically contain less leavening and often more fat to create a sturdier, more moisture-resistant crumb.
The baking process differs significantly too. The bundt pan’s center tube conducts heat into the middle of the cake, cooking it from both outside and inside simultaneously. This unique heat distribution means bundts bake more evenly but require precise timing. I discovered through trial and error that recipes need approximately 15-20% more baking time than the same volume of batter would in layer pans, but with careful monitoring to prevent dryness.
Surface area is another critical difference. Bundt cakes have much more exposed surface relative to their volume compared to layer cakes. This affects both moisture retention and flavor absorption. When adapting my family’s traditional recipes for Molly’s egg-free diet, I found that bundts benefit from slightly higher liquid content and more intensely concentrated flavorings to compensate for what might otherwise be lost through the increased evaporation.
The finishing touches differ dramatically as well. While layer cakes rely on frosting for both flavor and decoration, bundts are typically finished with simple glazes, light dustings of sugar, or nothing at all. This simplicity is part of their charm but requires that the cake itself carry more flavor. I incorporate extracts, zests, and spices more generously in bundt recipes than I would for layer cakes that will be paired with sweet frostings.
Temperature sensitivity is heightened in bundt baking. The larger mass of batter means that temperature fluctuations in your oven have more dramatic effects. After an unfortunate incident with a sunken center caused by opening the oven door too early, I became religious about maintaining consistent temperature throughout the baking process, keeping the door firmly closed until at least 80% of the baking time has passed.
Finally, bundt cakes actually improve with age in ways that layer cakes often don’t. The dense structure and higher moisture content mean that flavors continue to develop and meld for 1-2 days after baking. I now intentionally bake my bundts a day before serving, knowing that the resting period enhances both flavor and texture, a luxury rarely afforded by more delicate layer cakes.
Achieving the Best Glaze for Your Bundt Cake
The perfect glaze transforms a good bundt cake into a magnificent one, adding both flavor and visual appeal. After years of experimenting in my Castleton kitchen, I’ve mastered the art of glazing that enhances rather than overwhelms these architectural desserts.
Consistency is the most crucial aspect of a successful glaze. Too thin, and it disappears into the cake; too thick, and it clumps unattractively. I use what I call the “ribbon test”: when lifted with a spoon, the glaze should flow in a ribbon that holds its shape for a moment before melting back into the bowl. For a standard powdered sugar glaze, this usually means 1 tablespoon of liquid per cup of sifted powdered sugar, adjusted drop by drop as needed.
Temperature matters tremendously for both cake and glaze. The cake must be completely cool before glazing, a lesson I learned the hard way when preparing for Molly’s school bake sale. A warm cake will absorb the glaze rather than displaying it beautifully on top. Conversely, certain glazes like chocolate ganache need to be at the right temperature to flow properly without becoming too thick or thin. I often do a test drizzle on the inside of my mixing bowl to check consistency before committing to the cake.
Application technique can make or break your presentation. For precise drizzles, I spoon my glaze into a piping bag (or a zip-top bag with a tiny corner snipped off) and apply with controlled pressure. For a more casual look, I use a spoon to drizzle from about 6 inches above the cake, allowing gravity to create natural, elegant streams. Moving your hand in a consistent circular motion while drizzling creates those professional-looking parallel lines around the bundt’s ridges.
Multiple glazes create spectacular effects with minimal effort. I sometimes apply a white vanilla glaze, allow it to set for 30 minutes, then follow with a contrasting chocolate drizzle. The flavor combination is wonderful, and the visual impact is impressive enough for special occasions. For my village’s spring festival last year, my lemon bundt with alternating white vanilla and pale yellow lemon glazes won the dessert competition primarily for its appearance.
Beyond basic powdered sugar glazes, consider ganaches, cream cheese glazes, and caramel drizzles. Chocolate ganache (equal parts heavy cream and chocolate) makes a rich, shiny coating that sets to a gorgeous sheen. My cream cheese glaze (softened cream cheese, powdered sugar, and enough milk to thin) adds tangy richness to spiced bundts. Homemade caramel sauce, allowed to cool until just pourable, creates a showstopping amber coating that hardens slightly when set.
For special occasions, consider decorative elements on top of your glaze. While the glaze is still wet, sprinkle with chopped nuts, toasted coconut, or festive sprinkles. For adult gatherings, a tiny sprinkle of flaky sea salt atop a chocolate or caramel glaze creates a sophisticated flavor contrast that elevates the entire dessert.
Finally, patience rewards the bundt baker. Allow your glaze to set completely before moving or covering the cake, usually at least one hour at room temperature. For glazes containing dairy, refrigeration may be necessary, but bring the cake back to room temperature before serving to ensure the best texture and flavor.
Conclusion
Mastering bundt cake recipes is a journey well worth taking. Through years of experimentation in my Peak District kitchen, I’ve discovered that these architectural beauties require specific techniques, but they reward your efforts with stunning results that never fail to impress. The joy on Molly’s face when she sees a perfectly glazed bundt cooling on our rack reminds me why I persisted through all the early failures to develop these reliable methods.
The key lessons I hope you’ll take away are patience with the process, attention to detail in preparation, and confidence in execution. From properly preparing your pan to mastering the perfect release timing, each step builds on the last to create bundt success. Remember that even professional bakers experience occasional bundt disappointments; what matters is learning from each bake.
I encourage you to start with simpler bundt designs and basic flavor profiles as you build your skills. Soon enough, you’ll be creating your own signature variations that reflect your taste and style. The wonderfully forgiving nature of bundt cakes means that even if your cake doesn’t release perfectly, a strategic application of glaze can transform minor imperfections into charming features.
Bundt cakes connect us to a rich baking tradition while allowing endless creative expression. They’re the perfect intersection of form and function, beautiful to behold yet practical to serve. Whether you’re baking for family weeknight desserts or special celebrations, the techniques we’ve explored will serve you well.
I’d love to hear about your bundt adventures, especially any creative variations you develop or rescue techniques you discover along the way. Happy baking, and may your bundts always release perfectly!
Love this recipe? Follow us on Facebook and Pinterest and explore more creative ideas on our food blog!
Frequently Asked Questions
What is the secret to a perfect bundt cake?
The secret to a perfect bundt cake lies in three critical elements: proper pan preparation, the right batter consistency, and precise timing. I always use a quality non-stick pan that I prepare with a thorough coating of solid shortening applied with a pastry brush, followed by a light dusting of flour. For the batter, aim for a consistency that’s thick enough to hold structure but still flows smoothly when poured. Finally, timing matters tremendously – never open the oven door during the first 30 minutes of baking, and allow the cake to cool for exactly 10 minutes before attempting to release it from the pan.
What makes a bundt cake moist?
The exceptional moistness in bundt cakes comes from a careful balance of ingredients and techniques. I incorporate a combination of butter (for flavor) and oil (for moisture retention) in my recipes. Adding ingredients like sour cream, yogurt, or buttermilk provides both moisture and tenderness through their acidity. Brown sugar helps retain moisture better than white sugar alone. Finally, being vigilant about baking time is crucial – bundt cakes should be removed when a wooden skewer shows moist crumbs rather than waiting until completely dry, as they continue cooking from residual heat after being removed from the oven.
How do you keep a bundt cake from sticking to the pan?
To prevent bundt cakes from sticking, I follow a meticulous three-step process that hasn’t failed me in years. First, use solid shortening (not spray) applied with a pastry brush to reach every crevice of the pan. Second, dust thoroughly with flour (or cocoa powder for chocolate cakes), tapping out any excess. Third, refrigerate the prepared pan for 10 minutes before filling with batter to firm up the coating. After baking, timing is critical – allow the cake to cool for exactly 10 minutes (set a timer!) before attempting to release it. If it still sticks, placing a hot, damp kitchen towel over the inverted pan for 5 minutes often loosens it through steam.
What type of flour is best for bundt cakes?
All-purpose flour typically works best for bundt cakes because it provides the ideal protein content (around 10-12%) to create structure that supports the cake’s weight while remaining tender. Cake flour, while producing a delicate crumb in layer cakes, often lacks sufficient strength for bundts and can lead to collapse or crumbling when released from the pan. For a compromise, I sometimes use a mixture of all-purpose flour with a tablespoon of cornstarch per cup, which creates a slightly more tender crumb while maintaining structural integrity. Always measure flour by spooning it into measuring cups and leveling off rather than scooping directly from the container, which compacts it.
Can you make a bundt cake without a bundt pan?
While a traditional bundt pan creates the characteristic fluted ring shape, you can achieve similar results with some creative alternatives. A tube pan (angel food cake pan) works well, though the sides won’t have decorative ridges. For improvised solutions, place an oven-safe cup or ramekin in the center of a round cake pan and pour the batter around it. Another option is using a deep, round pan and creating a foil cylinder wrapped in parchment to place in the center. Remember that these alternatives may affect baking time and release, so monitor carefully and thoroughly grease and flour your makeshift pan. The texture and flavor will remain authentic even if the appearance differs slightly.
What is the best way to store a bundt cake?
Bundt cakes store beautifully when properly handled. For short-term storage (3-4 days), keep the cake at room temperature under a cake dome or inverted bowl to protect it without touching the surface. Avoid refrigeration unless the glaze contains perishable ingredients, as refrigeration can dry out the cake. For longer storage, freeze unglazed bundt cakes by cooling completely, wrapping tightly in plastic wrap, then in aluminum foil, and placing in a freezer bag with the air pressed out. They maintain quality for up to 3 months. To thaw, unwrap while still frozen and let it come to room temperature on a wire rack for several hours before glazing and serving.
How is a bundt cake different from a regular cake?
Bundt cakes differ from regular cakes in several key ways. They’re deliberately denser with less leavening to maintain their ornate shapes when released from the pan. The center tube conducts heat differently, cooking the cake from both inside and outside simultaneously. They have more exposed surface area relative to volume, which affects moisture retention and requires adjusted ingredient ratios. Bundt cakes typically use simple glazes rather than frosting and actually improve with age as flavors develop over 1-2 days. These differences explain why regular cake recipes often fail in bundt pans without specific adaptations to accommodate the unique baking environment.